How fast do mushrooms grow? This may not even be in the top 5 questions you have when you first begin to think about growing gourmet mushrooms at home, but we are here to tell you it is an important question to ask. One of the biggest issues when growing mushrooms at home is contamination from bacteria and mold. Slow growing mushrooms are more susceptible to contamination just due to the time it takes for them to actually grow. Oyster mushrooms generally grow pretty quick compared to species like turkey tail and chicken of the woods (this is one reason why the golden oyster mushroom has been labeled an invasive species in North America).
Speed of growth is also important to consider when you are planning continued growth in a limited space. If you only have room for 1 or just a few species to grow at once, how quickly you can harvest them and start a new grow becomes important. This becomes even more important if you are planning to sell your mushrooms. Slow growth means you realize profits later. So, let's dive in and discover the answer to the question: how fast do mushrooms grow?
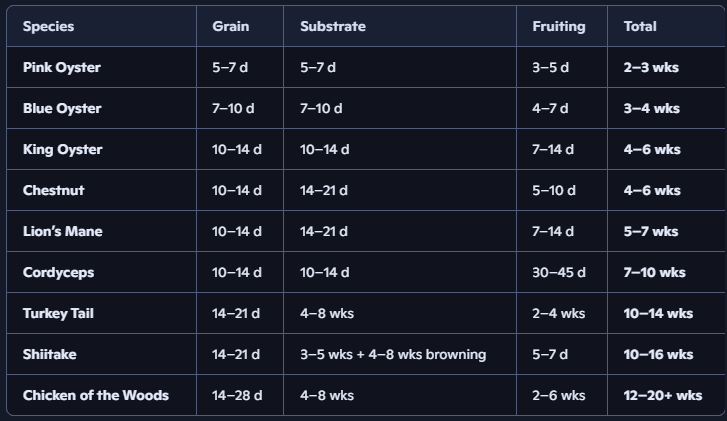
Growth speed is measured in 3 different timeframes:
These time frames assume ideal temperatures, no contamination, and proper substrates for each mushroom species.
Any number of things can slow down your growth speed. Contamination is the biggest one. Finding contamination in your substrate can set you back weeks. This is why it is of the utmost importance to read up on how to grow mushrooms before getting started. Now, let's answer the question "How fast do mushrooms grow" for some popular species.
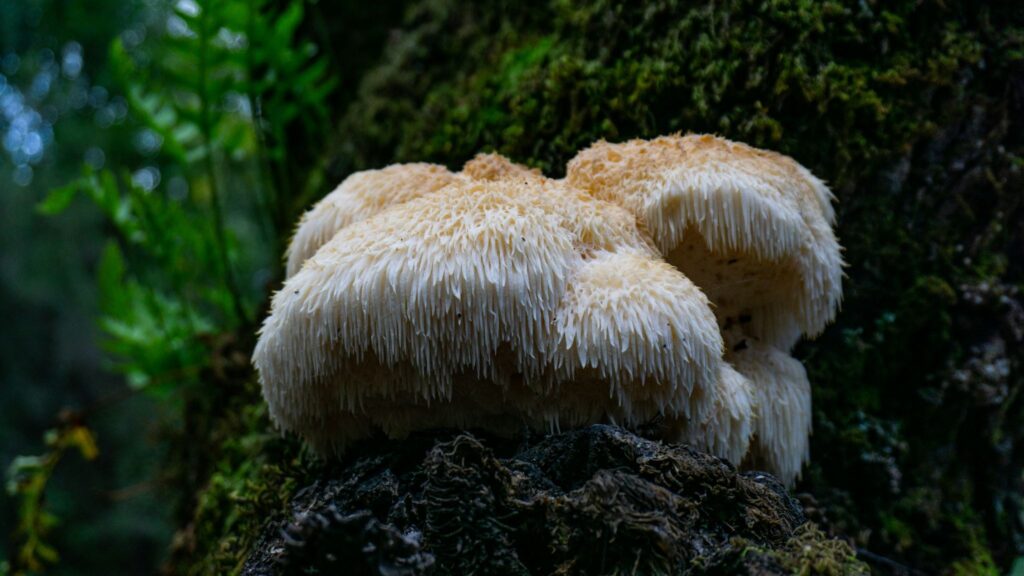
Photo by Jorge Stampa on Unsplash
The magnificent white mushrooms with a soft texture is known for its mild seafood flavor. Many use lion’s mane mushrooms as a substitute for meat. Lion’s Mane mushrooms fetch a high price at market so if you are looking to sell your gourmet mushrooms, this can be a profitable choice. They also grow pretty reliably once you have the technique locked down.
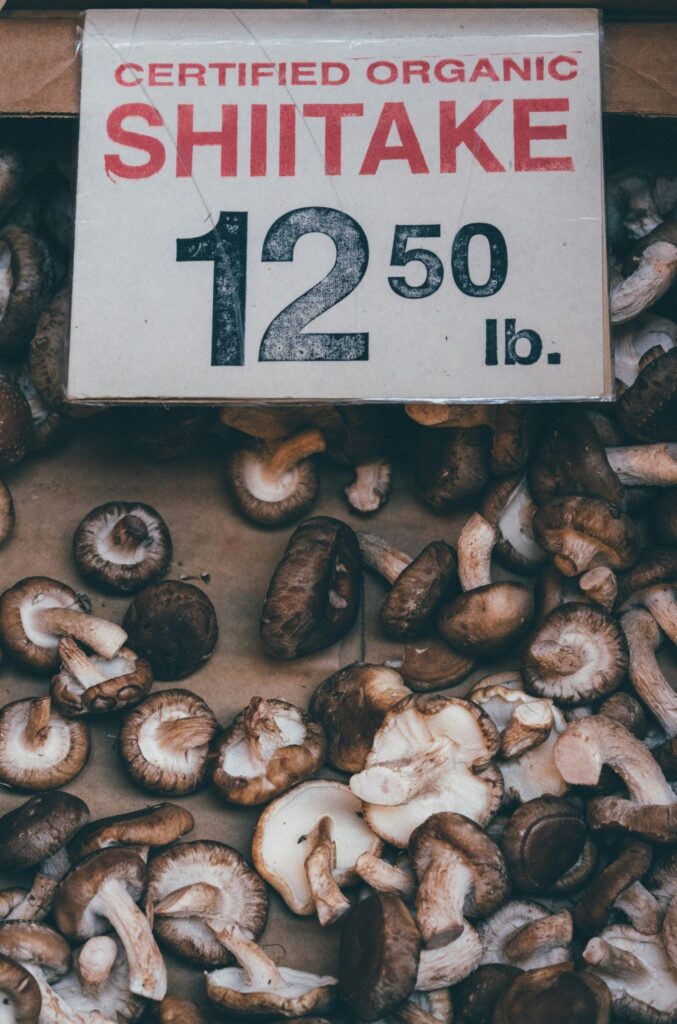
Photo by Thom Milkovic on Unsplash
This umami-rich mushroom is highly sought after and one of the most commonly grown mushrooms in the world. It is a fantastic culinary treat.

Photo by Simone Wessels-Bloom on Unsplash
The fan-shaped caps of Turkey Tail Mushrooms make them easily identifiable. They are found in many tinctures, teas, and supplements.
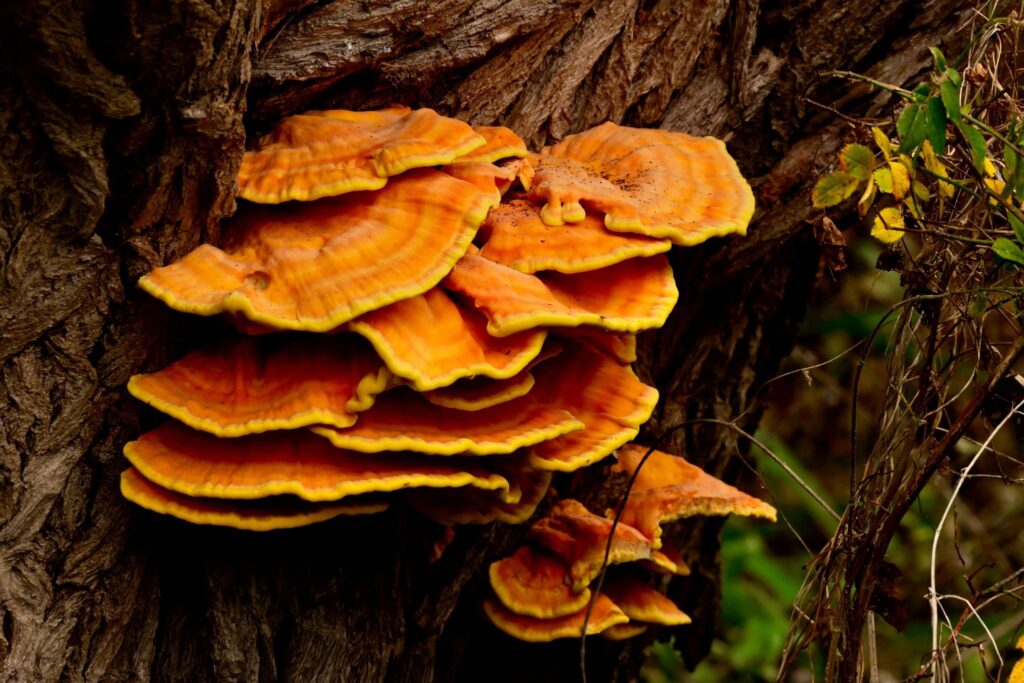
Photo by James Wainscoat on Unsplash
These are certainly some unique looking mushrooms. Their bright orange color draws people in, but be warned: they can be difficult to grow indoors.
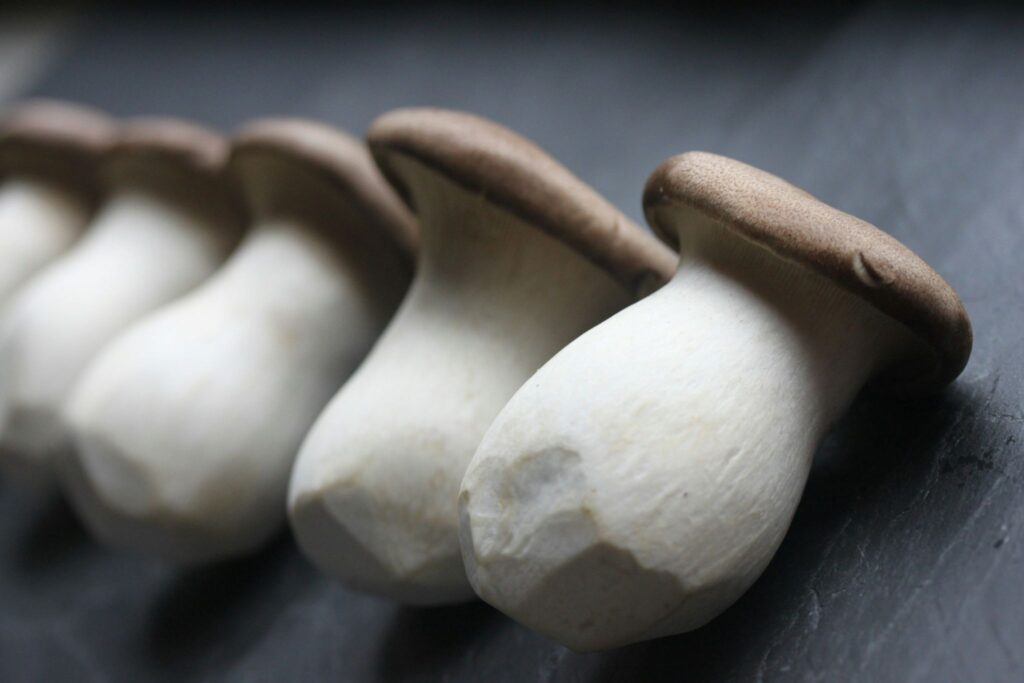
Photo by Megumi Nachev on Unsplash
King Oyster mushrooms grow as a single thick stem with a small cap. It has a surprisingly meaty texture and is one of the fastest growers.

Photo by Ryan Waldman on Unsplash
Pink Oyster mushrooms are pretty eye-catching due to their bright pink color, strong smell, and delicate features. It is the fastest gourmet mushroom to grow hands down.
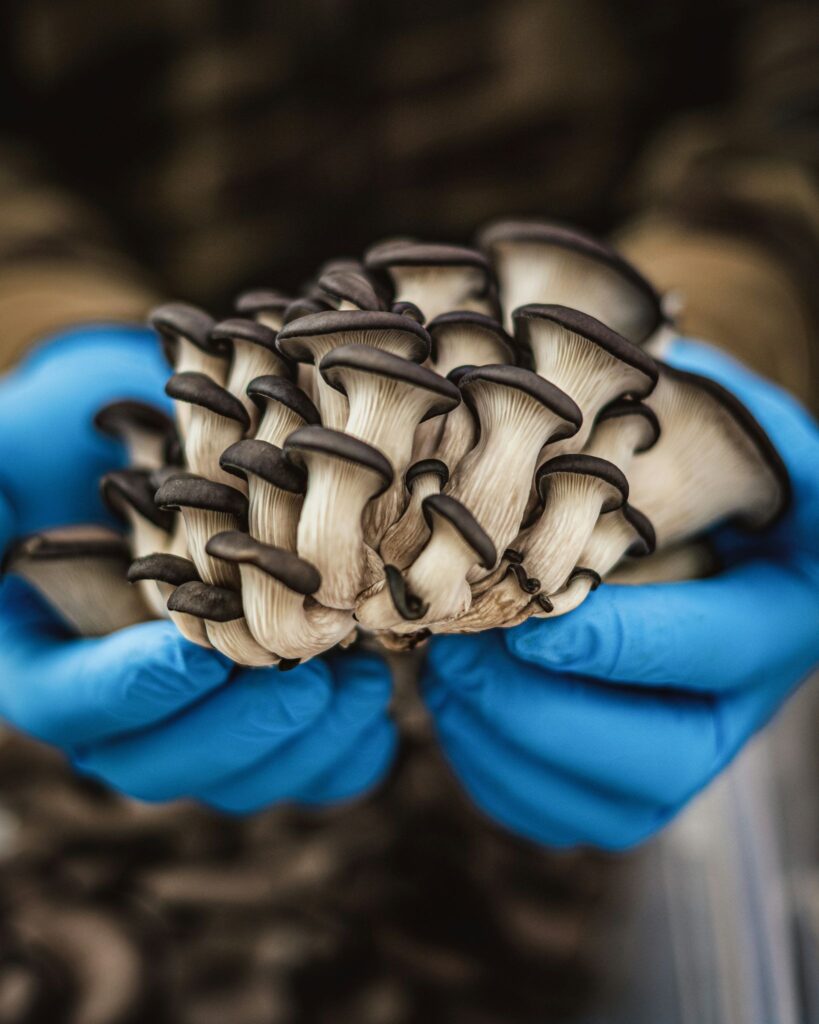
Photo by Tim Mossholder on Unsplash
Blue Oyster mushrooms grow in large bunches and usually produce large yields. They also grow relatively quick. You can look forward to their alluring silvery color.
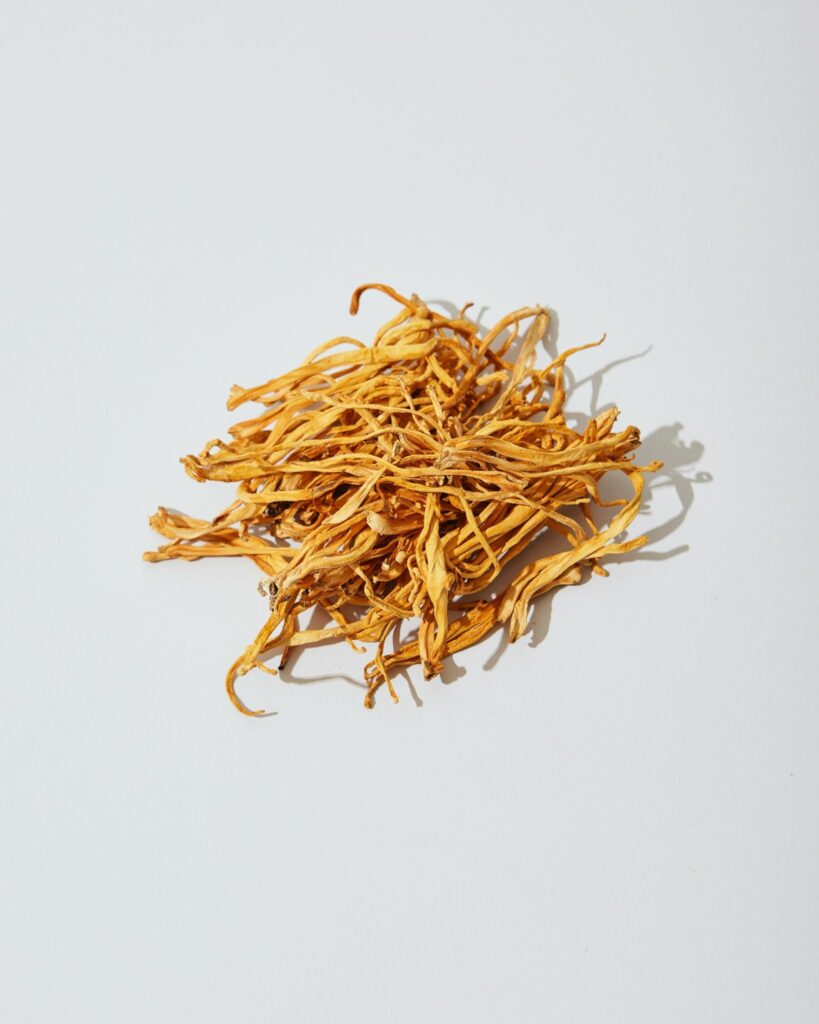
Cordyceps are found in many supplements, tinctures, and teas because they are sought after for their medicinal value. They are highly sought after at markets.
Chestnut mushrooms have a nutty flavor many find quite enjoyable. They grow reliably and make a great addition to any diet.
Certain mushrooms grow faster than others just due to their genetics. Oyster mushrooms generally grow quickly and easily because of their aggressive enzymes. Lion’s Mane on the other hand colonizes slower because of its dense mycelium. Chicken of the Woods is used to growing outdoors on trees, so it can be hard to translate to an indoor grow. So, the answer to "How fast do mushrooms grow" varies depending on the species.
If you are looking for fast growing mushrooms you can harvest within a month or two, grow oyster mushrooms.
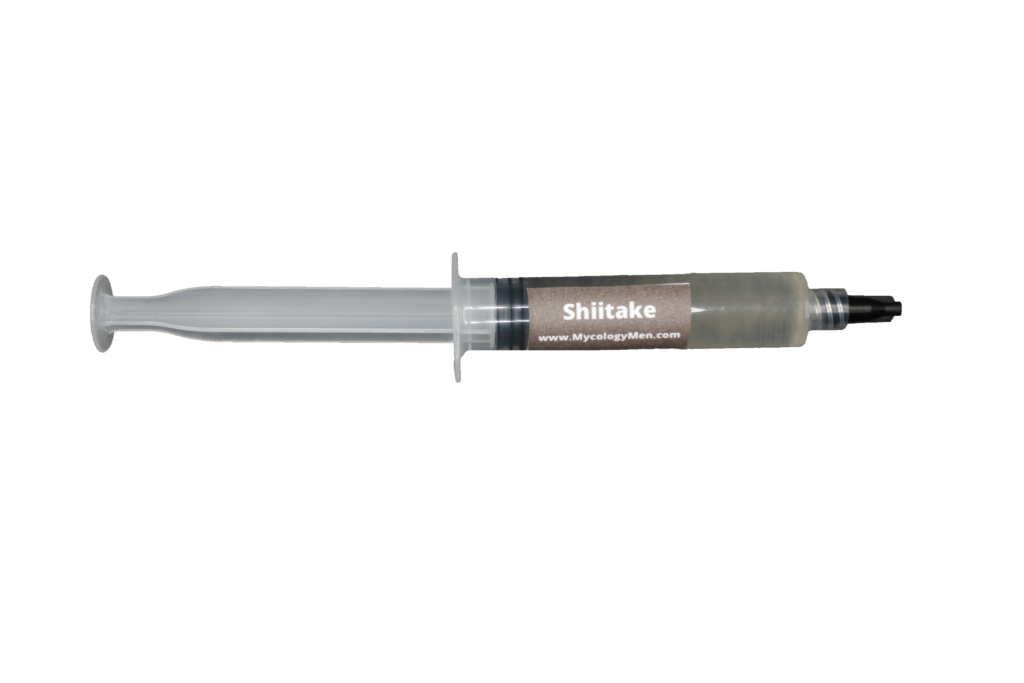
If you are looking for high profitability at market, grow lion’s mane or shiitake mushrooms.
If you are interested in the medicinal benefits, grow cordyceps or turkey tail mushrooms.
If you want to challenge yourself and reap the rewards, grow chicken of the woods mushrooms.
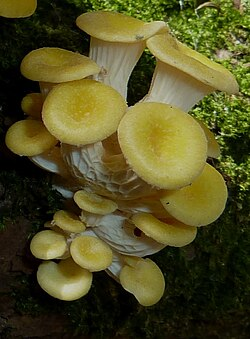
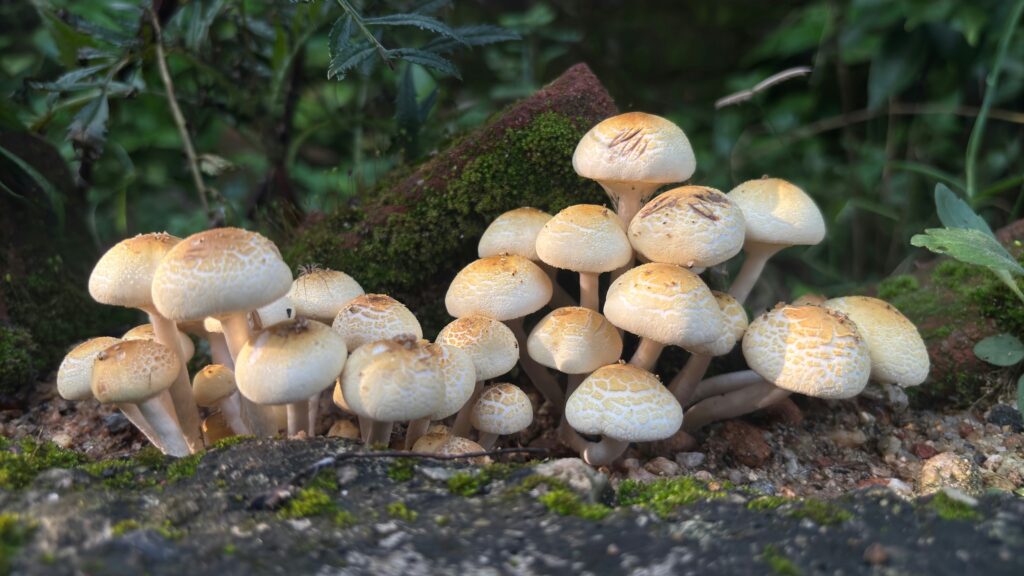
The golden oyster mushroom is a highly coveted fungal variety originally from eastern Asia. It is relatively easy to grow and has a pretty great flavor, which is why it has become popular and now a major threat in North America.
Mushroom grow kit suppliers began selling the golden oyster mushroom in the early 2000s because of the high demand for an easy-to-grow and delicious mushroom. Fast forward to today and the golden oyster mushroom has escaped cultivation facilities (and home grows) to wreak havoc on local forests and fungi pathways - especially in the Northeastern USA.
The USDA officially declared the golden oyster mushroom an invasive species and local communities are working hard to fight back through strategic growth of local fungi varieties. Their aim is to reverse the weakened fungi diversity in local communities by introducing mushrooms that are supposed to grow in these areas. Many mushroom grow kit suppliers are still selling golden oyster mushroom kits and fungi activists are none too happy. The cry for biodiversity and healthy forests over profit is a strong message fungi advocates across the country hope is heard.
The golden oyster mushroom (GOM) was at first just a popular choice amongst the mushroom growing community, but that popularity is exactly what made it into the threat it is today. Too much of a good thing can turn bad quickly.
This particular species of mushroom is relatively easy to grow and has a pretty fantastic flavor. Therefore, it became readily available in the form of at-home grow kits. This all started back in the early 2000s. Since then, it has run rampant outside of home grows and larger grow facilities to take over local wild fungi communities. As of 2025, the GOM has been found in 25 states and 1 Canadian province (USDA). More than its current hold on American fungi communities, it shows no signs of slowing its expansion.
But how exactly did this happen? People grow unique varieties of mushrooms all the time. Why is the golden oyster mushroom the seemingly only problematic one? Mycology expert Aishwarya Veerabahu theorizes that the GOM spreads so quickly because it releases billions of spores which get picked up in the wind (NPR). On top of that, people keep buying and growing the mushroom grow kits. That is certainly not helping the issue. Veerabahu goes as far as to urge people NOT to buy golden oyster mushroom grow kits (NPR).
The golden oyster mushroom grows so rapidly and so easily that it is pushing out native fungi therefore decreasing biodiversity of the affected areas. This can have a cascading effect as everything in nature affects one another. For example, could overgrown GOMs change habitats that birds and other mammals rely on? Native fungi are essential to nutrient-cycling and soil formation to help make habitats for wildlife. If they have nowhere safe to live or nothing to eat, they might move on, then it keeps going up the food chain. No birds to eat? Ok, bigger predators now struggle for food and so on until it finally reaches humans.
To continue the discussion above of reduction of fungal diversity, we can go even farther to how golden mushroom overgrowth can be incredibly harmful to forests (source). While golden oysters totally take over logs, stumps, and trees, it does not leave room for native mushroom varieties. These native mushrooms are absolutely needed to maintain the delicate balance of the forest ecosystem. Wood decay rates can change which leads to differences in soil formation and carbon emissions. Our local forests are already at risk due to global warming, a golden oyster mushroom takeover is certainly not helping.
The northeastern USA has ideal conditions for golden oyster mushrooms to flourish. There are many hardwood forests, lots of rain, high humidity, and lots of people using golden oyster grow kits. All together, this allows the golden oyster mushroom to spread like wildfire.
This is about more than just people who love or even kind of like mushrooms, this is about all of us and our local ecosystems. The invasive golden oyster mushroom is pushing out native fungi varieties and changing our forests for the worse. Sure, we would love to be able to safely grow this mushroom, but it is just not in the cards with the current situation. We cannot just forage eat a bunch of golden oyster mushrooms to solve this problem. We need a concentrated effort to NOT GROW golden oyster mushrooms and instead grow native varieties that can benefit the local community.
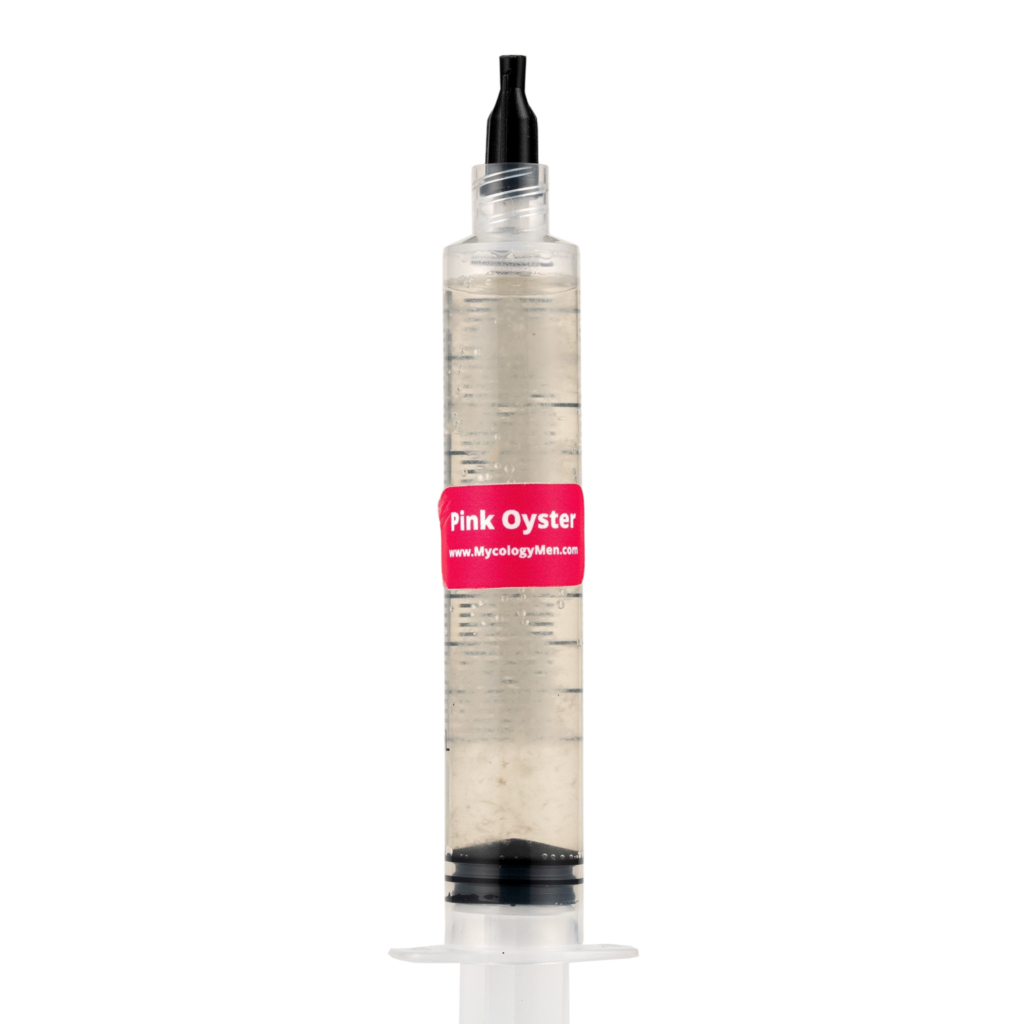
Pink Oyster Liquid Culture by Mycology Men
Here are some mushroom varieties that are not considered invasive in North America. You can safely grow these at home without worry of harming your local community.
As the headline says, always test your liquid cultures on agar before using them! This can save you a lot of time and energy from using a contaminated liquid culture. Why waste a perfectly good batch of grains just to grow bacteria that has beaten your mycelium in the resource battle?
Liquid cultures are known as “blind mediums” meaning it is really hard or impossible to tell if your liquid culture is contaminated with the naked eye. Bacteria can be too small to see and mold can remain dormant until it is injected into grains.
In fact, it is very common to have at least some bacterial or mold contamination in a liquid culture. But the real question is, who will win the resource battle: the mycelium or the contaminate?
Some people suggest that a cloudy liquid culture is a sign of contamination, but it is not as black and white as that. As we just mentioned, sure your liquid culture might have some contamination, but it can still grow perfectly fine as long as the mycelium wins the resource battle.
If you are at all concerned that your liquid culture is contaminated, the agar will reveal any serious contamination issues plain as day. Once you have identified contaminants, you can then proceed to save your liquid culture. We will discuss the steps to do so further along in this article.
Here is a short list of materials you will need to test your liquid culture on agar. Each of the items in this list are pretty necessary to successfully test your liquid culture. In mycology, it is best not to cut corners. Contamination is always lurking and a tricky beast to avoid unless you have the right tools.
Materials Needed to Test for a Contaminated Liquid Culture on Agar:
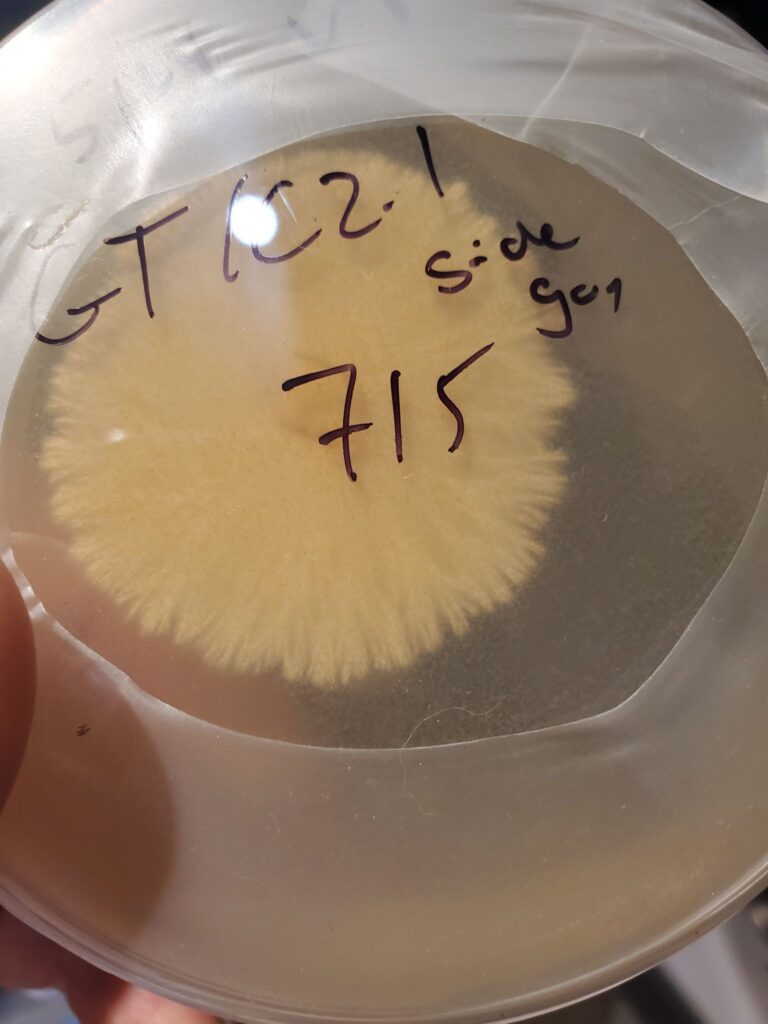
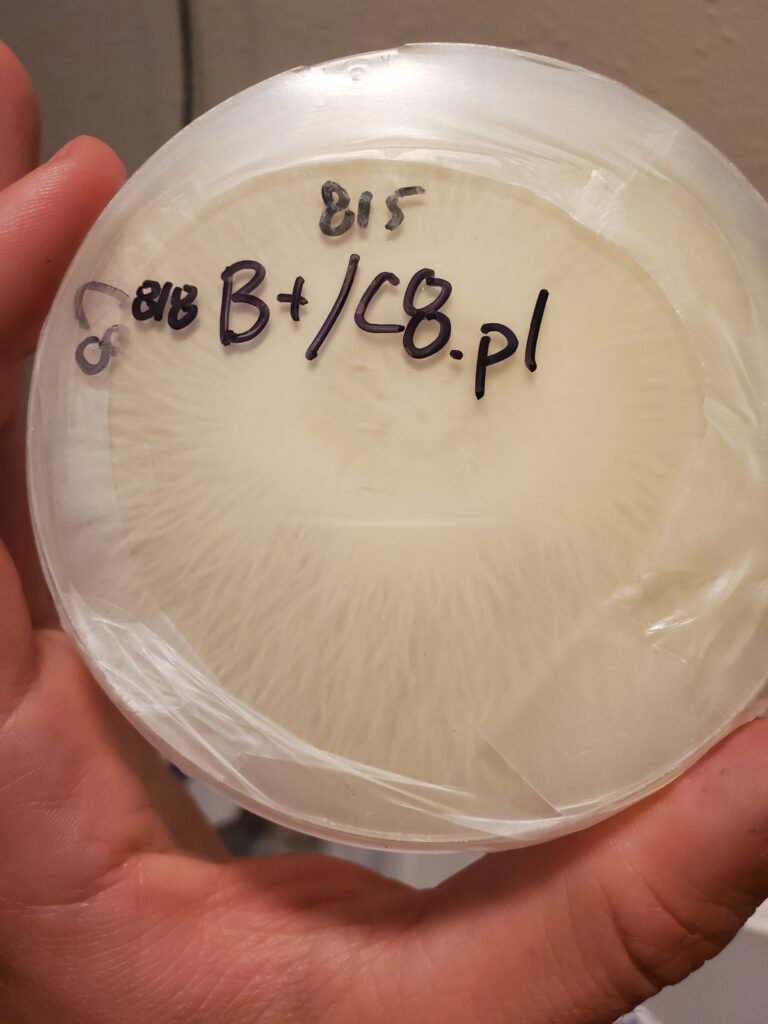
Not all mycelium grows the same, but you will know a healthy growth when you see it. There will be even and consistent expansion either in rhizomorphic (strandy) or tomentose (cottony) sections (or a combination of both - read more about mycelial sectors in our article on the topic).
There will not be wet spots, color changes, or separate colonies growing away from the center.
A contaminated liquid culture growing on agar is not a pretty sight. You may see slime from bacteria or mold rings. A good sign that you’ve got contamination is uneven growth patterns. Be careful not to confuse this with a mixture of rhizomorphic and tomentose mycelial sectors (read the article linked above). Now, even if you spot some contamination, if you caught it early on, there is still time to save the liquid culture! That is what we will talk about in the next section of this article.
This is usually the most reliable method to save your contaminated liquid culture. The agar plate will help you to identify clean mycelial sectors and then isolate and transfer them away from the contaminants. This method works well because it is easy to spot and avoid contamination so you can isolate the sector of healthy mycelium.
This method expands on the sector isolation technique described above. Basically, once you have isolated a clean mycelial sector on a fresh agar plate, you sandwich it with another clean agar plate above in order to save your contaminated liquid culture. The mycelium will grow upwards through the top agar plate and leave behind any residual contaminants on the bottom plate. This method works great because bacteria and mold cannot grow through solid agar, but mycelium can. You can never be too careful when it comes to contamination!
This is quite a fascinating technique to save a contaminated liquid culture that does not require much advanced knowledge at all. The basic premise is that mycelium grows faster than contaminants and we can use that to our advantage.
Want to avoid the whole rescue process? Sure, just take the necessary precautions to avoid contamination. For example, always flame sterilize your needles and work in a still airbox or flow hood. Use self-healing injection ports for your liquid cultures so no contaminants can sneak their way in.
What we consider the most useful method of preventing contamination is the use of a master agar plate. This is a plate of agar that you know for certain contains clean mycelium. It can be stored in a contaminant-free environment and used every time you want to make a new batch of liquid cultures.
Don’t worry. Making a DIY humidifier is not as hard as it may seem! We are going to lay it out nice and easy for you to follow along.
High humidity is not optional for growing gourmet mushrooms, it is absolutely essential. The goal is to mimic the natural environment in which mushrooms grow. This usually means mimicking places like the forest floor - high humidity, fresh airflow, and stable temperatures. Without proper humidity control, mushrooms simply won’t grow.
Now there are a number of ways to achieve the high humidity you want. It can be as simple as using a water mister, but it's time consuming to scale up using just a hand mister. Hand misting is usually only reasonable if you are growing a single tub of mushrooms. But if you have a larger operation, you’ll want a DIY humidifier that can humidify the whole room/tent. Bonus points if you can automate it!
In this article we are going to discuss proper humidity levels for growing gourmet mushrooms, how to build a DIY humidifier, specifically an ultrasonic fogger humidifier. We will also get into how to integrate it with your fruiting chamber and how to automate it (huge time saver). Finally, we will discuss troubleshooting common issues.
Specific humidity levels vary with the type of mushroom you are growing, but colonization typically requires about 70-80% RH (relative humidity) and fruiting occurs around 85-95% RH. For specifics on the strain of mushroom you wish to grow, give our article How to Use Liquid Cultures a read.
You may be tempted to purchase a cheaper cool-mist humidifier, but they are just not ideal for growing mushrooms. Sure, they can be great in your bedroom to make sleeping comfortable, but that is not the goal here. Store-bought humidifiers have weak airflow, inconsistent fog output, and are harder to automate. A DIY humidifier can fix all those issues. With just a few simple steps, we can make a humidifier that produces thick fog, is easy to scale and automate, and can be customized to your exact needs.
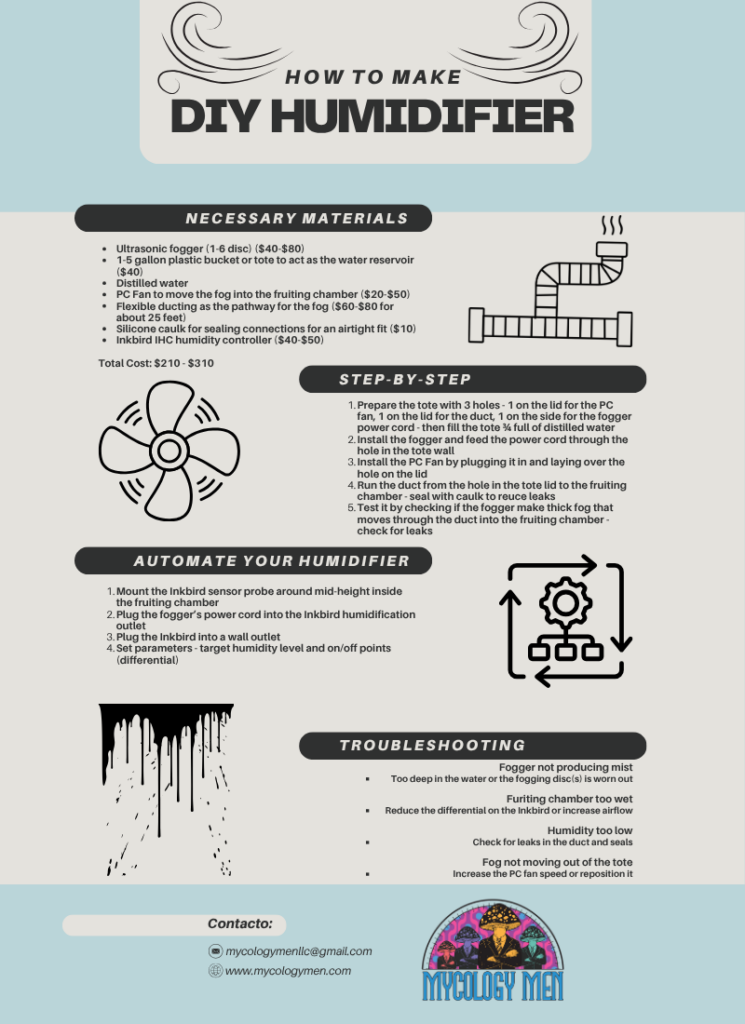
Total Cost: $210 - $310
You are going to need 3 holes in your tote and lid.
Finally, fill the tote about ¾ full with distilled water.
Place the fogger inside the tote and feed the power cord through the hole you made. The fogger should have instructions on how deep it should float for best results. The fogger may also come with a floater that can be used to achieve the ideal float depth.
Place the fan over the hole in the lid that you cut. It should be aimed so the air blows into the tote. Try not to air directly at the fogger or the duct. The goal is just to create a pressure difference inside the tote so that the fog flows into the duct and then into the fruiting chamber.
Run the duct from the hole in the tote lid you made to the fruiting chamber. Use silicone caulk to seal the connection to the tote lid so you can minimize fog loss.
Turn on the fogger and check that it is making a thick fog. Take notice of any leaks and seal them with your silicone caulk. Finally, check that the fog is flowing from the tote, through the duct, and into the fruiting chamber (the PC Fan should be running to force this airflow).
Automating the humidifier may seem like an unnecessary step, but trust us, spending the extra money on the Inkbird humidity controller will save you time and potentially money. As we mentioned, mushrooms require pretty specific humidity levels for growth. Too much or too little moisture is a bad thing. You probably don’t want to monitor humidity levels 24/7/ and you definitely don’t want to mess up your grow with too much or too little moisture.
Place it around mid-height and not directly in front of the inlet duct for most accurate readings.
This is how the device controls when to turn the fogger on and off.
Set the target humidity level (setpoint) and the differential. For example, if you make the setpoint 90% RH and the differential +/- 3%, the fogger will turn on at 87% RH and turn off at 93% RH.
You’re going to accumulate minerals. It’s a fact. Distilled water can make the mineral build up less severe, but it will still happen eventually. For this reason, you should clean the tote with diluted bleach every week. Also, replace the fogger discs every few months. The discs can be easily found online.
The fogger may be too deep in the water. Or, the fogging disc is worn out and needs replacing.
Reduce the differential on the Inkbird or increase airflow.
Check for leaks in the duct.
Increase the PC Fan speed for more airflow.

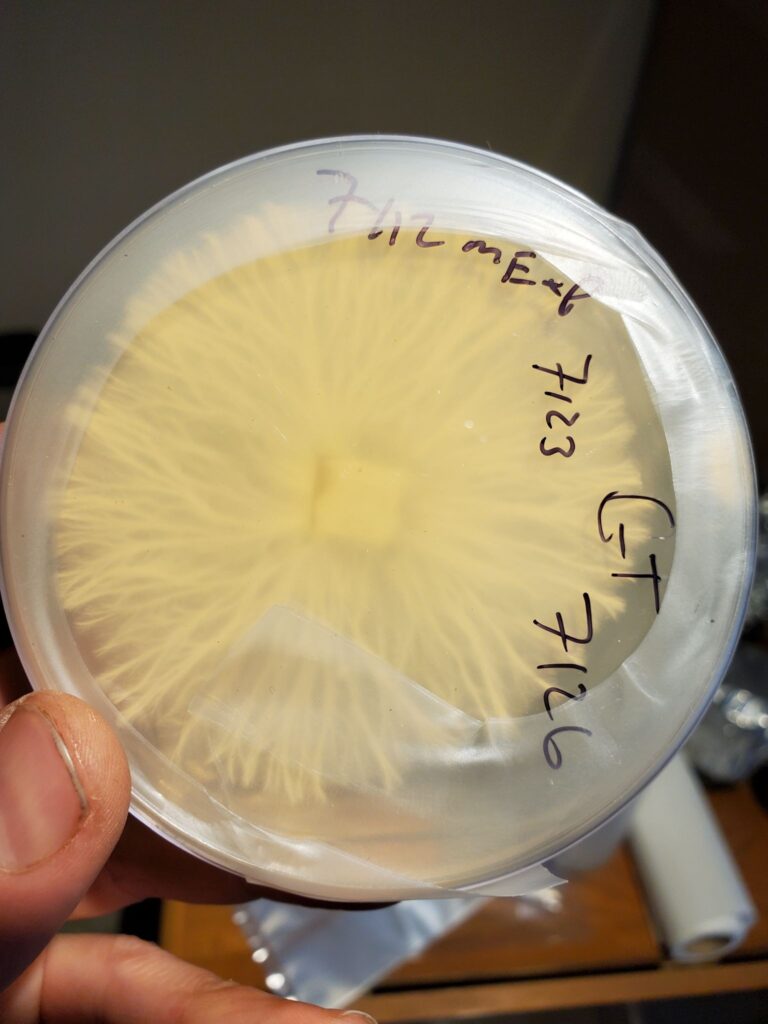
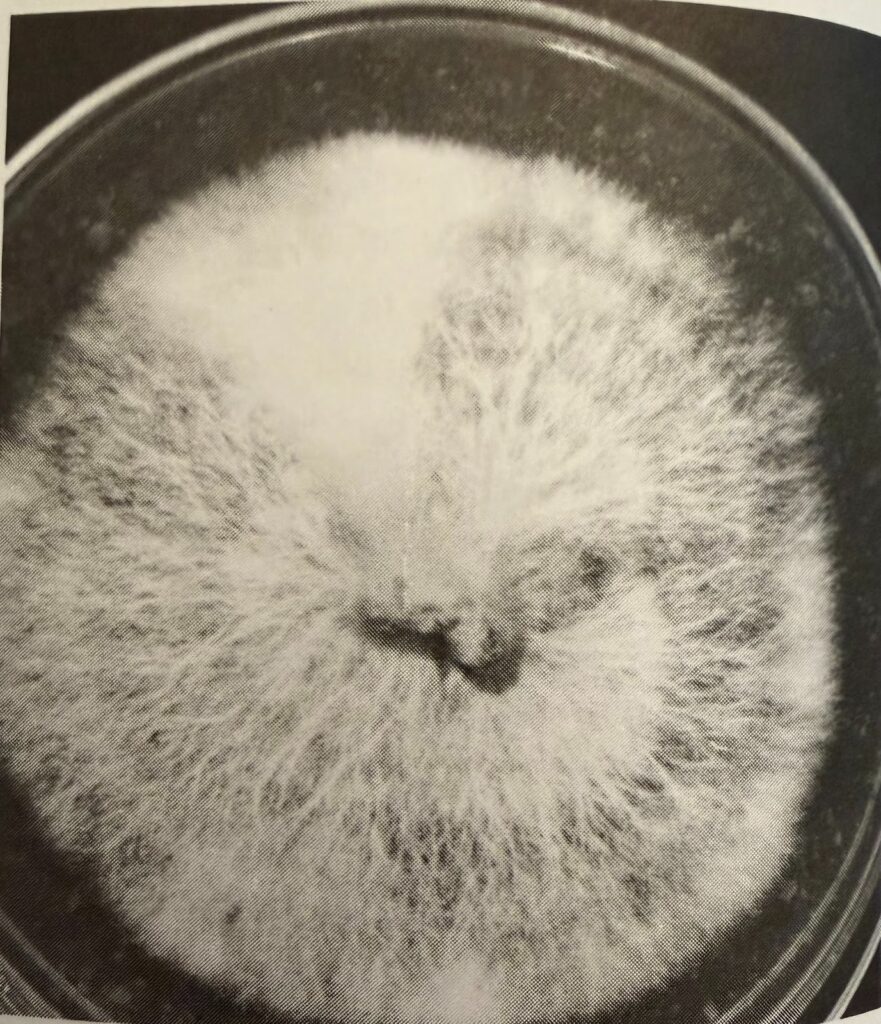
Rhizomorphic mycelium on agar by Mycology Men
Rhizomorphic mycelium and tomentose mycelium sectors are what you see growing on agar plates. They are distinct patterns that are literally the genetics of the mycelium. Strains are expressed visually differently. You may see differences in texture, density, growth speed, and tomentose or rhizomorphic patterns. Analyzing all of the visual clues allows mycologists to isolate specific sectors that are ideal for their goals. This can help you create a line of genetically ideal liquid cultures.
Rhizomorphic mycelium appears strandy (source). You can see distinct strands that make up the mass of rhizomorphic growth. Tomentose mycelium appears cottony. Rather than individual strands like rhizomorphic mycelium, tomentose mycelium is like a big fluffy mass. But which is better for growing mushrooms? We will answer that question and more during this article.
Rhizomorphic mycelia with a cottony sector (up top, slightly left)
(The Mushroom Cultivator, Stamets and Chilton, page 32)
Tomentose mycelium is considered by many to be inferior to rhizomorphic mycelium growth. The cottony and cloud-like sectors can be less aggressive during colonization which means slower growth speed.
With that being said, it does not mean that cottony mycelial sectors are weak or unusable. Tomentose sectors are even expected for some strains of mushrooms like oysters and reishi. They are also more likely to occur when the agar is low on nutrients or in a high humidity environment.
The main thing to look out for is cottony sectors when you were expecting rhizomorphic sectors. This could be an indicator of a number of things. First off, it could mean unstable genetics which is not ideal. It could also mean your mycelium is under stress from the environment. That could be a lack of nutrients, too much humidity, or temperature swings. Finally, it could also be an early indicator of contamination. Regardless of why a cotton sector shows up, if you are working with a strain that is otherwise rhizomorphic, you should be concerned.
So, to answer the question, “is tomentose mycelium bad”, the answer is: not always, but it can be concerning.
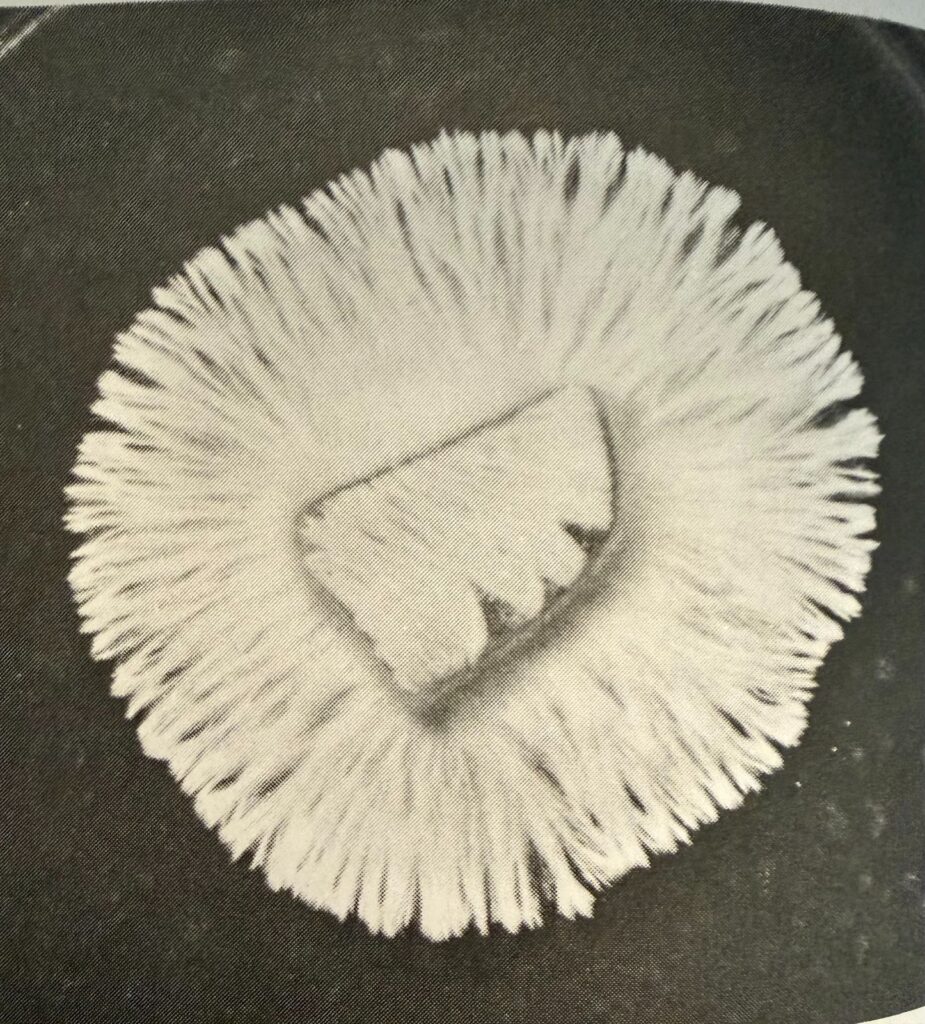
Rhizomorphic mycelia
(The Mushroom Cultivator, Stamets and Chilton, page 32)
Many find that rhizomorphic mycelium sectors are more suitable for their goals. The strandy, root-like sectors of mycelium are generally more aggressive during colonization. Not only that, but it could be an indicator of higher yields (not guaranteed). Rhizomorphic mycelium tends to adapt well to the grains and bulk substrate you will eventually be growing your mushrooms in.
So, to answer the question, “is rhizomorphic mycelium good”, the answer is: mostly yes, but it is not a guarantee of superior genetics.
Sectors of mycelium on agar are expressions of that strain's genetics. Different sectors are different genetics expressing themselves. This is why people use agar; it allows them to isolate specific sectors with traits they find appealing.
But it is important to remember that rhizomorphic mycelium and tomentose mycelium are not guaranteed indicators of a healthy and viable sector. These are great clues, but there are many other factors at play. For example, micro changes in the agar environment could lead to differences between sectors.
Stability, stability, stability. That is what you are looking for in an ideal sector. As we discussed above, many prefer rhizomorphic mycelium to tomentose mycelium, but just because you have a rhizomorphic sector, does not mean it is a good candidate for culture selection. What you really want are stable genetics. This means consistent growth direction, contaminate-free edges, and strong recovery after you have transferred a sector. If there are abrupt texture changes, wet-looking sectors, or uneven growth, you are probably looking at unstable genetics.
Cottony growth (tomentose mycelium) is not all bad! Sometimes it is even exactly what you want. Certain strains like oyster and reishi naturally grow tomentose. Cottony sectors are also known to be contaminant resistant. Now, we just want to be very clear here. Cottony growth can be contaminant resistant, but not because it has stronger genetics, but because cottony growth thrives in the same environment that bacteria and mold do not thrive. You will see tomentose mycelium commonly in environments with high humidity and low oxygen - this just happens to be the exact environment that mold and bacteria dislike. This is part of the reason why many commercial grows look for cottony agar sectors.
Find an agar plate with clean sectors, no contamination, and active growth. You don’t want a plate that is too young or too old. Plates that are too young have not fully developed the different sectors. Plates that are too old may have already exhausted their growth potential. The sweet spot is usually within 3-7 days after inoculation.
First off, sterilize your scalpel with a flame. Make it red hot then let it cool. Now, cut the agar plate from the leading edge of the sector you are targeting. By leading edge, we mean the youngest and therefore most active edge. It is where the mycelium is expanding into new territories.
Cut a wedge about 4mm wide. Transfer the wedge to a fresh agar plate and place it mycelium-side down.
It is best practice to avoid the center of the colonization because this is usually where the older mycelium lives. It will be harder to recover after transfer so it is best to just avoid it all together. It is also more difficult to tell the difference between sectors at the center so you might end up with a mixed bag.
You will never remember all the factors that made you choose that sector unless you practice extensive labeling. Trust us, it will save you headaches down the line. Important notes to label include, the plate ID (ex. Lion’s Mane Plate A), the sector ID (ex. Rhizomorphic leading edge), date you transferred the sector, and any notes you think may be useful (ex. fast growth).
Once you have let your transferred sector expand on a new plate, you can test a wedge in a grain jar. This will help you determine things like the colonization speed. If you are hunting genetics and transferring multiple sectors to multiple clean plates, then run the grain test with identical grain setups. This means using the same grains in the same jars with the same preparations and the same amount of mycelium. Since the only variable is the mycelium you used, this can help you find the best of the best.
Now we are really getting into the part when we find which sectors are worth continuing with. You should track how long it takes for full colonization of grains, how even was the colonization, and visual cues to determine health (ex. no wet spots or weird colors).
It is important to remember that fast growth does not automatically mean that it is the best sector. If it grows fast, but inconsistently, that could mean the genetics are unstable. In most situations, it is better to value consistency over speed. This is what we mean when we say that cottony sectors are not always bad. If they perform well in grain, then stick with them!
Once you have determined which grain tests you want to move forward with, move them to bulk substrate and run the same comparison. Record how long it takes for them to pin, how much you yield, and the quality of what you yield.
Once you have gone through all of this and have finally chosen a sector you want to keep and continue to use, you have to preserve it! Keep the master plate in cold storage, wrapped tightly to avoid contamination. It can also be life saving to make backup plates.
Welcome to the wonderful world of fungi! If you are just getting started on your mushroom journey or a practiced cultivator, knowing the difference between liquid culture vs spore syringe is an essential part of developing a wider knowledge base. Growing mushrooms always begins with one or the other. In this article we will talk about a variety of topics including: what is a liquid culture, what are mushroom spores, what are the differences between the two, which is better for beginners, which work faster, and even how to make liquid cultures from spores. We are so excited to have you along for the ride! Now, let’s get it started on the discussion of liquid culture vs spore syringe!

Photo by Christopher Cassidy on Unsplash
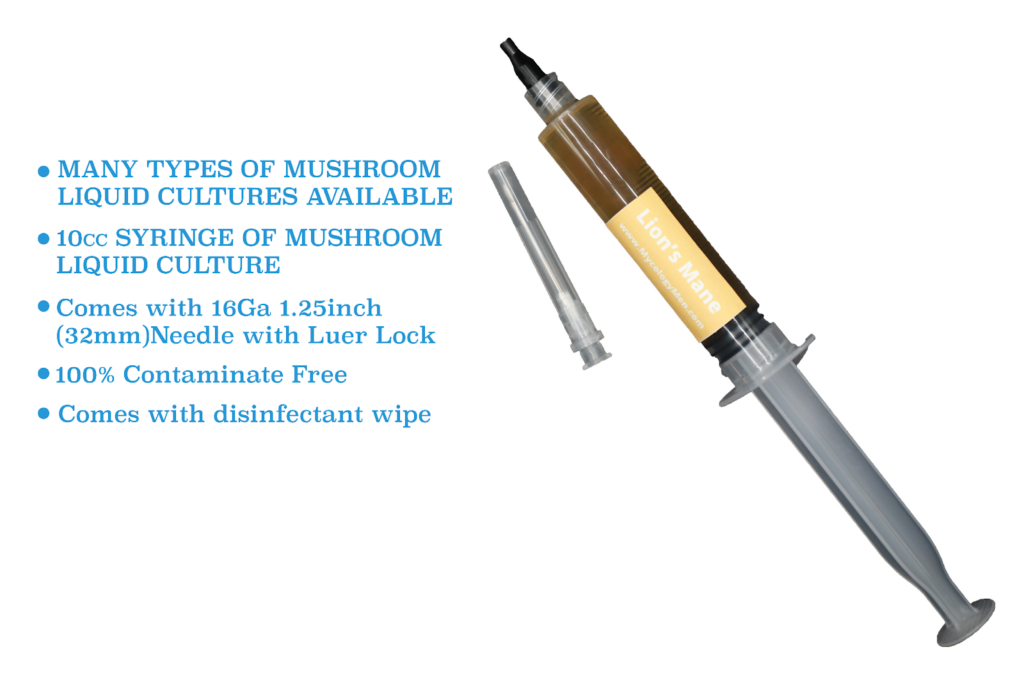
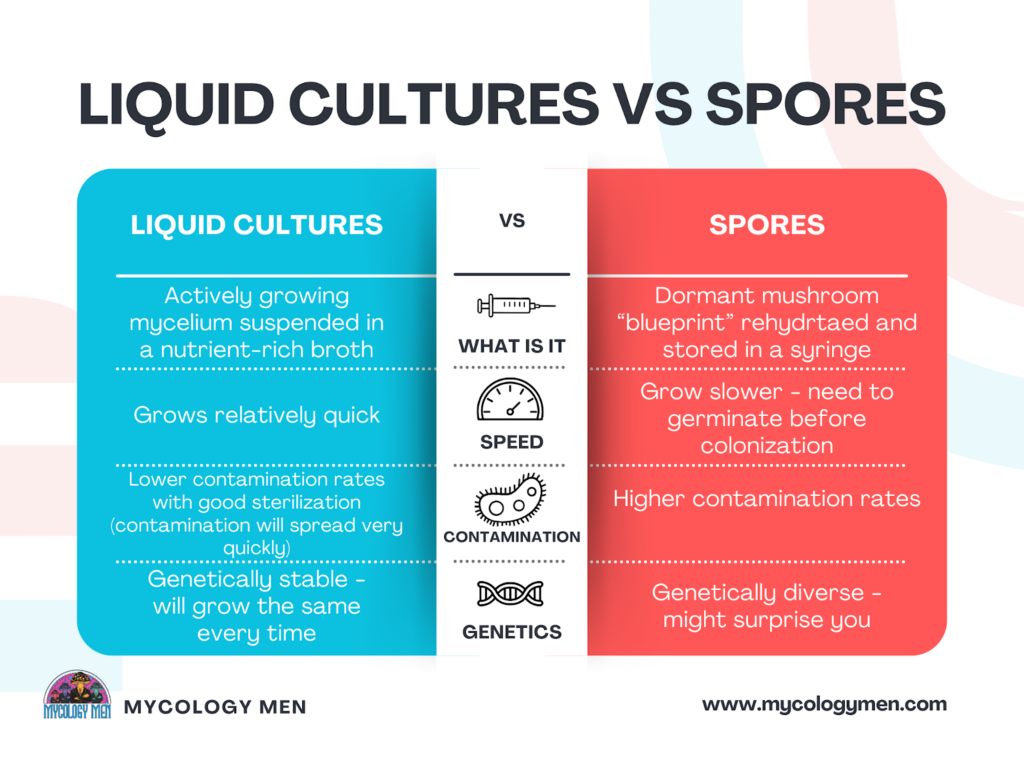
It’s alive! Frankenstein reference aside, liquid cultures actually do contain actively growing mycelium. The mycelium is suspended in a nutrient-rich liquid broth and stored in a large syringe. Inside the syringe you will see a cloudy collection - this is your mycelium! The liquid it hangs out in is a sterile sugar solution which is the perfect environment for mycelium to thrive.
Liquid cultures are preferred by many growers because they colonize faster than spores do (we will get into why that is in the next section). Done correctly with proper sterilization techniques, liquid cultures also have lower contamination rates. Another benefit you may consider is that liquid cultures are genetically stable. This means that each grow will be the same.
The risk with liquid cultures is that if there is bacteria present, the contamination will spread like wildfire. Growers need to really have their sterilization techniques locked in to successfully use liquid cultures.
There is no shortage of producers online with liquid cultures for sale. Try and find a company with good reviews and helpful tips that can guide you on your mushroom growing journey.
Mushroom spores are the blueprint from which your fungi will grow. You can think of them as mushroom seeds (to be clear, they are definitely not seeds, just the starting place for mushrooms). The key difference between mushroom spores and liquid cultures is that mushroom spores are dormant. This means there is no actively growing mycelium present like there is in a liquid culture.
Spores are released from the gills, teeth, and pores of mature mushrooms. Just shaking a mushroom cap can release millions of spores. Each spore contains half of the genetic material necessary to grow a mushroom. Two spores must be matched together before you can start growing mushrooms.
Once the spores are collected on a sterile surface, they can be rehydrated then stored in syringes. People like spores because they have a relatively long shelf life compared to liquid cultures. They are also preferred by some growers because each set of spores is entirely unique. This genetic diversity allows practiced growers to cultivate different lines of the same mushroom strain in which they look for preferred qualities such as harvest yield, grow rate, flavor, and more.
One downside of using spores is the same as what some might consider an upside: the genetic diversity. You never know what you are going to get out of a grow until you actually grow it. While this may be exciting for some, for others it is just a pain. Aside from that, spores will grow slower than liquid cultures because they start as dormant so they need to be germinated. Liquid cultures on the other hand are already actively growing. Finally, spores have a higher contamination rate than liquid cultures.
The answer to this question on liquid culture vs spore syringe really depends on your goals.
If you want fast, reliable, and low-contamination risk growing, use liquid cultures.
If you want to learn sterile techniques and experiment with different genetics, use spores.
As we described above, liquid cultures grow faster than spores, are genetically stable so the results are consistent, and they have a lower risk of contamination (assuming you follow proper sterilization techniques).
Spores on the other hand are genetically diverse so they are great for experimenting with genetic differences within a strain. They also force you to learn about sterilization techniques as contamination is a serious concern.
Spores run a high risk of contamination for a number of reasons. They are definitely more contaminant-prone than liquid cultures. The reason for this is that the spores are more likely to be contaminated during the collection process because this is done out in the open and not necessarily in a sterile environment. Spores then battle for resources with bacteria and mold. And they will lose that battle every single time because spores are dormant and the germination process is quite slow. Not only that, but spore syringes often contain microscopic contaminants already. It is really an uphill battle, but it can be done with proper training and techniques.
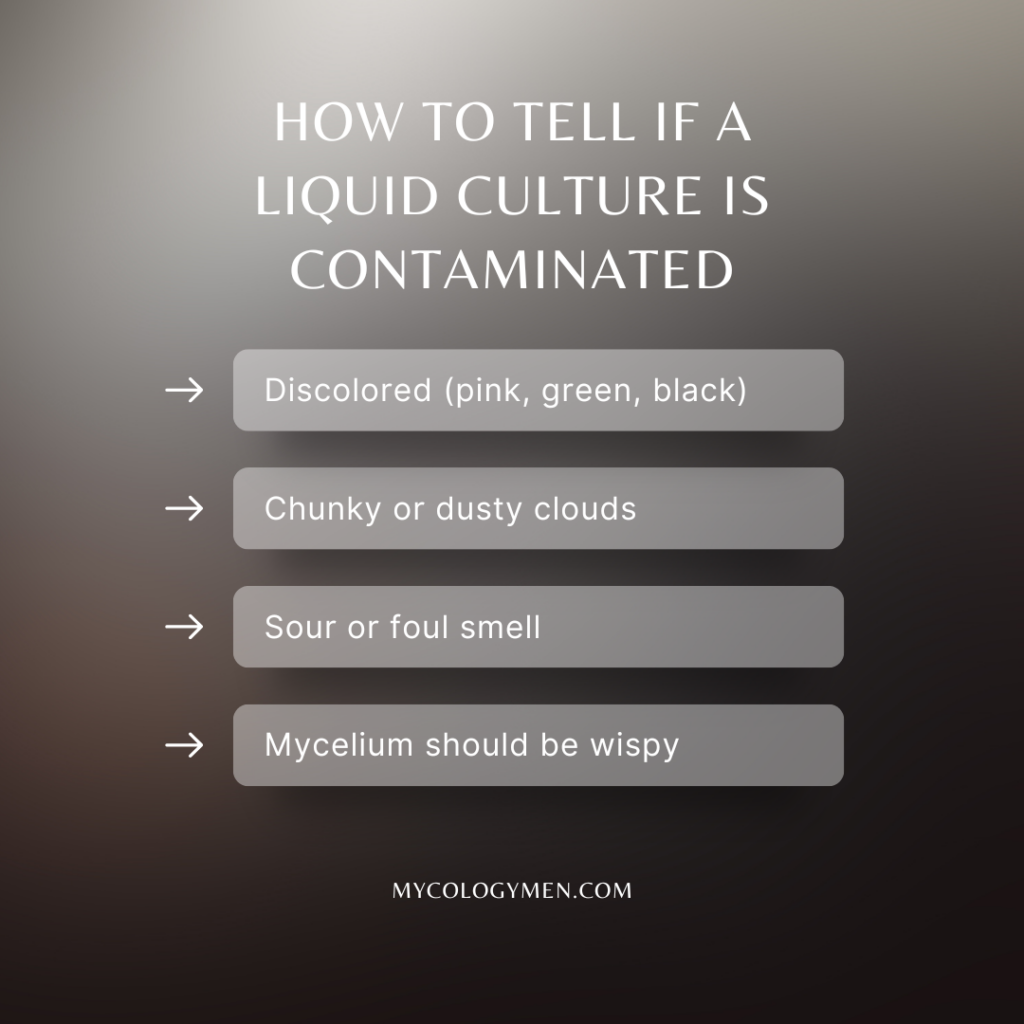
There are a few tell-tale signs you can keep an eye out for to determine if your liquid culture is contaminated. First off, if the syringe liquid is discolored at all (green, pink, black) it is probably contaminated. Secondly, the mycelium should be like wispy strands - anything else can mean contamination. This means dusty or chunky clouds are probably contaminated. Finally, and this one should be obvious, if it smells sour or downright awful, it is probably contaminated.
Liquid cultures will get to harvest substantially faster than spores will. This is because spores are dormant to start and need to germinate before colonization. Liquid cultures on the other hand are actively growing while still in the syringe.
So, you’re looking to grow some mushrooms? Well, you’ve come to the right place to start your intellectual journey! We are going to discuss liquid culture vs agar for growing mushrooms. The first thing you need to know about growing mushrooms is that you MUST have clean & healthy cultures to inoculate grains (read more about the full growth process in our article How to Use Liquid Cultures).
Typically, beginners usually come across liquid cultures and agar as the starting point for their grow. The issue is that these are commonly misunderstood. You may not even know the difference between the two.
In this article, we are going to detail exactly what are liquid cultures and agar, which is better for your goals, and how to use them together. We hope this can set you on the right path so you can have a successful mushroom growing experience. Now, let's learn about liquid culture vs agar!
A liquid culture is a syringe filled with what you need to grow your first batch of mushrooms. Inside the syringe is living mycelium suspended in a liquid broth loaded with nutrients to help the mushrooms grow. Without getting into too much detail (you can get into more detail in our article on growing with liquid cultures linked above), you inject the contents of the liquid culture into grains, let the grains colonize, then mix the colonized grains with a substrate and let that grow until the mushrooms are ready for harvest.
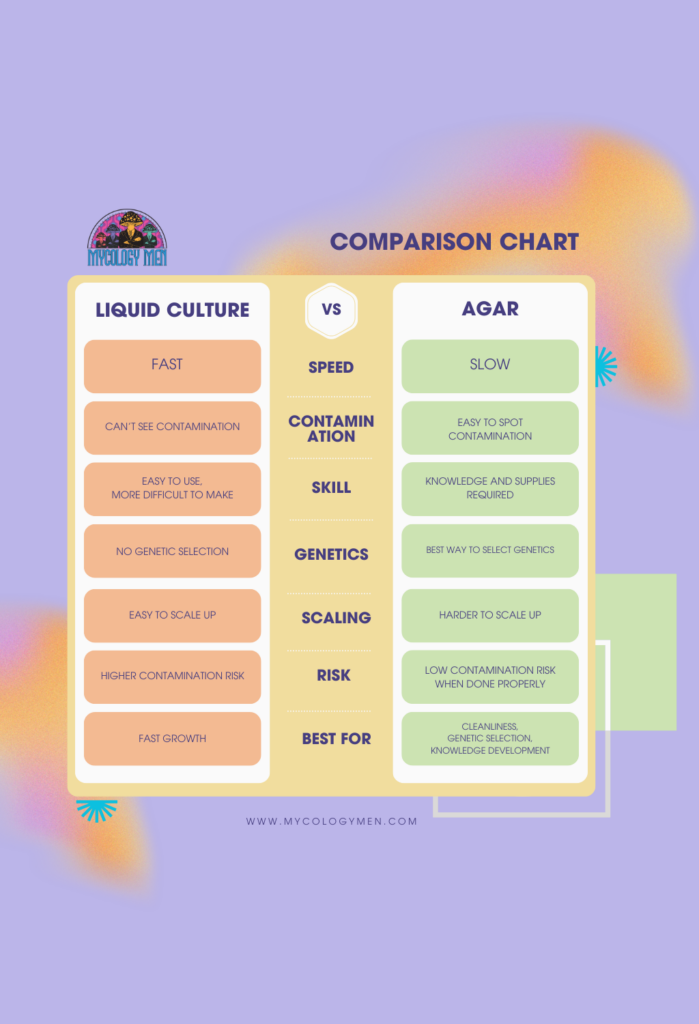
Liquid cultures are preferred by many growers because they colonize grains quickly, it is easy to scale up production for larger grows, and it is pretty easy to find high quality liquid cultures for sale online.
The main risk of using liquid cultures is contamination. It can be tricky to spot to the untrained eye. Even pros can get tripped up now and then. Once you use a contaminated liquid culture, it can be damn near impossible to save the grains. If you buy your liquid culture from a reputable producer, you should be fine. Another downside is that liquid cultures are genetically stable so you won’t be able to search for and grow stronger genetics than what you already have inside the syringe.
Agar (also sometimes referred to as agar plates) is a petri dish filled with a solid nutrient medium. It is kind of like fungi jello. Spores from a mushroom are spread on the agar and allowed to grow. Agar itself contains no fungi. It is simply the growing medium for fungi. If you want to learn more about making agar plates, give this article a read - How to Make Agar at Home.
Agar has the benefit of allowing users to catch any contamination early on. It will be visible on the agar plate alongside the mycelium. You can even clean your agar so you can keep the process going.
Agar is also beneficial if you want to isolate strong genetics from a particular strain. As we mentioned above, you can start with spores on agar. Each set of spores will produce slightly different mushrooms all within the same strain. Spore A might grow small and unflavorful shiitake while spore B grows the best shiitake mushrooms you’ve ever had. Agar allows you to pick and choose the genetics you really want.
There are a few downsides to using agar. For one, it takes a relatively longer time to reach harvest when compared to liquid cultures. Not only that, but it requires more supplies like a still air box or flow hood (tools to keep your agar clean and sterile while working with it).
If you want to develop a structurally sound mycology foundation, then working with agar is the way to go. It will teach you all about sterile techniques, genetics, and the growth process from spore to harvest.

If you want to grow fast then liquid cultures are for you. Assuming you have purchased your liquid culture from a reputable producer, you can get right into inoculating grains as soon as you receive your syringe. Liquid cultures are also best for those who wish to inoculate multiple bags of grains at a time. They are ideal for scaling up production.
There are a few scenarios in which starting from agar is the best choice over liquid cultures. The first scenario is if you have a desire to develop a really strong foundation in mycology. Starting from spore to make agar will teach you mycology from top to bottom.
Another reason you may choose to start with agar is if you want to hunt for strong genetics of the mushroom strain you wish to grow. Liquid cultures come as-is. There is no making the mycelium inside genetically stronger. With agar, you can select the genetics that you desire.
A third reason you might want to consider starting with agar is if you want to verify there is no contamination. As we mentioned above, it can be tricky to spot if a liquid culture is contaminated and if you use a contaminated liquid culture to inoculate grains, well there’s very little chance of coming back from that. When you use agar, you can physically see contamination spreading on the agar plate. Not only can you spot it, but you can also clean it. So if you want to verify cleanliness, use agar over liquid cultures.
Brand new to mycology: Consider starting with agar. You will learn everything you need to know and when you get to the inoculation phase, you will have a guaranteed clean starting point.
You want fast results: Start with a liquid culture. Starting from agar takes longer to reach harvest. Just do yourself a favor and check that the liquid culture producer you buy from is reputable. If it is contaminated and you use it, you just wasted time and supplies.
You want to learn everything about mycology: Start with agar and work your way through the entire process up to harvest and additional harvests (flushes).
You want to scale up: Liquid cultures are ideal for scaling your production. But you might consider starting with agar to select the genetics you want to grow in bulk. If you don’t start with agar, you're stuck growing whatever came in your liquid culture.
Let's talk about how to store liquid culture syringes. Liquid cultures are one of, if not the most popular starting place for many mushroom enthusiasts. It is quite easy to buy high quality mushroom liquid cultures online and they grow quickly.
But did you know that a liquid culture contains living mycelium? That’s right. A liquid culture is a syringe filled with a nutrient broth in which living mycelium is suspended. That is why they grow so quickly - they are already alive!
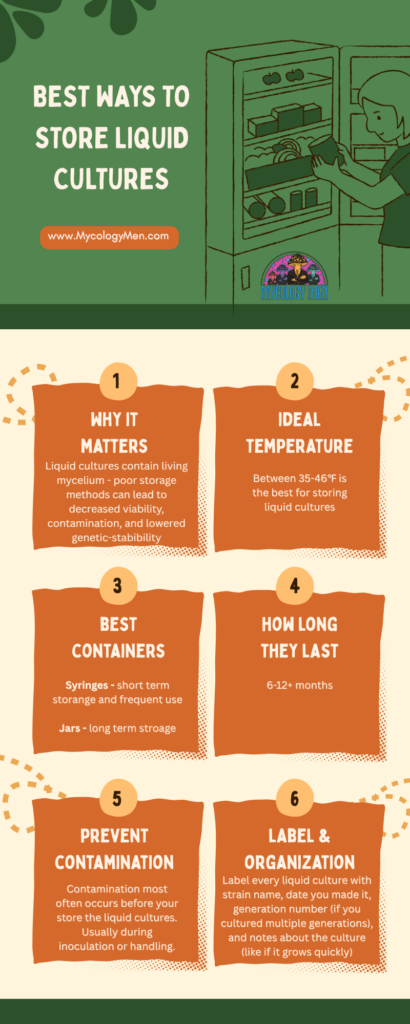
This is also the reason that proper storage methods are essential. The living mycelium inside of a liquid culture will be drastically affected by how you store it. Poor storage methods can lead to decreased viability, contamination, and lowered genetic-stabibility.
Good storage methods can save you time and money in the long term. You don’t want to start growing some mushrooms from some old liquid cultures only to find they are contaminated after weeks of waiting for your grains to colonize. What a waste!
Liquid cultures can last 6-12+ months under ideal storage conditions. It is really not that hard either. In this article we are going to teach you everything you need to know about storing liquid cultures so they remain contaminate-free for up to a year or more.
You want to store your liquid cultures in refrigerator temperatures. Between 35-46℉ is the best for storing liquid cultures. At these lower temperatures, the living mycelium inside the liquid culture slows its metabolism. This prevents overgrowth and the depletion of essential nutrients. Not only that, but the lower temperatures also inhibit bacteria growth so your LC can remain contaminant-free!
Be careful not to make the temperature too low or else you may run into some other problems. Freezing temperatures can kill or weaken the liquid culture.
If you are storing your liquid cultures at room-temperature, it is highly suggested that they be used within 1-2 weeks before you run a high risk of contamination.
Determining whether you want to store your liquid cultures in syringes or jars is really based on how long you need to store the liquid cultures for. Syringes are best for short term storage and frequent use. This means less than 12 months, but more ideally less than 6 months. Syringes are beneficial because they are easy to label and dose.
If you plan to store your liquid culture for more than 12 months or just longer periods in general (say, over 6 months), then jars are probably ideal for you. Jars are less prone to contamination than syringes are. They are a great way to build up a culture library.
Properly stored liquid cultures are generally stable for about 6-12 months. You can get more time from certain strains, but it is usually best to play it safe.
Regardless of how long you store the cultures, you should test them on agar every few months just to confirm they are still viable and contaminate-free. Simply plunge a few mL of culture onto an agar plate and see how it develops. You will be able to easily see any contamination.
If your culture turns cloudy, yellow, smells bad/rotten, or develops slimy sediment, then chances are it has gone bad. There are ways to save a cloudy culture (check our blog for more info), but the culture may be a lost cause if any of these signs persist.
Contamination most often occurs before your store the liquid cultures. Usually during inoculation or handling. Here are a few best practice tips you can follow to try to avoid any pre-storage contamination:
An organized culture library makes your life easier - trust us…
You should label every liquid culture with strain name, date you made it, generation number (if you cultured multiple generations), and notes about the culture (like if it grows quickly or fruits a lot). Labeling your cultures is very important so you don’t make any easily avoidable mistakes such as mixing strains or losing track of cultures. You can even digitize your library for even more accessibility!
Thinking about using your outdoor space to grow some mushrooms? Good choice! It is actually pretty simple to get started. After that, it is low maintenance and will continue to provide you with homegrown mushrooms for several years or more. In this article we will detail how to use mushroom plug spawn for growing on logs. This is different from sawdust spawn. Plug spawn is best for smaller projects (up to about 4 logs).
We will also discuss popular mushroom varieties and the type of wood they grow best on. Aside from that, we can’t forget about the different methods of inoculation including: logs, stumps, and pillars. Don’t worry if you do not know what that all means yet, we will lay it out nice and simple for you.Finally, we will also get into some common challenges mushroom growers can face and the best way to overcome these challenges. Let’s get started.
Choosing a proper mushroom/log combo is critical to a successful grow. Some mushroom varieties are just incompatible with certain types of wood. On the other hand, each variety of mushroom has a perfect wood match. Hardwoods like Oak, Maple, and Beech are most commonly used.
It doesn’t take much research to find the combination that works best for your situation. Here is a quick list of some of the most popular mushroom varieties and the types of wood that work best for them:
Oyster - Beech, Maple
Shiitake - Oak, Maple, Beech, Elm
Lion’s Mane - Poplar, Beech
Chicken of the Woods - Oak, Beech, Poplar
Turkey Tail - Oak, Maple, Beech
Maitake - Oak
Reishi - Maple, Oak
You want to use healthy logs from hardwood trees for inoculation. Dead or diseased logs won’t cut it. Any size log or branch can be used (as long as it is healthy). Smaller logs can colonize faster, but they won’t produce for as long as bigger logs. Logs that are too big are pretty difficult to move around and work with
Ideally, you want something that is about 6 inches in diameter and 4 feet in length. It is best to inoculate the logs within 2 weeks of being cut from a live and healthy tree. Any longer and the logs can dry out which is not ideal for mushroom growth.
This is the most widely used method of inoculation. It is tried and true and has worked for thousands of years.
Use logs that are about 6 inches in diameter and 4 feet in length. Larger and heavier logs will be hard to maneuver.
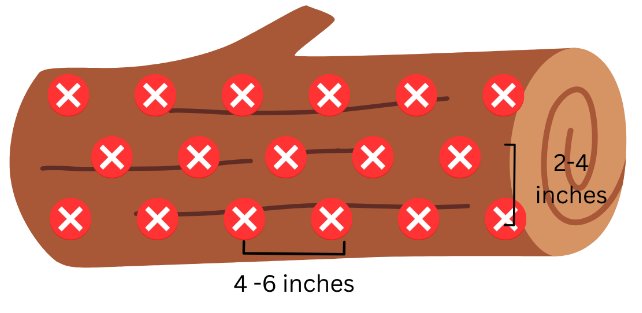
2. Place your plug spawns into the holes. Make sure they go all the way in and fit snug. Use a soft hammer if needed.
3. Melt wax in a thrift store pot (don’t use your good pots because the wax is hard to remove). Then brush the melted wax over the plug spawns in the holes. This will protect the plug spawns.
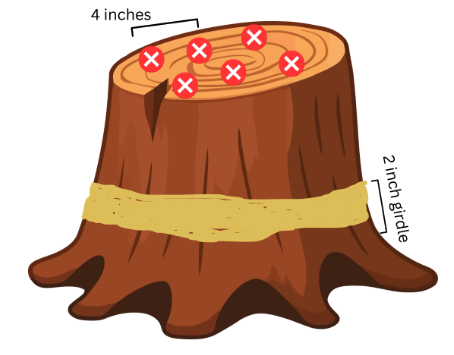
You can choose to inoculate stumps instead of logs. Stumps may take longer to colonize, but they will continue to fruit for up to a decade. So if you are not in a rush, maybe find yourself a good stump to grow some mushrooms on.
The stump you use needs to be from a tree that was cut down within a week or two prior. It also needs to be located in a shaded area. If you do not know what type of wood the stump is, it might not be worth trying to inoculate it because your efforts may go to waste.
This method is usually reserved for larger projects that utilize sawdust spawn. We will not be covering this in this article. Be on the lookout for an upcoming article that will cover this method.
Patience is a key factor when growing mushrooms on logs. It can take over a year for your logs to fully colonize before they start to fruit. Smaller logs will colonize faster, but they will fruit less often. Full size 4 foot logs like described above can fruit for several years.
Make sure to keep your logs in a shaded area for the incubation period. You do not want your logs just laying on the ground in contact with the soil, so use smaller pieces of wood to elevate the logs about 2 inches off the ground.
With just a few logs, you can lay them side by side in a layer with some space in between each log for airflow. If you have a larger amount of logs, you can stack them log cabin style.
There is very little maintenance that is needed while you wait for your logs to colonize. If the weather is dry for an extended period, it can be beneficial to soak them for about 24 hours to increase the moisture level. Frequent watering is NOT RECOMMENDED.
Fruiting will occur naturally when the log has fully colonized. Just be patient because this process can take a year or more. Fruiting usually occurs after rainfall.
To harvest the mushrooms, you can either just pull them out one-by-one or cut the stem at the base close to the log surface. Mushrooms on logs will continue to fruit over and over for a number of years.
Some varieties of mushrooms will do better if the log is partially buried into the ground. Chicken of the woods and Reishi are the two most common mushroom varieties that require partial log burying. Wait until the log is fully colonized before you bury it. This can take about a year so be patient. You will know the log is fully colonized when you see mycelium on the ends of the log.
To bury your logs, first dig a trench that is ½ the diameter of your log. Then place the log into the trench. Use the soil you dug out and pack it around the log so it is nice and snug. You only want the top surface of the log to be exposed.

The mushroom plug spawns are competing for nutrients against other fungi and mold and such. If your plug spawns are losing this battle, you may have to begin again with a fresher log and properly sealed inoculation holes.
The first thing you should do is be patient. Logs can take up to 2 years to fruit. If they are still not fruiting, you can try to force the fruiting by soaking the logs for 24 hours.
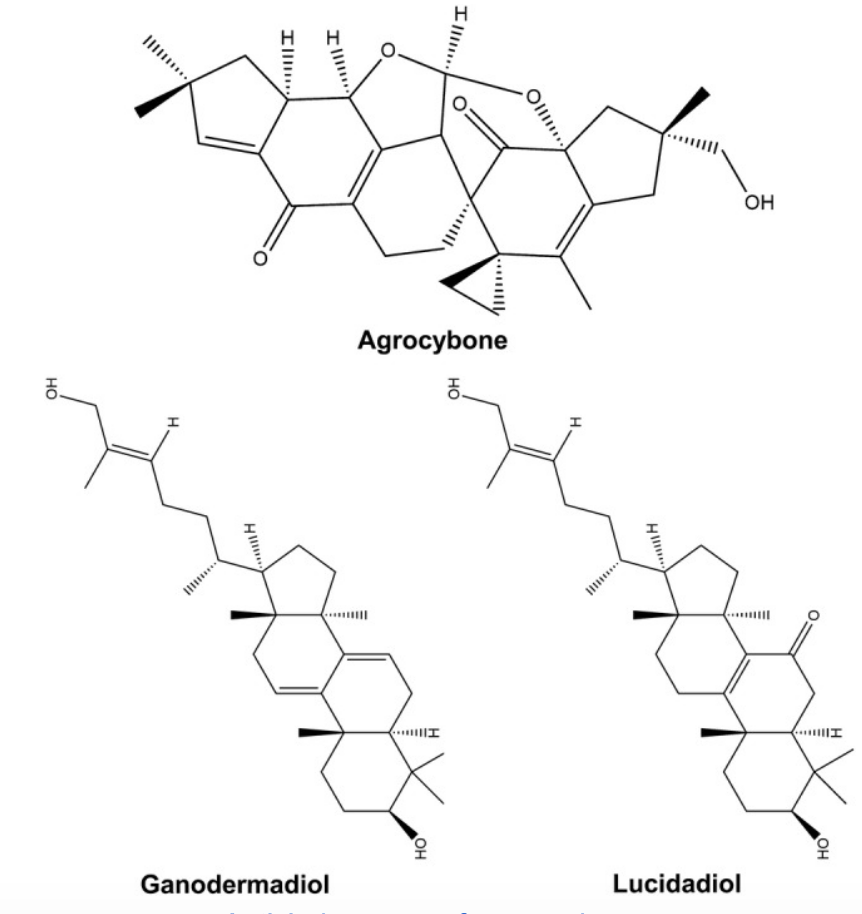
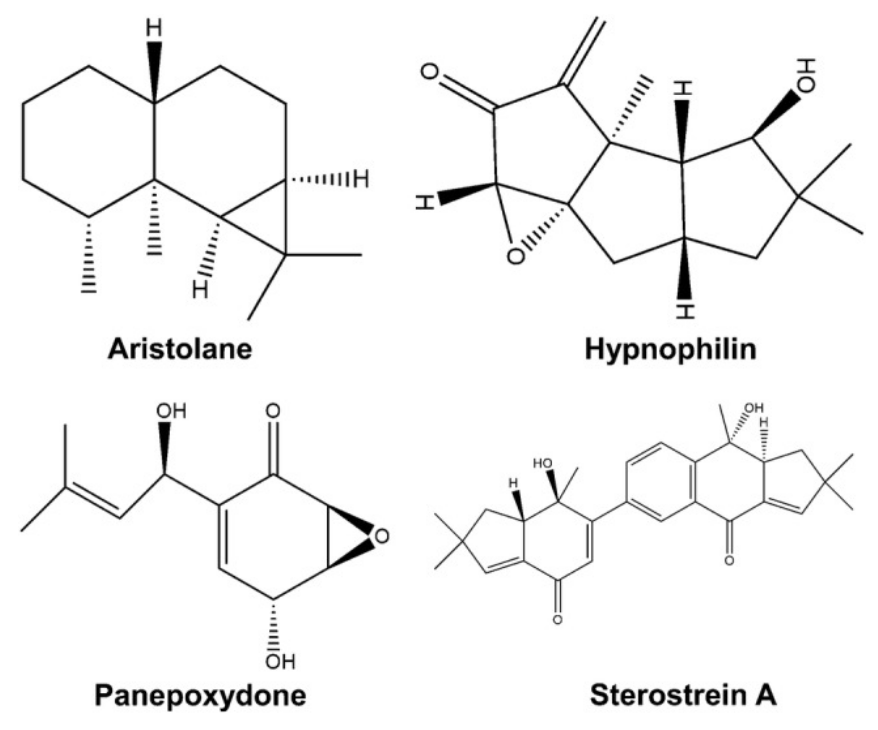
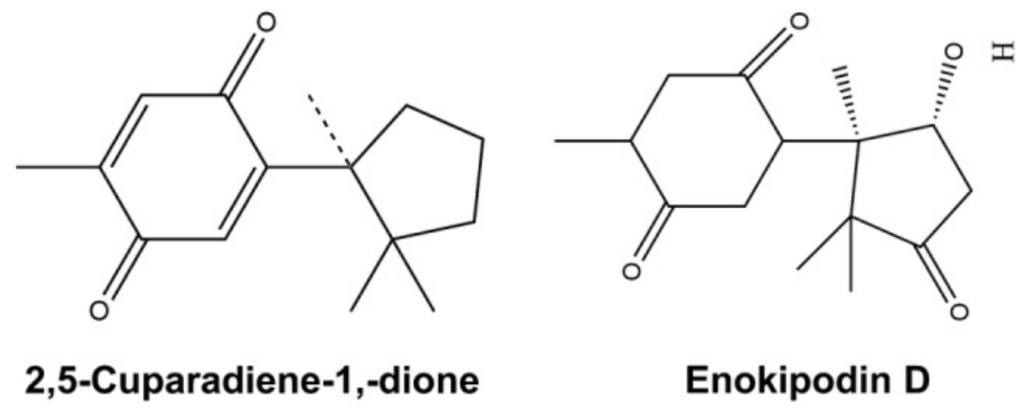
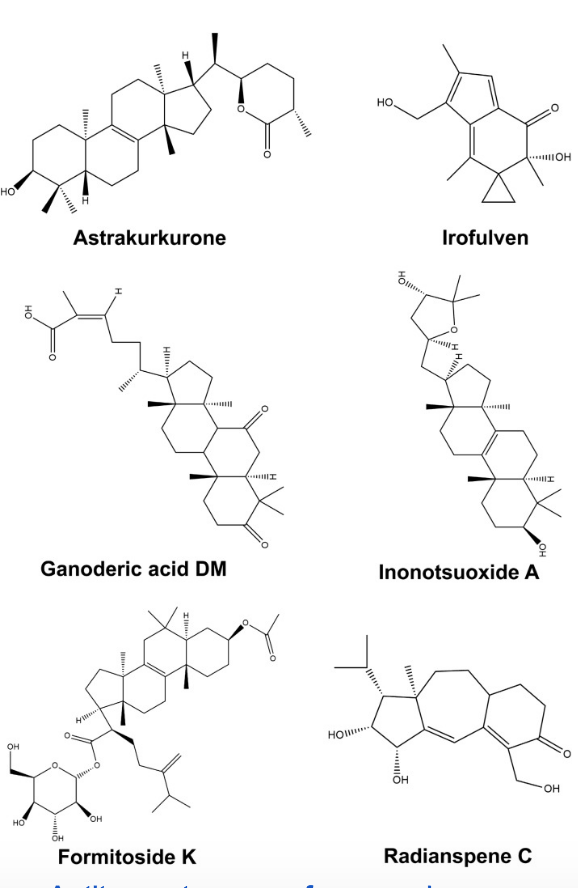
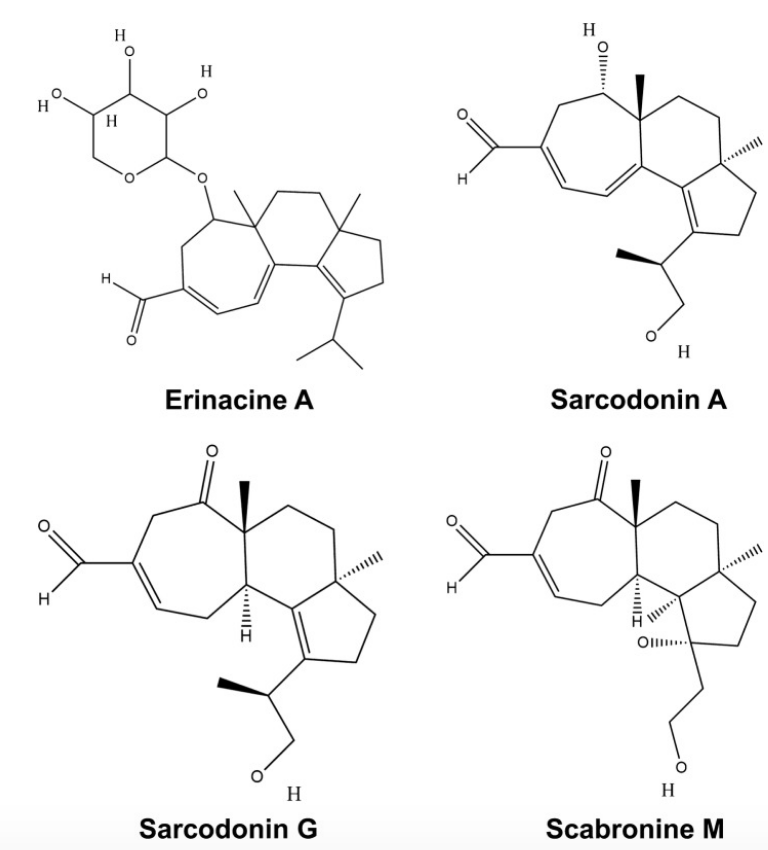
Terpenes are compounds found in plants, fruits, vegetables, and fungi. They can be partially responsible for the aroma and flavor of these plants. Terpenes have gained attention recently with the legalization of cannabis. Cannabis terpenes help to create the effects felt from different strains of cannabis. Some may help with pain management and inflammation. Others may help you sleep or get into a better mood. “Terpenes and terpenoids can be found in abundance in mushrooms”. (source) In this article we will discuss the types of terpenes found in mushrooms, the potential benefits of terpenes found in mushrooms, and the entourage effect.
Terpenes commonly found in mushrooms are different from the popular cannabis terpenes. In fact, there are more than 20,000 known terpene varieties. Here is a list of some popular mushroom strains and the most abundant terpenes found in them.
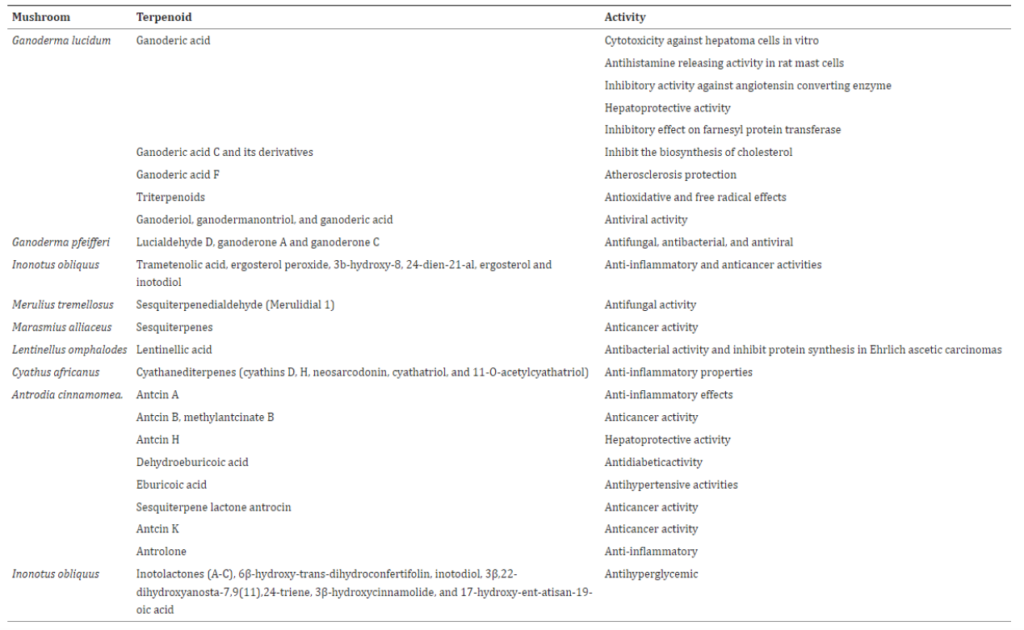
Reishi - Reishi mushrooms contain Ganoderic Acid, Ganoderiol, and Triterpinoids. Known benefits include being an antihistamine, antiviral, and antioxidant.
Chaga - Chaga mushrooms contain Trametenolic Acid. This terpene is known for its anti-inflammatory and anticancer properties.
Lion’s Mane - Lion’s Mane mushrooms contain hericenones. This can help with brain cell growth and may have antidepressant effects.
Psilocybin (Magic Mushrooms) - Psilocybin mushrooms contain several terpenes including Cubebol, B-copaene, Δ-cadinene, and Germacrene D.
Sadly, this is a little studied subject. There is a great need for more studies with more in-depth research. What we know from existing studies does show therapeutic promise in many wellness areas. Here (source, source) are a few of the most accepted benefits mushroom terpenes may have:
Antimicrobial - Terpenes found in certain mushroom varieties have shown promise in the fight against drug-resistant bacteria. Bacteria are constantly evolving and developing a resistance to the drugs we use to fight them. Therefore the search for natural alternatives with antimicrobial properties is “rapidly increasing”.
Antiviral - Like the search for natural compounds that can fight against bacteria, researchers are also on the hunt for compounds with antiviral properties to fight against viruses. Certain terpenes found in different mushroom varieties have shown promising antiviral properties.
Antiparasitic - Diseases like malaria are caused by a parasitic infection. This disease claims the lives of over 500,000 people each year. This is not made any better by the fact that there are limited treatment options available. Certain terpenes found in different types of mushrooms may provide a natural alternative to fighting against the likes of malaria and other parasitic diseases.
Antioxidant - Oxidation occurs to the cells in our body as we age, fight diseases, and deal with stress. This increases the speed at which we age.Antioxidants go against the oxidation process and it seems that some wild mushrooms may have therapeutic potential. Terpenes found in wild mushrooms have been shown to contain antioxidant properties.
Anti-inflammatory - The anti-inflammatory properties of terpenes found in a “wide variety of [mushroom] strains” are some of the most promising therapeutic results so far uncovered through the current research. There seems to be an abundance of terpenes and mushrooms containing these terpenes with anti-inflammatory properties.
Antitumor - One amazing area of research looks into how mushroom terpenes “counteract the growth of malignant tumors”. Certain terpenes found in mushrooms have shown promise in a laboratory setting. Much more research is needed on this topic.
Neurodegenerative - Mushroom terpenes extracted from a number of mushroom strains have shown neuroprotective properties. This means that they can protect cells from death and degeneration. Cell degeneration can lead to diseases like Alzheimer’s.
While the effects from isolated mushroom terpenes are all well and good, the real benefits of mushrooms lie within a phenomenon called the Entourage Effect. The entourage effect is basically like that old saying: the whole is greater than the sum of the parts (Aristotle said that!).
While research shows that mushroom terpenes can have therapeutic effects like anti-inflammation and antiviral, the highest level of benefits occurs when all parts of the mushroom are working together. The interactions between different terpenes and other compounds in mushrooms provides more benefits than just isolated mushroom terpenes. This, like most work on the therapeutic benefits of mushrooms, requires much more research to fully understand what is exactly going on.