If you are like many others throughout America and the rest of the world, you may be interested in growing your very own mushrooms at home. There is no shortage of supplies available online, but how do you successfully use them to grow an abundance of mushrooms in the comfort of your own home?
While the basic process is somewhat easy to figure out, there are some nuances that require a bit of know-how to successfully grow a mushroom crop. The basic process is as follows:
The tricky part is knowing the specifics of these steps. For example, knowing how to keep your work area and materials sterile and free from contamination is crucial. Additionally, different mushroom varieties work best with different grain and substrate mixtures. You also need to know how to keep your grow within the proper humidity and temperature ranges.
If this all sounds a bit overwhelming that is understandable, but we promise you, it is not as bad as it may seem at first. By reading this in depth article that details exactly how to grow gourmet mushrooms at home using liquid cultures, you are already ahead of the curve. We are going to discuss the exact steps in a How-to-Guide, dive into the differences between each popular mushroom variety, and provide you with some tips and tricks to keep your grow sterile and successfully harvest some tasty fungi!
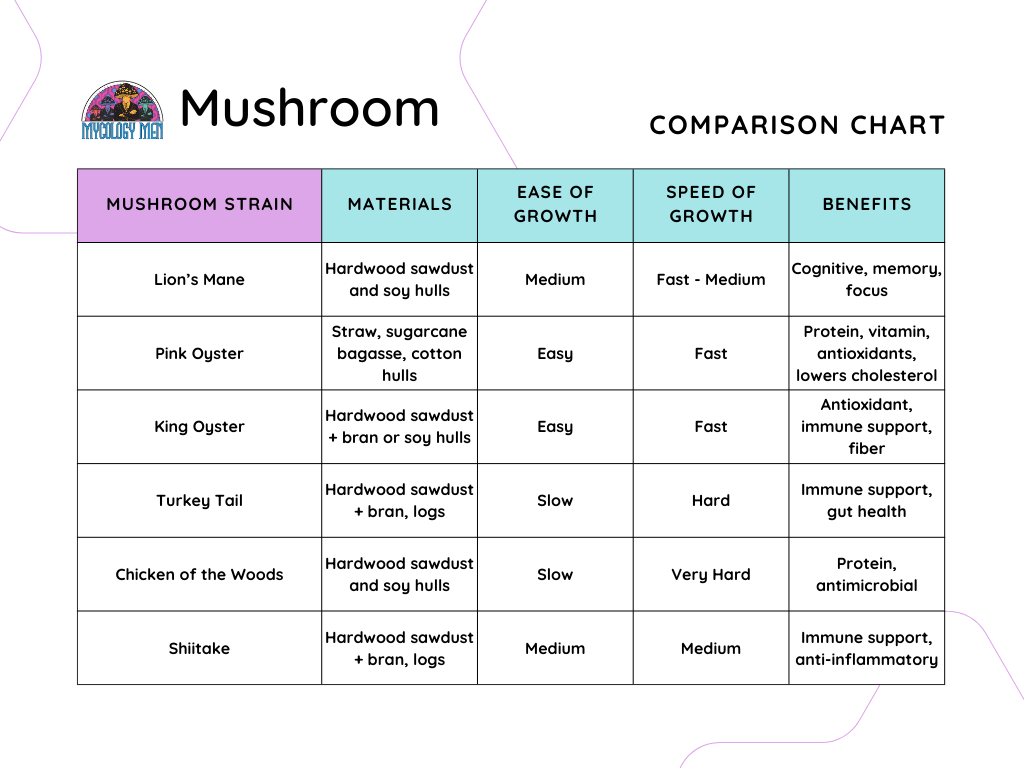
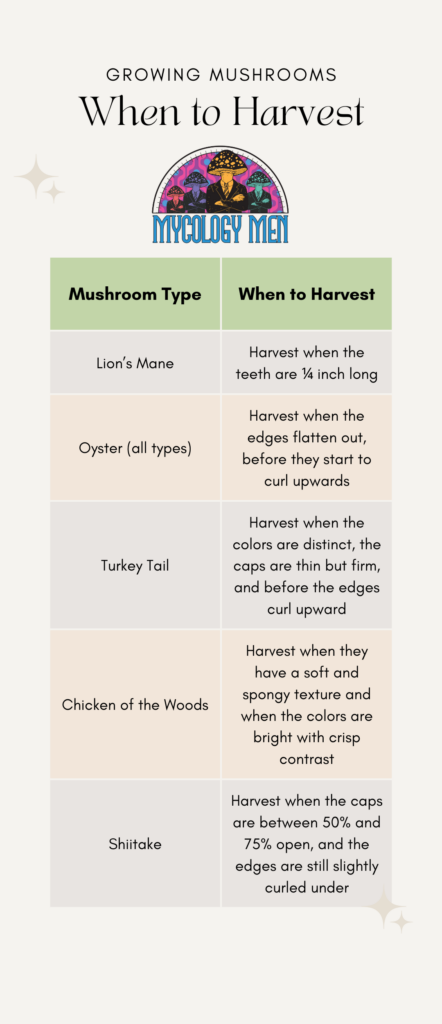
Which mushroom you decide to grow can be based on a few criteria including: time to harvest, materials needed, and difficulty of growing. Growing mushrooms is not an hours or even days long process. This can take months or even up to a year to fully harvest your mushrooms. Here is a quick guide to help you decide which mushroom varieties you want to grow.
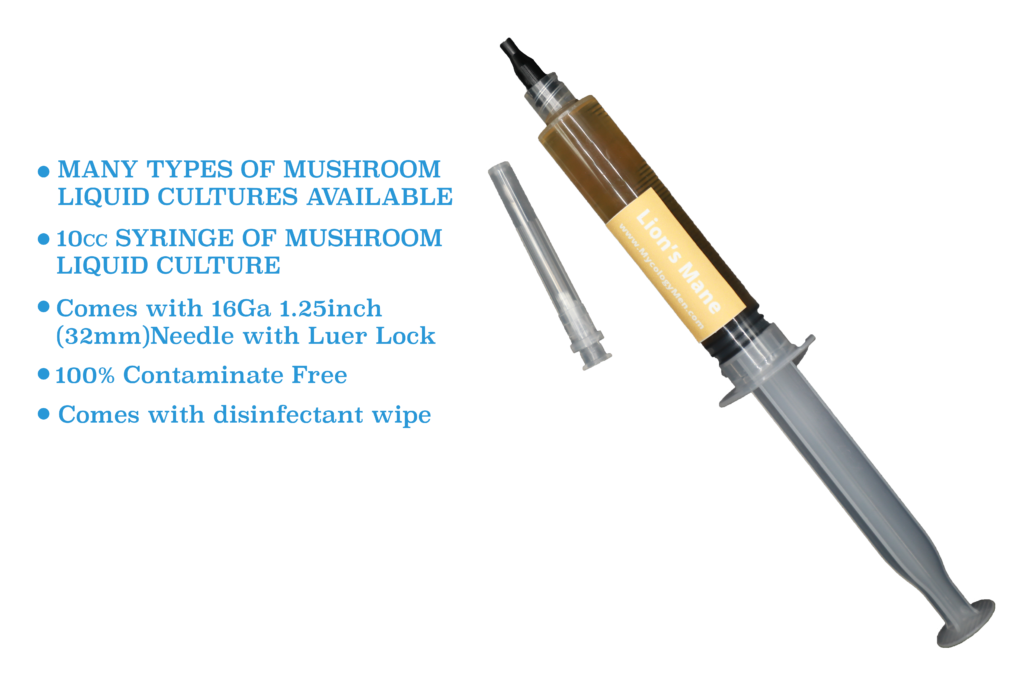
Here we are going to outline the materials and supplies you will need to successfully grow your mushrooms at home. It all starts with the liquid culture. A liquid culture is a sterile nutrient liquid containing live mushroom mycelium. It is basically your mushroom starter pack. You can buy mushroom liquid cultures online from reputable retailers.
After sourcing your liquid culture, you will need grains and a grow bag. The most commonly used grain is rye grain. You will also need a mushroom grow bag with an injection port. You can either buy the grains and mushroom grow bag separately or you can find pre-filled grow bags. Either option is viable.
Finally, you will need the specific substrate that works best for the mushroom variety you chose (see the chart above) and a bucket in which you will grow the mushrooms. The bucket needs to have a lid and holes. The lid will hold moisture and keep the temperature consistent. The holes will allow excess moisture to escape.
Once you have your bucket, it is important to drill some ¼ inch holes about 4 inches apart spreading across the middle and upper portions of the bucket. These holes should be covered with micropore tape. You should drill some more holes towards the bottom of the bucket and leave them uncovered. These bottom holes will allow excess moisture to escape.
Supplies:
Which Substrates Work with Which Mushrooms
Substrate Overview (by Composition)
| Substrate Type | Base Ingredients | Ideal For | Notes |
| Straw (Pasteurized) | Wheat, oat, or barley straw | Oysters, Golden, Pink | Cheap, forgiving; best for beginners |
| Master’s Mix (Sterilized) | 50 % hardwood sawdust + 50 % soy hulls | Lion’s Mane, King Oyster, Reishi | High yields; requires sterilization |
| Hardwood Sawdust + Bran | 80 % sawdust + 20 % wheat/rice bran | Shiitake, Turkey Tail, Reishi | Classic woodlover substrate |
| Compost + Casing Layer | Horse manure compost + peat/vermiculite casing | Button, Portobello | Requires precise composting |
| Brown Rice + Nutrients | Brown rice + sugar + yeast | Cordyceps militaris | Lab-sterile process only |
| Paper/Cardboard | Shredded cardboard or paper pulp | Oyster species | Eco-friendly, lower yield |
| Coffee Grounds (Mixed) | Coffee + straw/sawdust | Oysters | Supplementary use only; can contaminate easily |
If you purchased your grains separately from the grow bag, then you need to sterilize the grains before using them. This is a pretty simple task, but it requires a pressure cooker and a heat sealer. Optionally you can supplement your grains with gypsum. Adding gypsum to the grains reduces clumping of the grains and gives the mycelium extra nutrients to promote healthier and quicker growth.
Use the calculator above to calculate exactly how much gypsum and water you need based on how much grains you have.
Here is a quick recipe you can follow to supplement your grains:
Rye grains: 500g
Gypsum: 5g
H2O: 320g
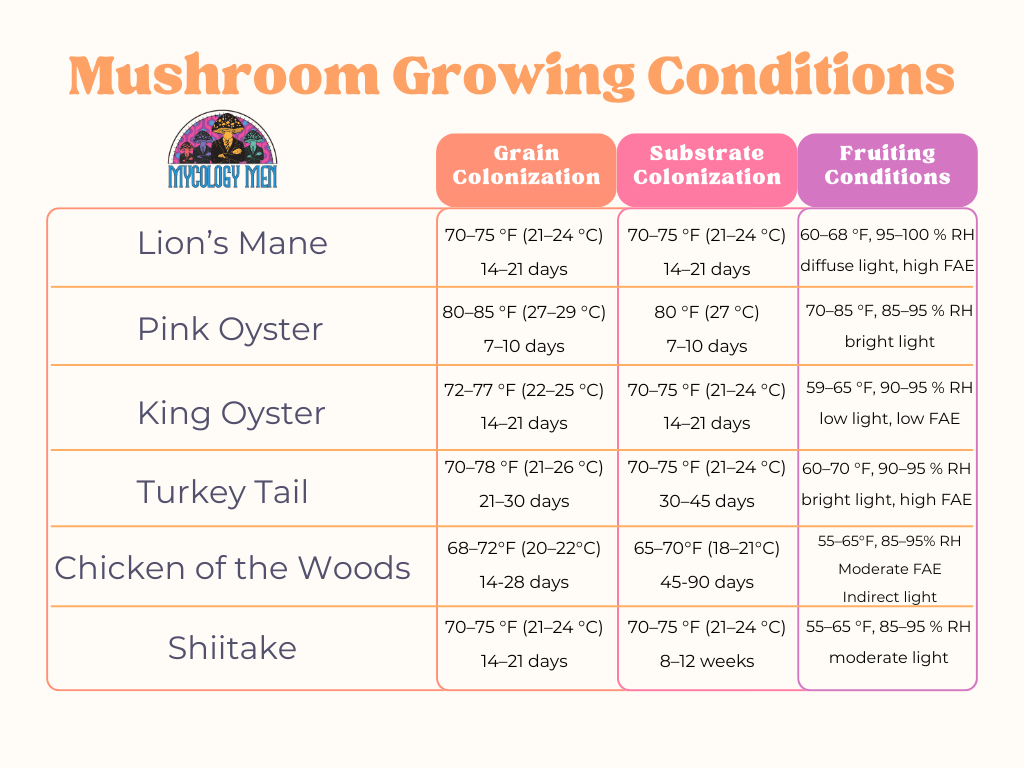
The perfect growing environment for mushrooms is one where you can accurately control both temperature and humidity. The exact temperature range will depend on the type of mushroom you are growing. Take a look at this quick chart to help you figure out your specific needs.
Now that all the set up is done, it is time to start to growing-process! This is where the fun really begins.
Now that you have your liquid culture, sterilized grains, and mushroom grow bag, it is time to sterilize your materials and work station. This step is of the utmost importance. Mycelium is just one tiny part of an entire ecosystem of microorganisms and they are all fighting for the same resources to grow. If your materials and work station are covered in bacteria, it is likely the mycelium will lose the battle for resources and either not grow at all or grow with significant contamination.
Here are some steps you can take to ensure a clean work space:
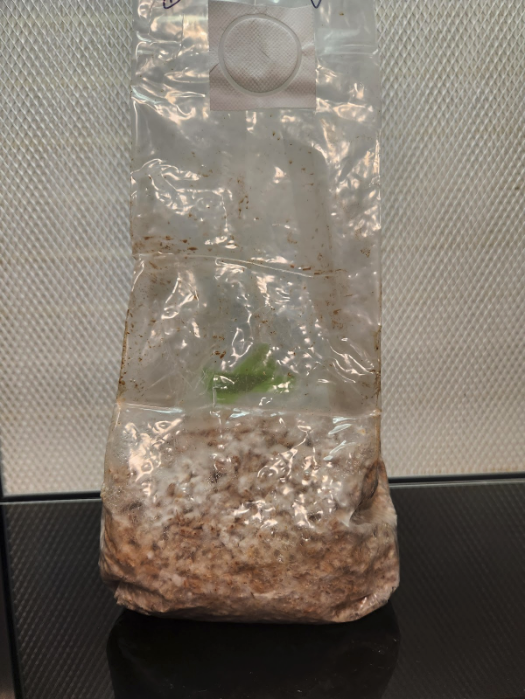
If you are using a new needle it should be sterile and can be used directly out of the packaging. If you are reusing a needle, use a flame to sterilize the needle and let cool before injecting into grains. Use an alcohol wipe to clean the injection port of your bag before injecting. Remember, contamination is your biggest enemy! It is best to wear nitrile gloves while doing this whole process.
Inject 3mL of liquid culture per pound of grain. So if you have a 3lb grain bag, inject 9mL of liquid culture.
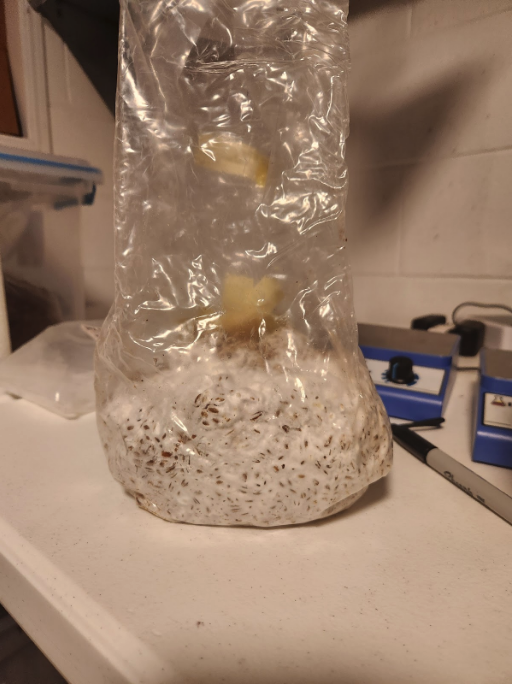
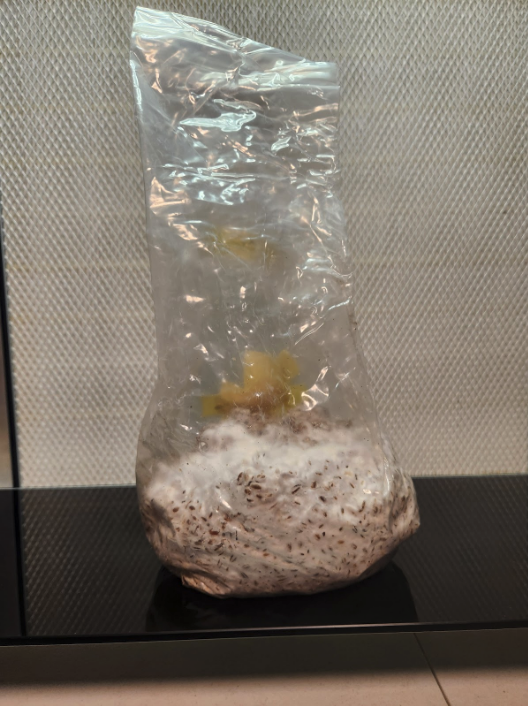
To spread the mycelium from the liquid culture evenly through the grow bag, give the grow bag a good shaking.
Now the mycelium will begin to grow over a few days. Once you see about 30% colonization, give the bag another good shake to spread the mycelium again. You can repeat this step when the bag has reached about 80-90% colonization.
Finally, once the bag has fully colonized, practice a bit of patience and wait a week to make sure the interior grains have colonized as well.
As we have mentioned multiple times during this article, bacteria and mold are the enemy when it comes to growing mushrooms. They compete for limited resources and can beat out mycelium. To fight against bacteria and mold, there are two options for your substrate. Either sterilize it (kill everything and start with a blank slate), or pasteurization (kill bad microbes, but leave some beneficial ones).
Which you use mostly depends on the substrate you are using. Nutrient-rich or finely processed substrates must be sterilized. Bacteria and mold thrive on nutrients. Low-nutrient and fibrous substrates can be pasteurized.
Here is a quick guide to help you determine which method to use:
| Mushroom | Substrate | Sterilize or Pasteurize? |
| Pink Oyster | Straw / sawdust+bran | Pasteurize / Sterilize |
| Lion’s Mane | Hardwood sawdust | Sterilize |
| Turkey Tail | Chips | Pasteurize |
| King Oyster | Master’s Mix | Sterilize |
| Chicken of the Woods | Sawdust blocks | Sterilize |
| Shiitake | Sawdust blocks | Sterilize |
Use your pressure cooker to sterilize the substrate. Place them inside at 15psi for 2.5 hours. Follow the manufacturer's instructions for using the pressure cooker. It usually involves about ½ inch of water at the bottom to produce the steam.
No dripping
Squeezed handful releases only a few drops
With fully colonized grains, it is time to transfer everything to your bucket filled with substrate. Remember to drill the appropriate holes in the bucket and cover the upper and middle holes with micropore tape. Here are the steps we outlined in the Supplies section above: “¼ inch holes about 4 inches apart spreading across the middle and upper portions of the bucket. These holes should be covered with micropore tape. You should drill some more holes towards the bottom of the bucket and leave them uncovered. These bottom holes will allow excess moisture to escape”.
Refer to the table above in the Choose Which Mushroom(s) to Grow section to find which substrate works best for your mushroom variety.
Mix the colonized grains with the substrate in a 1:2 ratio. This means using double the amount of substrate than the amount of grains. For example, a 3lb grain bag needs 6lb of substrate. Cover your bucket top with a lid. Make sure to break up clumps of grain and fully mix into the substrate to ensure full colonization
Leave the filled buckets in your growing environment with proper temperature and humidity levels. You can refer to the Create the Perfect Growing Environment section above for specifics. Here is a summary: warm and dark place, 70-80℉, 90-95% humidity
Once the substrate has fully colonized, it is time to make it fruit. Just remember to be patient, the colonization process can take a few weeks. To induce fruiting, remove the micropore tape from the buckets upper and middle holes. This will allow airflow which is important.
You want to keep the bucket in a highly humid environment (~90% humidity). If you find the substrate is drying out at all, you can spray the holes with a fine mist. You should also introduce indirect sunlight to whichever room the bucket lives.
After about a week in this environment, you should see the mushroom “pins” start to appear. This is a great sign! After about another week, you will see full mushroom clusters begin to form. You're nearly there!
Harvesting your mushrooms is as simple as grabbing and twisting them loose or using a sharp knife (like this mushroom knife) to cut them at the base. There are some things you can look for to help you determine when the mushrooms are ready for harvest. When done correctly, the substrate will fruit multiple times!
Your mushrooms should fruit multiple times as long as you have set everything up properly and harvested them without too much disturbance. To help with more fruiting, you can spray mist onto the hole openings of your bucket after each harvest.
If your liquid culture or grain have bacteria, then you are most likely doomed from the start. Check if the grains are wet and slimy or smell bad. If there is no colonization after 2 weeks, you probably had contaminated liquid culture or grains,
You need just the right amount of humidity. Too wet and the grains will burst and bacteria will run rampant. Too dry and the mycelium will struggle to colonize.
You need just the right temperature for mycelium to thrive. Too cold and it will not grow. Too hot and bacteria will take over and mycelium will die.
If you do not sterilize properly, bacteria will thrive. This is true for both your grains and work space.
Mycelium requires oxygen to grow. If there is no airflow, the mycelium will not grow. Check for clogged vents and holes. Breathable micropore tape is considered a must-have.
If you fail to shake and disperse the grains after about 30% colonization, growth will slow significantly.
If air is not flowing, CO2 is building up and this will prevent fruiting.
High humidity is a must. Usually 90% or more. Anything lower and you risk aborting the fruiting stage.
Light is what tells the mushrooms it is ok to start fruiting. Without light, they will not enter the fruiting stage.
Mushrooms are pretty specific with the temperatures they will grow in. Check the chart above in the Perfect Growing Environment section for specifics relating to the type of mushrooms you are growing.
Keep that substrate moist or it will not fruit! You can use a spray mist to keep the substrate moist.
Be sure to check the chart in the section Purchase Liquid Cultures and Other Supplies above to see which substrate pairs with which mushroom varieties.