July 26, 2022

Learn How to Make Agar at Home

The Complete Guide: How to Make Agar at Home

How to Make Agar at Home by Mycology Men

What is Agar and Why is it Used in Mushroom Cultivation?

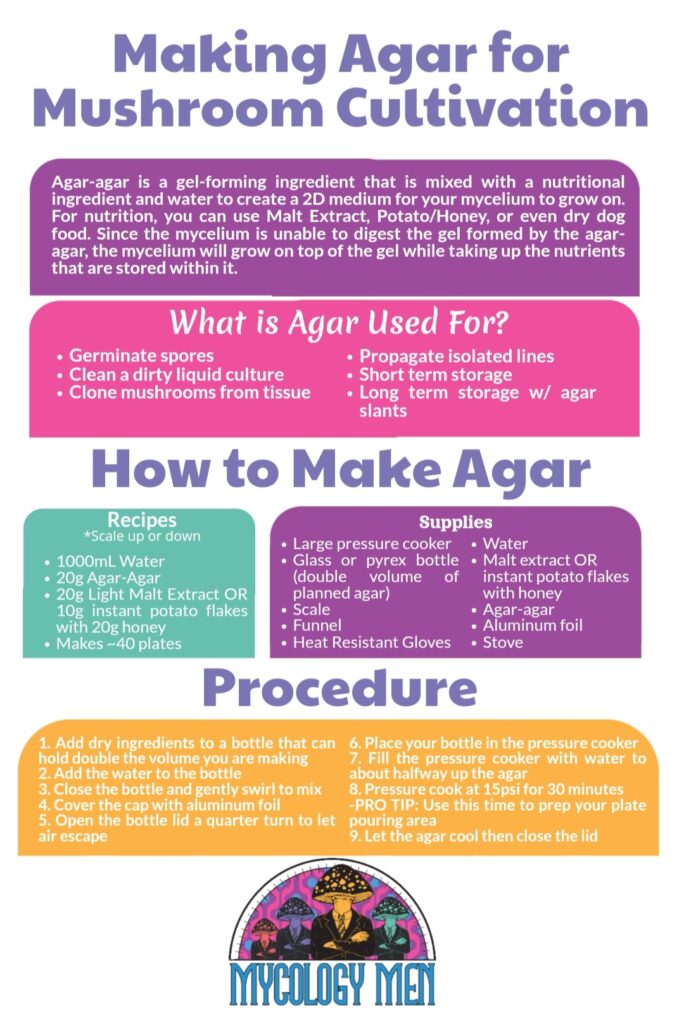
Agar-agar is a gel-forming ingredient that is mixed with a nutritional ingredient and water to create a 2D medium for your mycelium to grow on. There are many different ingredients that can be used as nutrition in agar; some of the most common recipes include Malt Extract, Potato/Honey, or even dry dog food.

Since the mycelium is unable to digest the gel formed by the agar-agar, the mycelium will grow on top of the gel while taking up the nutrients that are stored within it. This characteristic makes agar plates very useful in mushroom cultivation. 

Agar plates can be used to germinate spores from a Multispore Syringe, clean up a dirty liquid culture, clone mushrooms from living tissue, and propagate specific lines you’ve isolated. They also serve as a short-term storage solution, since you can store mycelium on agar plates in the fridge for months. For a long-term storage solution, you can use your agar to make agar slants.

An agar slant is agar cooled in a test tube at an angle, providing a sloped surface for the mycelium to grow on. The small amount of air in the tube and the narrow opening combine to reduce the chances of your agar drying out or becoming contaminated over time. Agar slants have been known to contain viable mycelium even after years of storage in a fridge.

Now let's dive into how to make agar at home...

How to Make Agar at Home: Preparation

Before you start making agar, you want to plan on creating a clean area to pour the agar. After sterilization, it is extremely important to maintain sterility to avoid contamination. Contamination occurs when bacteria, molds, or other microorganisms come into contact with your agar and use the available nutrition to grow and multiply.

The presence of contamination on your plates will make it very difficult to move your mycelium onto grains or into Liquid Culture. Contaminants can be transferred to your agar either by touching it directly with a dirty tool or by floating in the air and settling on your plate.

To avoid directly transferring contaminants onto your agar make sure to wash your hands before doing any sterile work and clean any tools that will come into contact with your agar. This won’t be a problem while pouring, however, once you start transferring mycelium from plate to plate it will be important.

An easy way to quickly sterilize a tool, such as a scalpel or syringe tip, is to heat it over a flame until it becomes red hot. You can also clean tools using 70% Ethanol or 70% Isopropanol, but be careful using these solutions around any flame. 

Avoiding contaminants from the air is harder to do than just cleaning tools. When trying to overcome this problem, the main goal is to prevent microorganisms in the air from coming into contact with your agar. Three ways to minimize contamination are working in a Still Air Box (SAB), pouring around a bunsen burner, or in front of a laminar flow hood.

A SAB creates an area you can work in that minimizes the amount of air moving around your workspace, a bunsen burner uses the updraft of the flame to create a small sterile area under the flame, and a laminar flow hood uses a fan and HEPA filter to clean the air before blowing it over your workspace.

Supplies:

  • Pressure Cooker (Needs to be big enough to hold your glass bottle)
  • Glass or Pyrex bottle to hold agar mixture (Use a bottle that can hold double the volume you plan on making and can withstand pressure cooking)
    • Examples: Mason jar, liquor bottle, Erlenmeyer flask, Pyrex bottles 500mL or 1L
  • Scale 
  • Funnel
  • Heat resistant gloves
  • Water (Can use tap, distilled or purified)
  • Malt Extract or Instant Potato Flakes and Honey
  • Agar Agar
  • Aluminum foil
  • Stove

How to Make Agar at Home: Recipes

Below are two agar recipes that I have had success with. Keep in mind that there are many other recipes out there, but any recipe will work with this protocol. All recipes can be scaled up or down depending on the volume you need, and each plate should be filled with 20-25mL of agar. 

Malt Extract Agar (MEA)

Water1000 mL250 mL
Agar Agar20 g5 g
Light Malt Extract20 g5 g
# of Plates~40~10

Potato Dextrose Agar (PDA)

Water1000 mL250 mL
Agar Agar20 g5 g
Instant potato flakes10 g2.5 g
Honey20 g5 g
# of Plates~40~10

Procedure

1. Add dry ingredients to the bottle.  

  • Make sure to use a bottle that can hold double the volume you plan on making.

Making Agar at Home: Adding Dry Ingredients

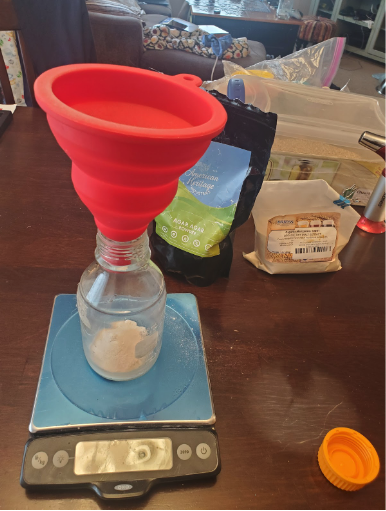
2. Add the water to the bottle.

3. Close the bottle and swirl to mix ingredients.

  • Avoid having the mixture go towards the mouth of the bottle.

4. Cover cap with aluminum foil. 

  • This is to make sure water doesn't go into the bottle during sterilization in the pressure cooker, so let the foil overhang the lid by a few inches.

Making Agar at Home: Cover Cap with Aluminum Foil

5. Open the lid of the bottle a quarter turn to let air escape during sterilization.

  • This is important so that the bottle doesn’t explode.

6. Place the bottle in a pressure cooker making sure it is secure and will not fall over.

  • If your bottle doesn’t fit standing up you can use glass jars to tilt the bottle up to about 45°
  • Make sure to add enough water to the pressure cooker. I usually go up to about half the height of the agar.

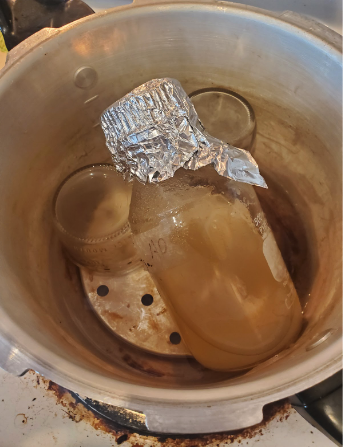
7. Pressure cook at 15 psi for 30 minutes.

  • Use this time to prepare your pouring area if you plan on making plates or slants right after sterilization.

8. Let agar cool until it can be handled safely. Fully close the lid.

  • Agar will stay liquid until ~108℉ (42℃)
  • Agar can be cooled to a solid and then reheated later to pour.
    • Remember to loosen the cap a quarter turn before heating up.

How to Make a Still Air Box for Making Agar at Home

how to make still air box
Maing Agar at Home: How to Make a Still Air Box by The Mycology Men

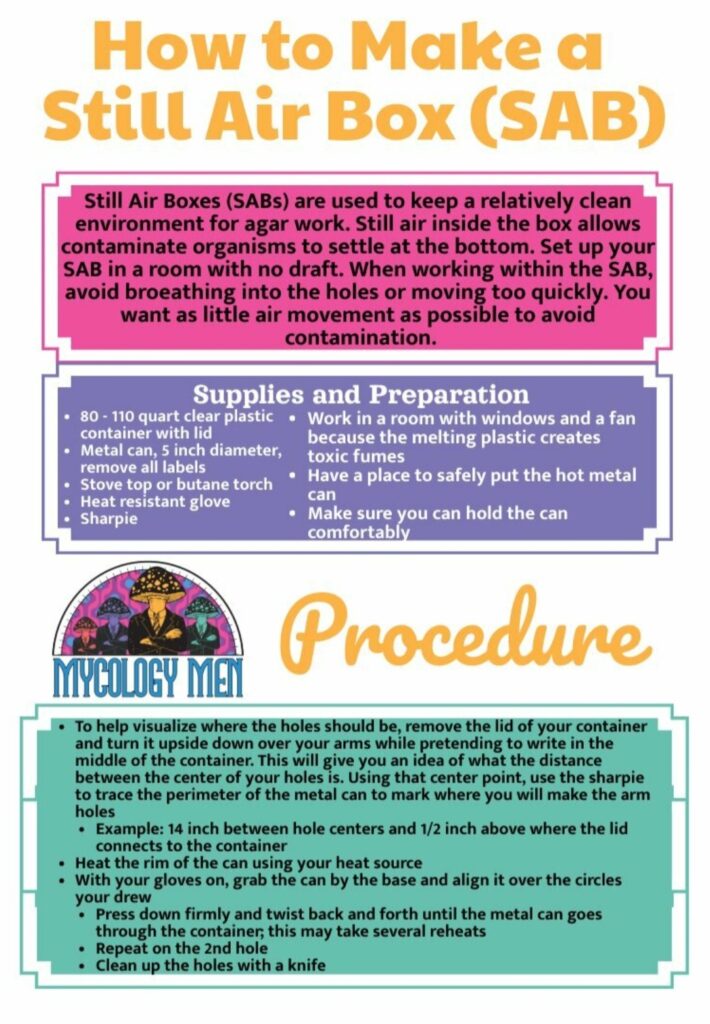
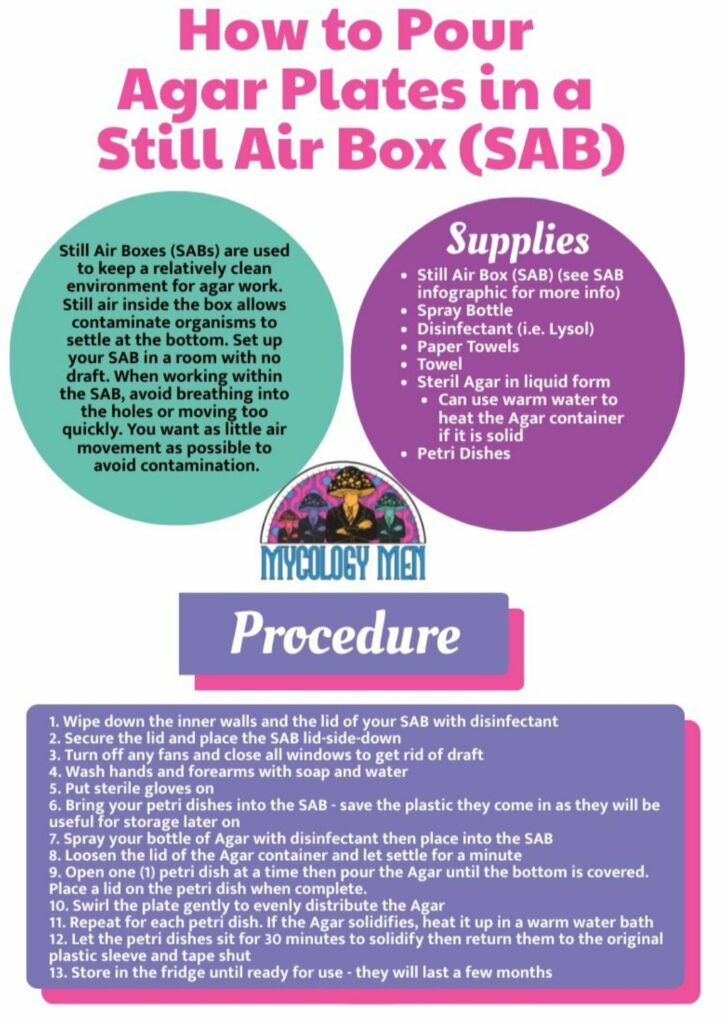
A SAB is a convenient and cheap way to create a relatively clean area to do agar work. It is made by cutting holes in a large storage container so you can stick your hands in and work within it. The idea behind a SAB is that if the air in the box is not moving, the organisms floating within the container will settle to the bottom.

After a few minutes, you will be able to work in clean air within the box. Keeping the air within the container as still as possible is the most important thing when using a SAB. When choosing where you are going to work, make sure it is not a drafty area and turn off any fans running in the room.

Besides setting up in a draft free area, the most important thing to focus on is minimizing the effect you have on the still air. Your breathing can cause air to flow into the SAB, so avoid breathing directly into the holes and wear a mask, if possible.

Moving your hands within the SAB will cause air movement and may bring in some outside air; move slowly and deliberately while working. Also be aware not to move your arms or hands directly above any open agar or grains.

We are constantly shedding contaminants from our skin that may drop down and settle on your plate. Being aware of your movements while working is an important skill to develop in any aseptic technique. 

Supplies:

  • Clear, plastic storage container with locking top, between 80 to 110 quarts
    • A larger height and wider base container is best
  • Metal can with at least 5” diameter for making holes
    • Remove anything flammable (e.g., labels, stickers) from your can
  • Heating element 
    • Examples: Butane torch, Stovetop
  • Sharpie
  • Heat resistant gloves for holding and moving hot can

Making Agar at Home: Making a Still Air Box Supplies

Preparation 

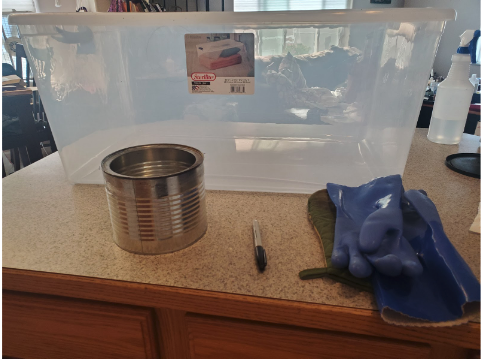
First, you must prepare to safely make the arm holes. You will have a very hot metal can, so you must be able to comfortably hold it and move it with the gloves you are using. Ensure you also have a place to let the container cool.

Putting it in a sink or laying it on some towels are some options that have worked for me. The melting plastic from making the holes will create toxic fumes, so I recommend opening windows and turning on nearby fans to get some air flowing.

Before heating anything up, you should mark where the arm holes will go. You will need to comfortably put both of your arms in the SAB and manipulate items near the center of the work space. To help visualize where the holes should be, remove the lid of your container and turn it upside down over your arms while pretending to write in the middle of the container.

This will give you an idea of what the distance between the center of your holes is. Using that center point, trace the perimeter of the metal can to mark where you will make the arm holes. I made my SAB with 9” between the edges of the holes and 1/2” above where the lid meets the container.

Procedure

1. Once your holes are marked, set your container on a table with the marked holes facing up.

Still Air Box Procedure

2. Heat up the rim of the can.

Heat up rim of can

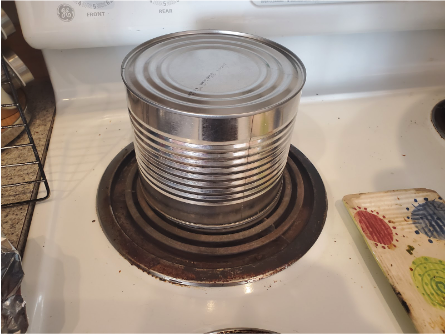
3. Once hot enough, use your gloves to grab the can from the base. Place the rim over your marked holes.

4. Gently push down on the can and slightly twist back and forth until it goes through the wall of the container. (You might have to reheat the can multiple times and repeat this process until it’s fully through.)

Push Down Can

5. Pull the can out of the container and set down on your cooling area. 

  • If there is still a small part of the plastic disk attached to the container, use a knife to cut through the remaining plastic.
Cutting Through Plastic Container

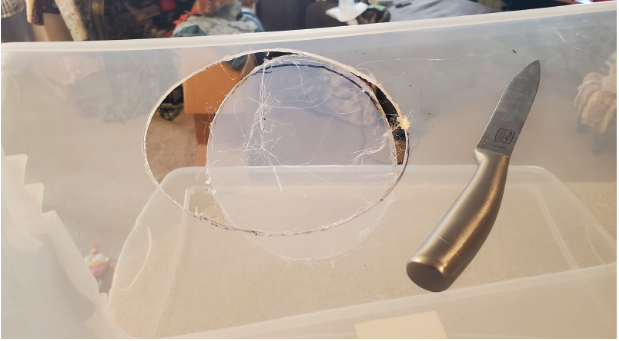
6. After cooling, remove any plastic that is stuck to the can and then repeat the process to make the second hole.

Cutting 2nd Hole Still Air Box

How to Make Agar Plates for Making Agar at Home

how to make agar plates
Making Agar at Home: How to Make Agar Plates by The Mycology Men

Supplies: 

  • Still Air Box (SAB)
  • Spray Bottle for disinfectant
  • Disinfectant
    • Lysol, 10% Bleach, 70% Ethanol, or 70% Isopropanol
  • Paper Towels
  • Towel (optional)
  • Sterile Agar
  • Petri Dishes

Procedure

  1. Wipe down the inner walls and the lid of the SAB with your disinfectant.
    • I recommend 10% bleach or lysol. 70% ethanol or isopropanol can be used, but the fumes from these solutions create a potential hazard while working near a flame.
  2. Secure the lid of the container and place lid side down on your working space. Shut off all fans and avoid any drafty areas.
    • For added sterility, you can soak a towel in 10% bleach, wring it out, and place it inside on the lid to be used as your work surface. This will ensure that even if you drop something it will stay sterile.
  3. Wash your hands and forearms with soap and water.
    • You can put on gloves after cleaning for added sterility.
  4. Bring your dishes into the SAB and stack them.
    • Save the sleeve the dishes came in to store the poured agar plates in later.
  5. Spray down your bottle of agar with disinfectant and bring it into the SAB.
  6. Loosen the lid of the agar bottle and let sit for a couple seconds to allow air to settle.
  7. Open one dish at a time and pour until the bottom is covered, then re-cover the dish with its lid.
    • Swirl dish after pouring to evenly distribute agar and remove any bubbles.
  8. Repeat for each dish creating stacks as you go to avoid crowding the work area.
    • If agar solidifies in the bottle while pouring you can melt the agar by heating it up in hot water. Make sure not to let water near the neck or top of the bottle.
  9. Let agar plates sit for about 30 minutes at room temperature to solidify.
  10. Once solid, return the agar plates to the original sleeve and tape it shut.
  11. You can store agar plates in the refrigerator for a few months until ready for use.
    • Store plates upside down to avoid condensation on the agar.

Pouring Agar Plates Using a Bunsen Burner
Making Agar at Home: Pouring Agar Plates Using a Bunsen Burner

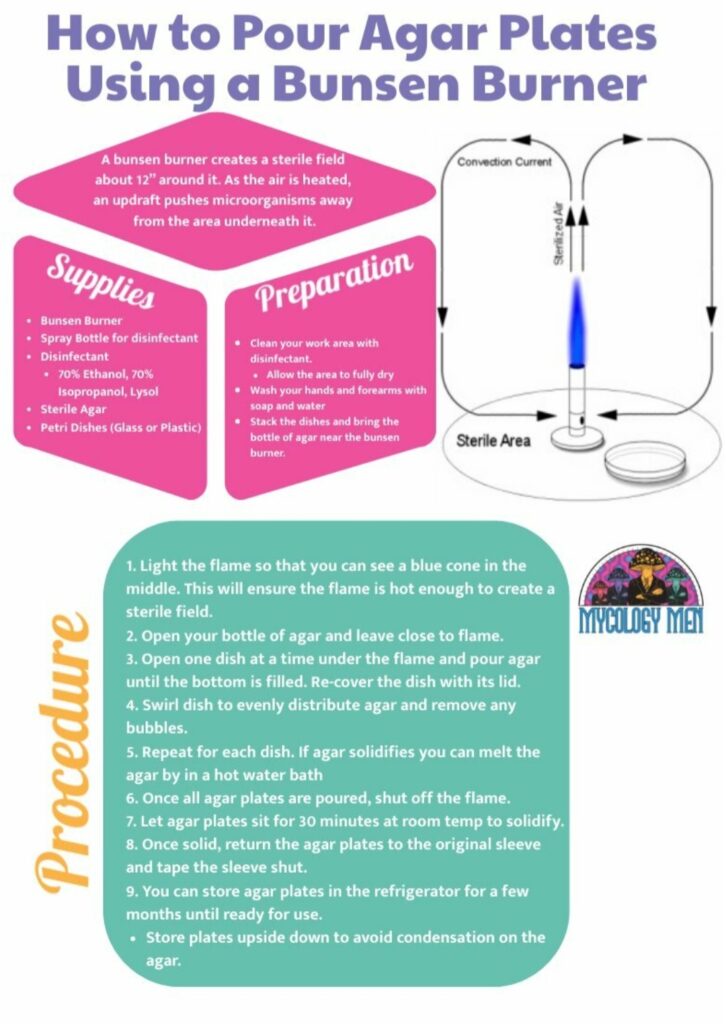
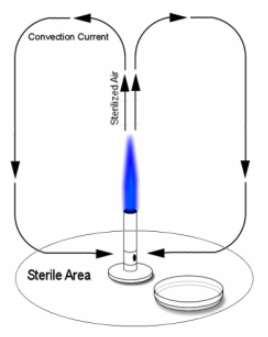
With a hot enough flame, a bunsen burner creates a sterile field about 12” around it. As the air is heated it rises and creates an updraft that pushes microorganisms floating around the flame upward and away from the area underneath it. As you're working under the flame, you will want to minimize any movements that disrupt these air currents. 

Supplies: 

  • Bunsen Burner
  • Spray Bottle for disinfectant
  • Disinfectant
    • 70% Ethanol, 70% Isopropanol, Lysol
  • Sterile Agar
  • Petri Dishes (Glass or Plastic)

Preparations

  1. Clean your work area with disinfectant.
    • Be sure to allow the area to fully dry before lighting a flame.
  2. Wash your hands and forearms with soap and water.
  3. Stack the dishes and bring the bottle of agar near the bunsen burner.
    • Save the sleeve the dishes came in to store the poured agar plates later.

Procedure

  1. Light and adjust the flame so that you can see a blue cone in the middle of the flame.
  • This will ensure the flame is hot enough to create a sterile field.
  1. Open your bottle of agar and leave close to flame.
  2. Open one dish at a time under the flame and pour agar until the bottom is filled. Re-cover the dish with its lid and move it to the side.
  • Swirl dish after pouring to evenly distribute agar and remove any bubbles.
  1. Repeat for each dish.
    • If agar solidifies in the bottle while pouring you can melt the agar by heating it up in hot water. Make sure not to let water near the neck or top of the bottle.
  2. Once all agar plates are poured, shut off the flame.
  3. Let agar plates sit for about 30 minutes at room temperature to solidify.
  4. Once solid, return the agar plates to the original sleeve and tape the sleeve shut.
  5. You can store agar plates in the refrigerator for a few months until ready for use.
    • Store plates upside down to avoid condensation on the agar.

Pouring Agar Plates Using Hood Flow
Pouring Agar Plates Using Hood Flow by The Mycology Men

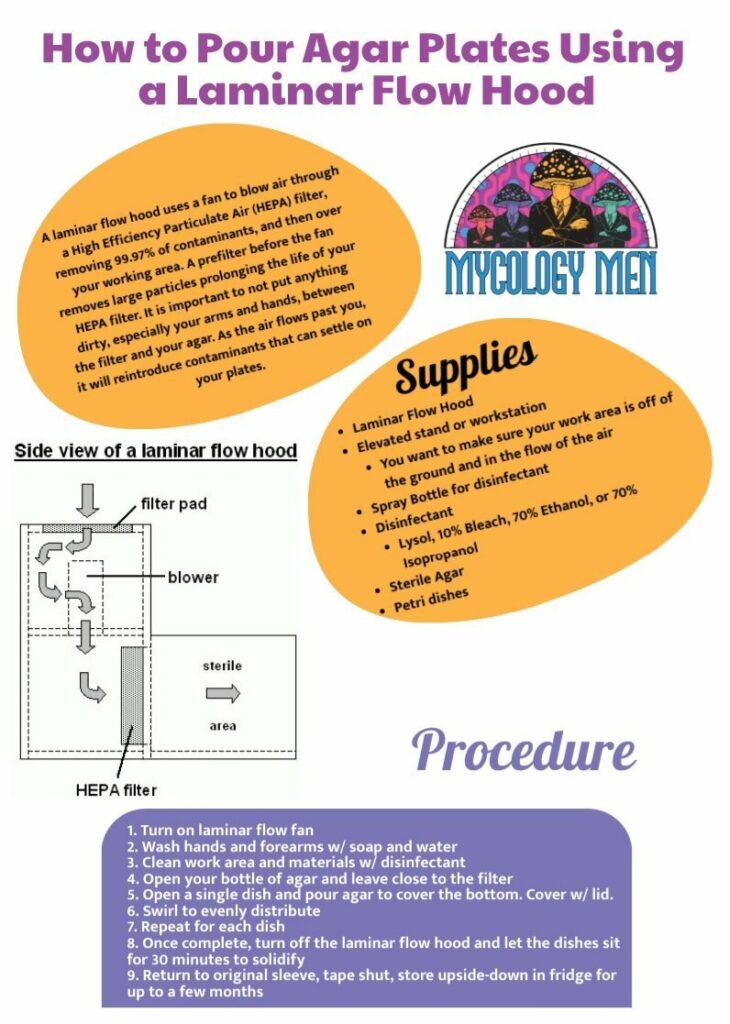
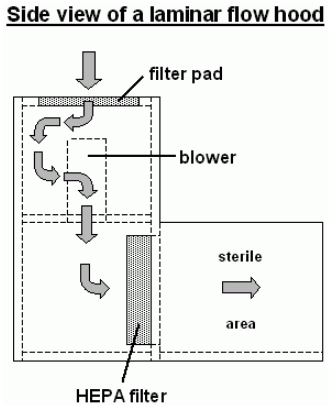
A laminar flow hood uses a fan to blow air through a High Efficiency Particulate Air (HEPA) filter, removing 99.97% of contaminants, and then over your working area. A prefilter before the fan removes large particles prolonging the life of your HEPA filter. It is important to not put anything dirty, especially your arms and hands, between the filter and your agar. As the air flows past you, it will reintroduce contaminants that can settle on your plates.

Supplies:

  • Laminar Flow Hood
  • Elevated stand or workstation
    • You want to make sure your work area is off of the ground and in the flow of the air
  • Spray Bottle for disinfectant
  • Disinfectant
    • Lysol, 10% Bleach, 70% Ethanol, or 70% Isopropanol
  • Sterile Agar
  • Petri dishes

Procedure

  1. Turn on the laminar flow fan and let it run for a couple seconds before beginning.
  2. Wash your hands and forearms with soap and water.
  3. Clean your work area off with your disinfectant.
  4. Wipe down your materials with disinfectant and bring your dishes and agar into the work area.
  5. Open your bottle of agar, but leave it close to the filter.
  6. Open one dish at a time and pour agar until the bottom is covered. Re-cover plate with the lid and move to the side.
    • Swirl dish after pouring to evenly distribute agar and remove any bubbles.
  7. Repeat for each dish making stacks for space, if necessary.
    • If agar solidifies in the bottle while pouring you can melt the agar by heating it up in hot water. Make sure not to let water near the neck or top of the bottle.
  8. Once all agar plates are poured, turn off the laminar flow fan.
  9. Let agar plates sit for about 30 minutes at room temperature to solidify.
  10. Once solid, return the aga plates to the original sleeve and tape shut.
  11. You can store agar plates in the refrigerator for a few months until ready for use
    • Store plates upside down to avoid condensation on the agar.

Eager to learn more about growing mushrooms? Make sure to check out our blog for more guides!

Mycology Men
linkedin facebook pinterest youtube rss twitter instagram facebook-blank rss-blank linkedin-blank pinterest youtube twitter instagram