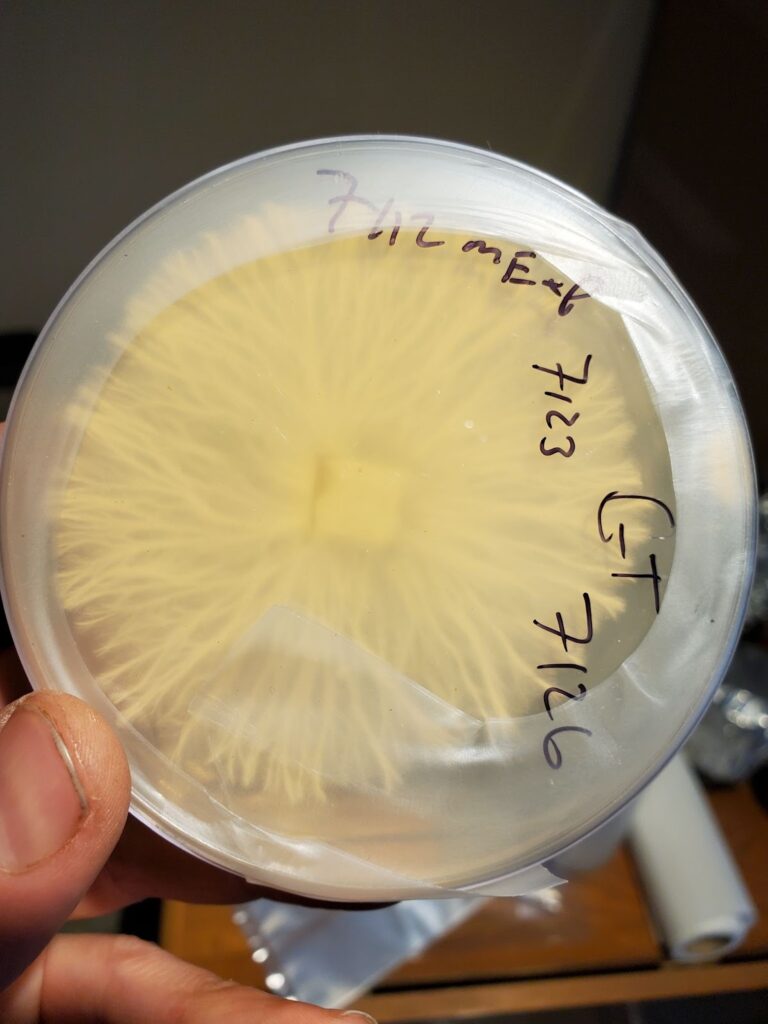
Rhizomorphic mycelium on agar by Mycology Men
Rhizomorphic mycelium and tomentose mycelium sectors are what you see growing on agar plates. They are distinct patterns that are literally the genetics of the mycelium. Strains are expressed visually differently. You may see differences in texture, density, growth speed, and tomentose or rhizomorphic patterns. Analyzing all of the visual clues allows mycologists to isolate specific sectors that are ideal for their goals. This can help you create a line of genetically ideal liquid cultures.
Rhizomorphic mycelium appears strandy (source). You can see distinct strands that make up the mass of rhizomorphic growth. Tomentose mycelium appears cottony. Rather than individual strands like rhizomorphic mycelium, tomentose mycelium is like a big fluffy mass. But which is better for growing mushrooms? We will answer that question and more during this article.
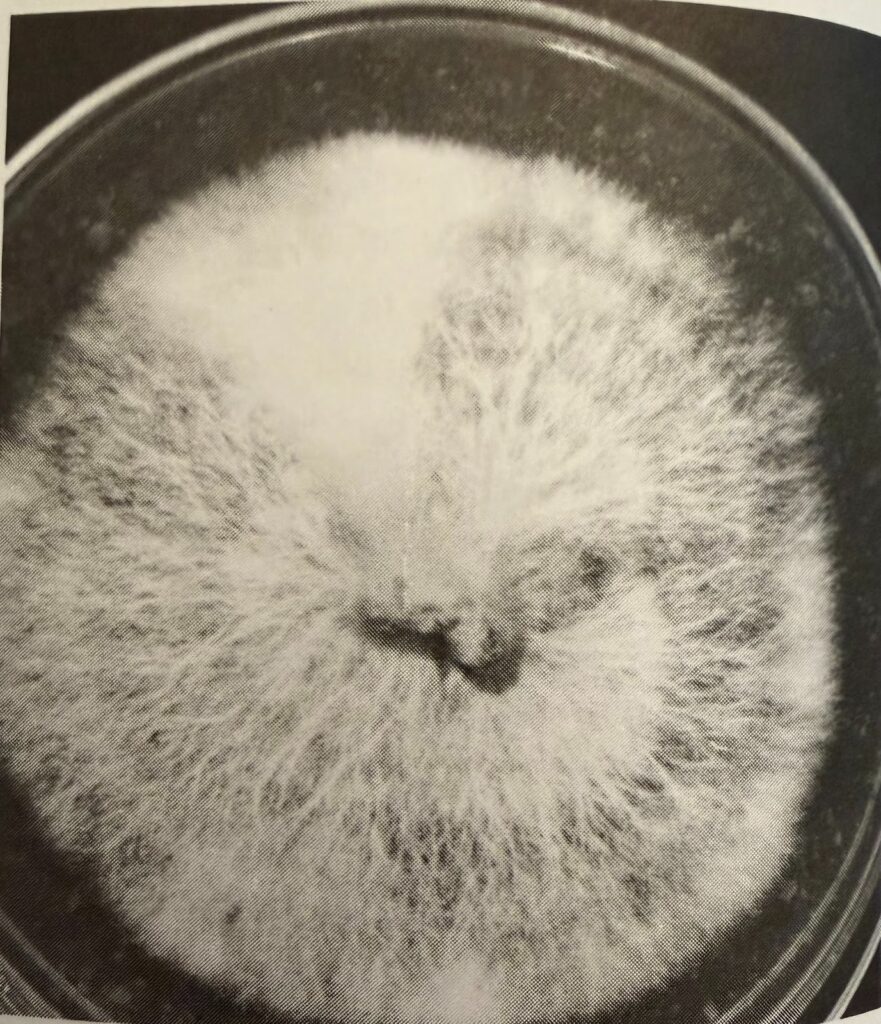
Rhizomorphic mycelia with a cottony sector (up top, slightly left)
(The Mushroom Cultivator, Stamets and Chilton, page 32)
Tomentose mycelium is considered by many to be inferior to rhizomorphic mycelium growth. The cottony and cloud-like sectors can be less aggressive during colonization which means slower growth speed.
With that being said, it does not mean that cottony mycelial sectors are weak or unusable. Tomentose sectors are even expected for some strains of mushrooms like oysters and reishi. They are also more likely to occur when the agar is low on nutrients or in a high humidity environment.
The main thing to look out for is cottony sectors when you were expecting rhizomorphic sectors. This could be an indicator of a number of things. First off, it could mean unstable genetics which is not ideal. It could also mean your mycelium is under stress from the environment. That could be a lack of nutrients, too much humidity, or temperature swings. Finally, it could also be an early indicator of contamination. Regardless of why a cotton sector shows up, if you are working with a strain that is otherwise rhizomorphic, you should be concerned.
So, to answer the question, “is tomentose mycelium bad”, the answer is: not always, but it can be concerning.
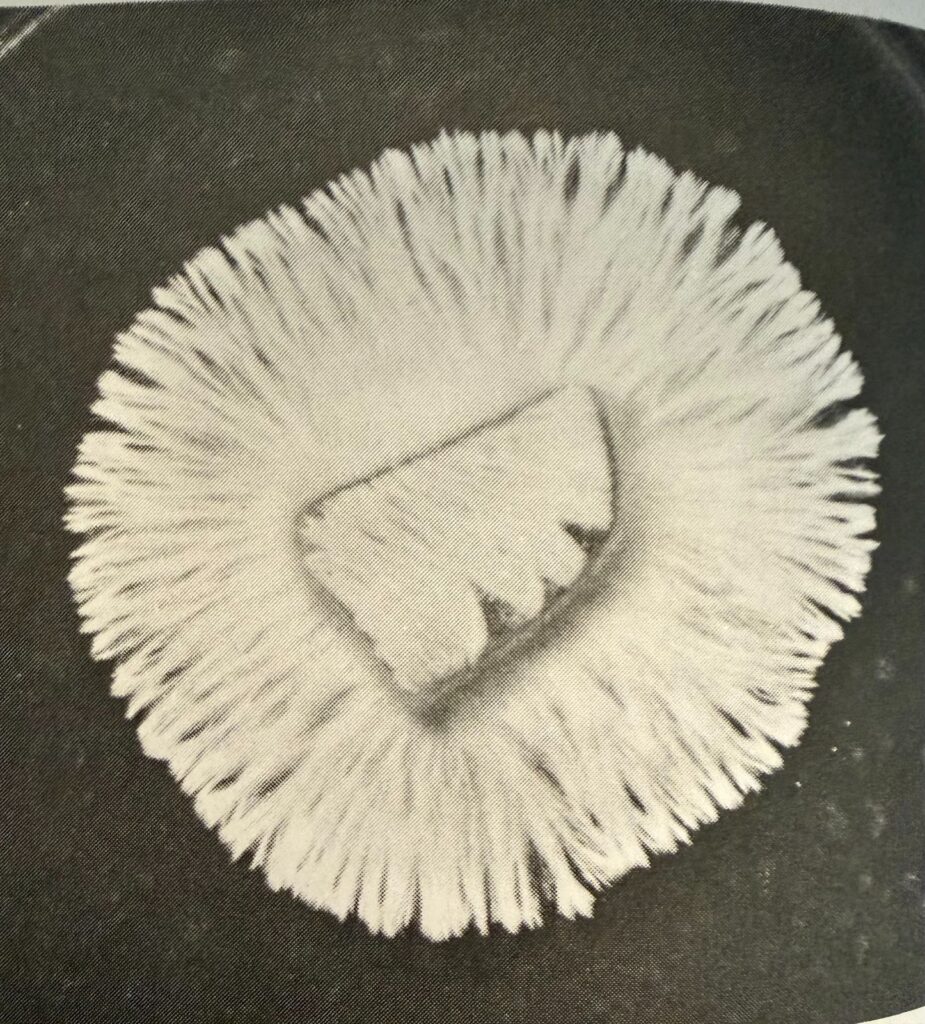
Rhizomorphic mycelia
(The Mushroom Cultivator, Stamets and Chilton, page 32)
Many find that rhizomorphic mycelium sectors are more suitable for their goals. The strandy, root-like sectors of mycelium are generally more aggressive during colonization. Not only that, but it could be an indicator of higher yields (not guaranteed). Rhizomorphic mycelium tends to adapt well to the grains and bulk substrate you will eventually be growing your mushrooms in.
So, to answer the question, “is rhizomorphic mycelium good”, the answer is: mostly yes, but it is not a guarantee of superior genetics.
Sectors of mycelium on agar are expressions of that strain's genetics. Different sectors are different genetics expressing themselves. This is why people use agar; it allows them to isolate specific sectors with traits they find appealing.
But it is important to remember that rhizomorphic mycelium and tomentose mycelium are not guaranteed indicators of a healthy and viable sector. These are great clues, but there are many other factors at play. For example, micro changes in the agar environment could lead to differences between sectors.
Stability, stability, stability. That is what you are looking for in an ideal sector. As we discussed above, many prefer rhizomorphic mycelium to tomentose mycelium, but just because you have a rhizomorphic sector, does not mean it is a good candidate for culture selection. What you really want are stable genetics. This means consistent growth direction, contaminate-free edges, and strong recovery after you have transferred a sector. If there are abrupt texture changes, wet-looking sectors, or uneven growth, you are probably looking at unstable genetics.
Cottony growth (tomentose mycelium) is not all bad! Sometimes it is even exactly what you want. Certain strains like oyster and reishi naturally grow tomentose. Cottony sectors are also known to be contaminant resistant. Now, we just want to be very clear here. Cottony growth can be contaminant resistant, but not because it has stronger genetics, but because cottony growth thrives in the same environment that bacteria and mold do not thrive. You will see tomentose mycelium commonly in environments with high humidity and low oxygen - this just happens to be the exact environment that mold and bacteria dislike. This is part of the reason why many commercial grows look for cottony agar sectors.
Find an agar plate with clean sectors, no contamination, and active growth. You don’t want a plate that is too young or too old. Plates that are too young have not fully developed the different sectors. Plates that are too old may have already exhausted their growth potential. The sweet spot is usually within 3-7 days after inoculation.
First off, sterilize your scalpel with a flame. Make it red hot then let it cool. Now, cut the agar plate from the leading edge of the sector you are targeting. By leading edge, we mean the youngest and therefore most active edge. It is where the mycelium is expanding into new territories.
Cut a wedge about 4mm wide. Transfer the wedge to a fresh agar plate and place it mycelium-side down.
It is best practice to avoid the center of the colonization because this is usually where the older mycelium lives. It will be harder to recover after transfer so it is best to just avoid it all together. It is also more difficult to tell the difference between sectors at the center so you might end up with a mixed bag.
You will never remember all the factors that made you choose that sector unless you practice extensive labeling. Trust us, it will save you headaches down the line. Important notes to label include, the plate ID (ex. Lion’s Mane Plate A), the sector ID (ex. Rhizomorphic leading edge), date you transferred the sector, and any notes you think may be useful (ex. fast growth).
Once you have let your transferred sector expand on a new plate, you can test a wedge in a grain jar. This will help you determine things like the colonization speed. If you are hunting genetics and transferring multiple sectors to multiple clean plates, then run the grain test with identical grain setups. This means using the same grains in the same jars with the same preparations and the same amount of mycelium. Since the only variable is the mycelium you used, this can help you find the best of the best.
Now we are really getting into the part when we find which sectors are worth continuing with. You should track how long it takes for full colonization of grains, how even was the colonization, and visual cues to determine health (ex. no wet spots or weird colors).
It is important to remember that fast growth does not automatically mean that it is the best sector. If it grows fast, but inconsistently, that could mean the genetics are unstable. In most situations, it is better to value consistency over speed. This is what we mean when we say that cottony sectors are not always bad. If they perform well in grain, then stick with them!
Once you have determined which grain tests you want to move forward with, move them to bulk substrate and run the same comparison. Record how long it takes for them to pin, how much you yield, and the quality of what you yield.
Once you have gone through all of this and have finally chosen a sector you want to keep and continue to use, you have to preserve it! Keep the master plate in cold storage, wrapped tightly to avoid contamination. It can also be life saving to make backup plates.
Welcome to the wonderful world of fungi! If you are just getting started on your mushroom journey or a practiced cultivator, knowing the difference between liquid culture vs spore syringe is an essential part of developing a wider knowledge base. Growing mushrooms always begins with one or the other. In this article we will talk about a variety of topics including: what is a liquid culture, what are mushroom spores, what are the differences between the two, which is better for beginners, which work faster, and even how to make liquid cultures from spores. We are so excited to have you along for the ride! Now, let’s get it started on the discussion of liquid culture vs spore syringe!

Photo by Christopher Cassidy on Unsplash
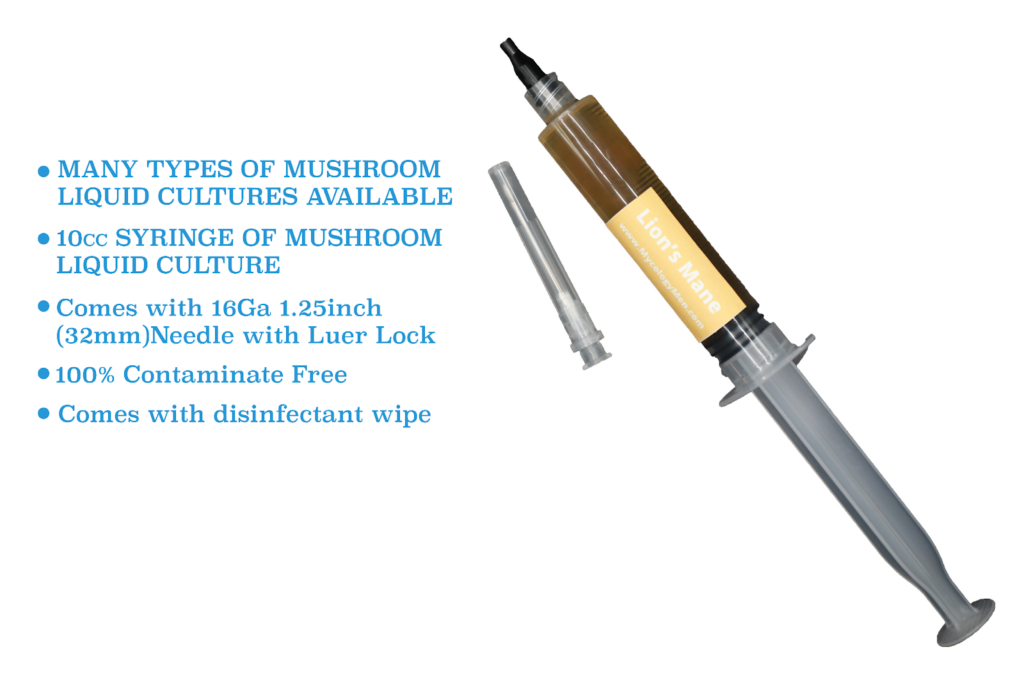
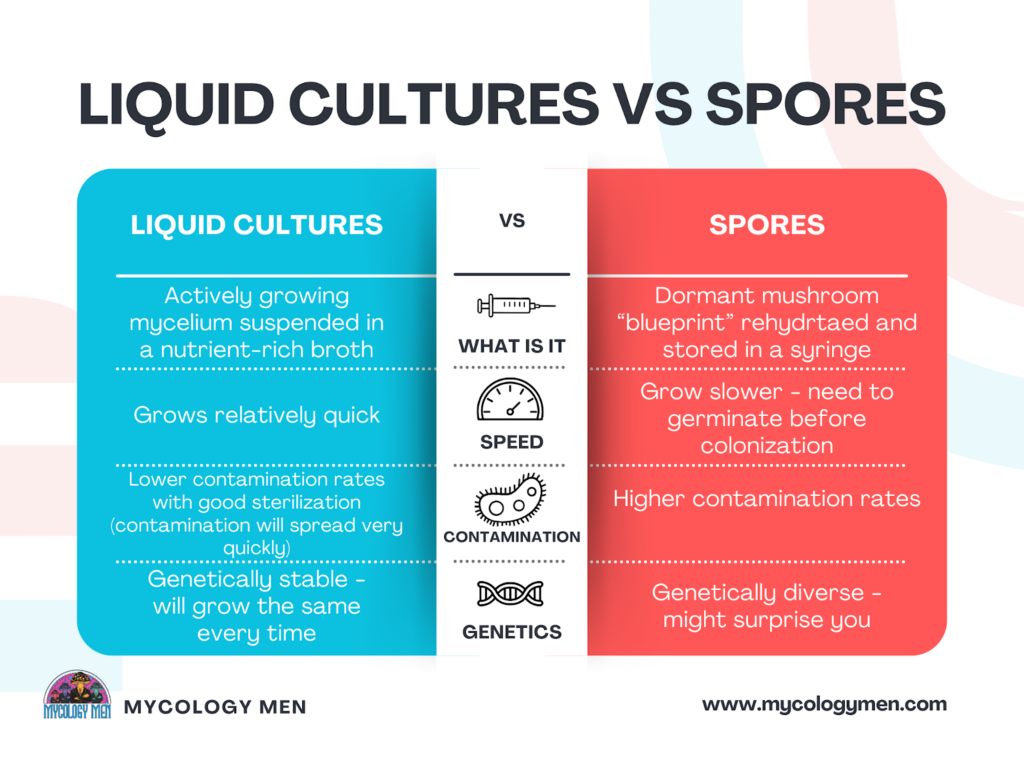
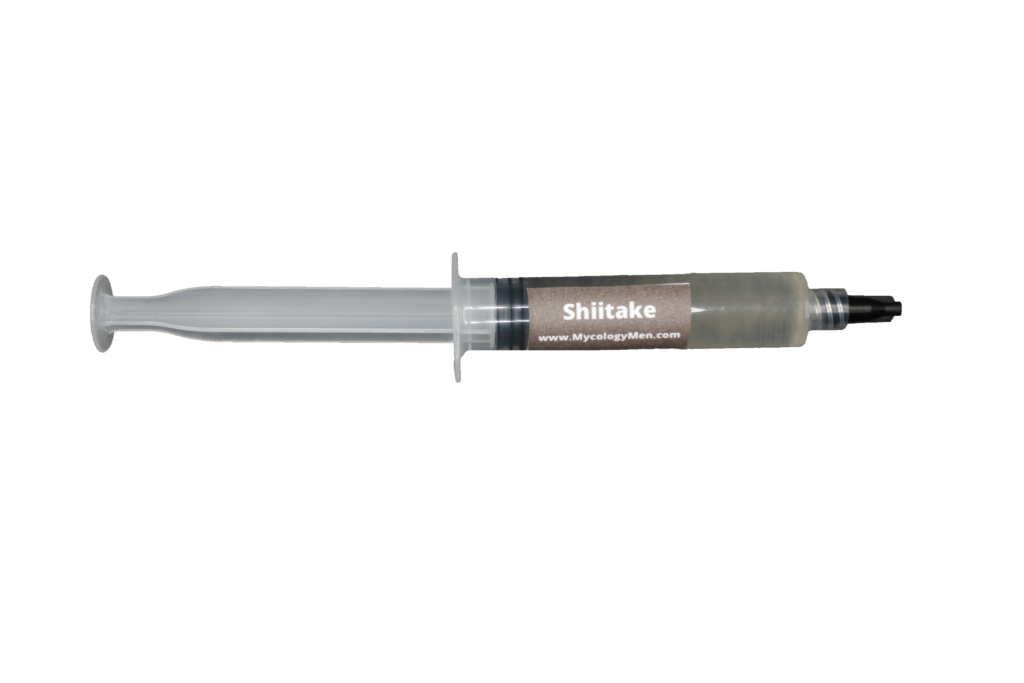
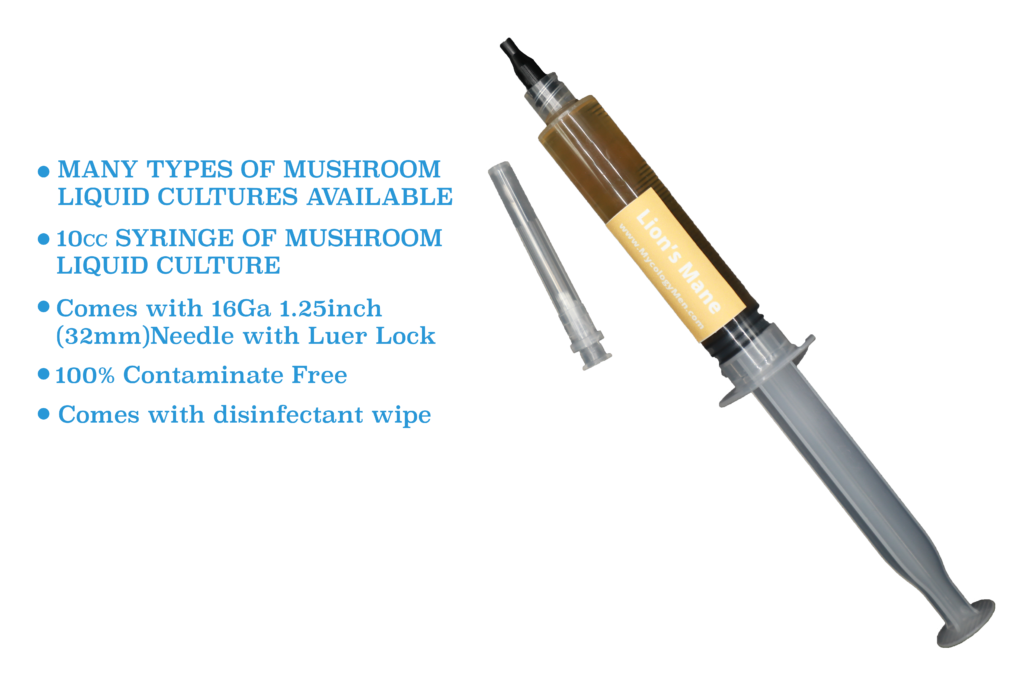
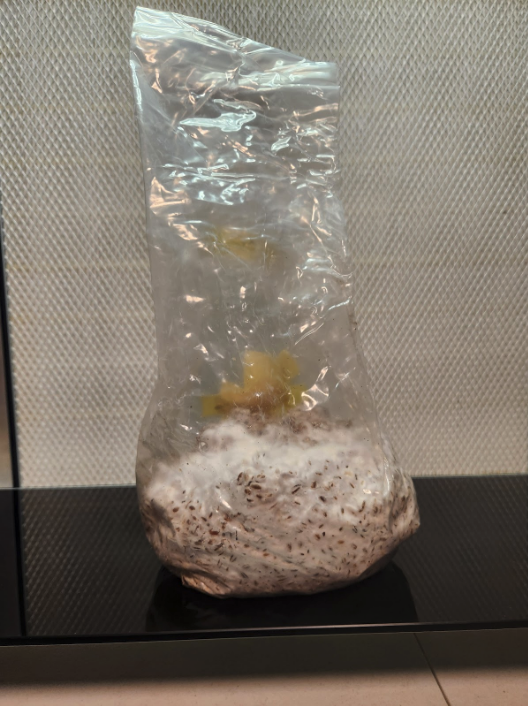
It’s alive! Frankenstein reference aside, liquid cultures actually do contain actively growing mycelium. The mycelium is suspended in a nutrient-rich liquid broth and stored in a large syringe. Inside the syringe you will see a cloudy collection - this is your mycelium! The liquid it hangs out in is a sterile sugar solution which is the perfect environment for mycelium to thrive.
Liquid cultures are preferred by many growers because they colonize faster than spores do (we will get into why that is in the next section). Done correctly with proper sterilization techniques, liquid cultures also have lower contamination rates. Another benefit you may consider is that liquid cultures are genetically stable. This means that each grow will be the same.
The risk with liquid cultures is that if there is bacteria present, the contamination will spread like wildfire. Growers need to really have their sterilization techniques locked in to successfully use liquid cultures.
There is no shortage of producers online with liquid cultures for sale. Try and find a company with good reviews and helpful tips that can guide you on your mushroom growing journey.
Mushroom spores are the blueprint from which your fungi will grow. You can think of them as mushroom seeds (to be clear, they are definitely not seeds, just the starting place for mushrooms). The key difference between mushroom spores and liquid cultures is that mushroom spores are dormant. This means there is no actively growing mycelium present like there is in a liquid culture.
Spores are released from the gills, teeth, and pores of mature mushrooms. Just shaking a mushroom cap can release millions of spores. Each spore contains half of the genetic material necessary to grow a mushroom. Two spores must be matched together before you can start growing mushrooms.
Once the spores are collected on a sterile surface, they can be rehydrated then stored in syringes. People like spores because they have a relatively long shelf life compared to liquid cultures. They are also preferred by some growers because each set of spores is entirely unique. This genetic diversity allows practiced growers to cultivate different lines of the same mushroom strain in which they look for preferred qualities such as harvest yield, grow rate, flavor, and more.
One downside of using spores is the same as what some might consider an upside: the genetic diversity. You never know what you are going to get out of a grow until you actually grow it. While this may be exciting for some, for others it is just a pain. Aside from that, spores will grow slower than liquid cultures because they start as dormant so they need to be germinated. Liquid cultures on the other hand are already actively growing. Finally, spores have a higher contamination rate than liquid cultures.
The answer to this question on liquid culture vs spore syringe really depends on your goals.
If you want fast, reliable, and low-contamination risk growing, use liquid cultures.
If you want to learn sterile techniques and experiment with different genetics, use spores.
As we described above, liquid cultures grow faster than spores, are genetically stable so the results are consistent, and they have a lower risk of contamination (assuming you follow proper sterilization techniques).
Spores on the other hand are genetically diverse so they are great for experimenting with genetic differences within a strain. They also force you to learn about sterilization techniques as contamination is a serious concern.
Spores run a high risk of contamination for a number of reasons. They are definitely more contaminant-prone than liquid cultures. The reason for this is that the spores are more likely to be contaminated during the collection process because this is done out in the open and not necessarily in a sterile environment. Spores then battle for resources with bacteria and mold. And they will lose that battle every single time because spores are dormant and the germination process is quite slow. Not only that, but spore syringes often contain microscopic contaminants already. It is really an uphill battle, but it can be done with proper training and techniques.
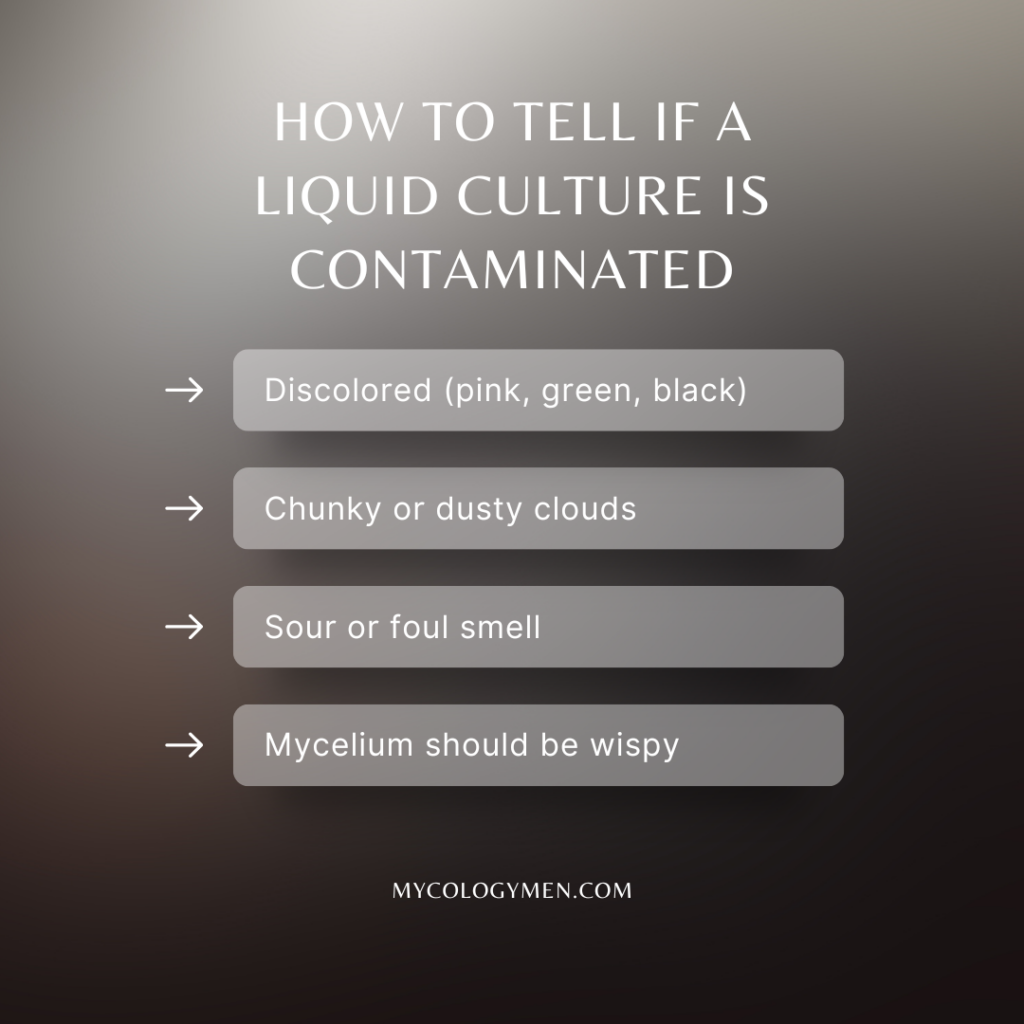
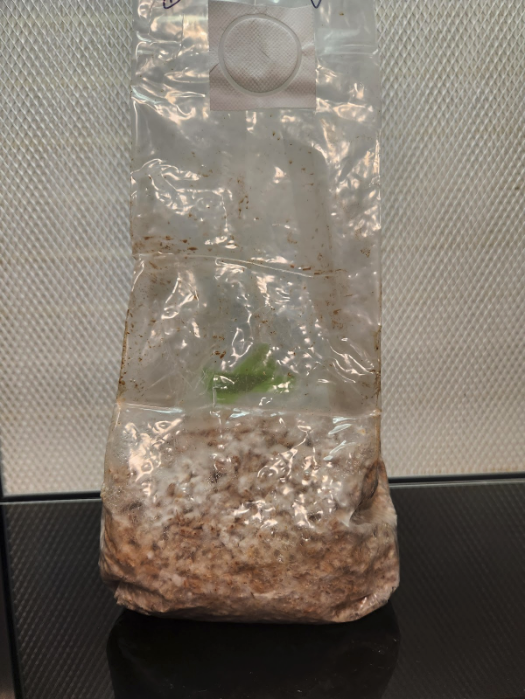
There are a few tell-tale signs you can keep an eye out for to determine if your liquid culture is contaminated. First off, if the syringe liquid is discolored at all (green, pink, black) it is probably contaminated. Secondly, the mycelium should be like wispy strands - anything else can mean contamination. This means dusty or chunky clouds are probably contaminated. Finally, and this one should be obvious, if it smells sour or downright awful, it is probably contaminated.
Liquid cultures will get to harvest substantially faster than spores will. This is because spores are dormant to start and need to germinate before colonization. Liquid cultures on the other hand are actively growing while still in the syringe.
So, you’re looking to grow some mushrooms? Well, you’ve come to the right place to start your intellectual journey! We are going to discuss liquid culture vs agar for growing mushrooms. The first thing you need to know about growing mushrooms is that you MUST have clean & healthy cultures to inoculate grains (read more about the full growth process in our article How to Use Liquid Cultures).
Typically, beginners usually come across liquid cultures and agar as the starting point for their grow. The issue is that these are commonly misunderstood. You may not even know the difference between the two.
In this article, we are going to detail exactly what are liquid cultures and agar, which is better for your goals, and how to use them together. We hope this can set you on the right path so you can have a successful mushroom growing experience. Now, let's learn about liquid culture vs agar!
A liquid culture is a syringe filled with what you need to grow your first batch of mushrooms. Inside the syringe is living mycelium suspended in a liquid broth loaded with nutrients to help the mushrooms grow. Without getting into too much detail (you can get into more detail in our article on growing with liquid cultures linked above), you inject the contents of the liquid culture into grains, let the grains colonize, then mix the colonized grains with a substrate and let that grow until the mushrooms are ready for harvest.
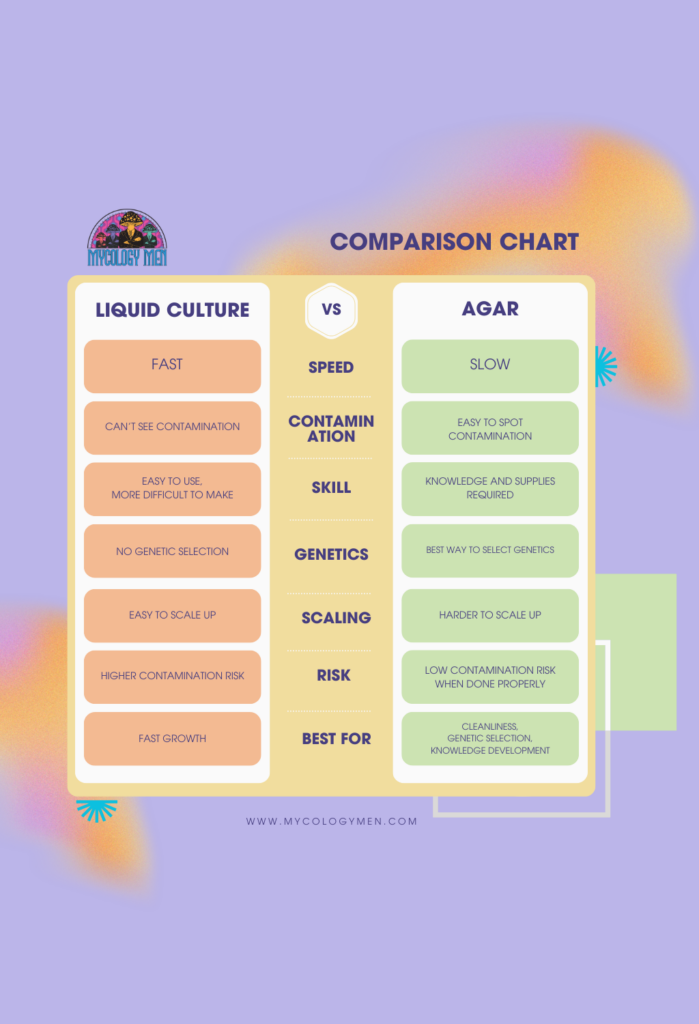
Liquid cultures are preferred by many growers because they colonize grains quickly, it is easy to scale up production for larger grows, and it is pretty easy to find high quality liquid cultures for sale online.
The main risk of using liquid cultures is contamination. It can be tricky to spot to the untrained eye. Even pros can get tripped up now and then. Once you use a contaminated liquid culture, it can be damn near impossible to save the grains. If you buy your liquid culture from a reputable producer, you should be fine. Another downside is that liquid cultures are genetically stable so you won’t be able to search for and grow stronger genetics than what you already have inside the syringe.
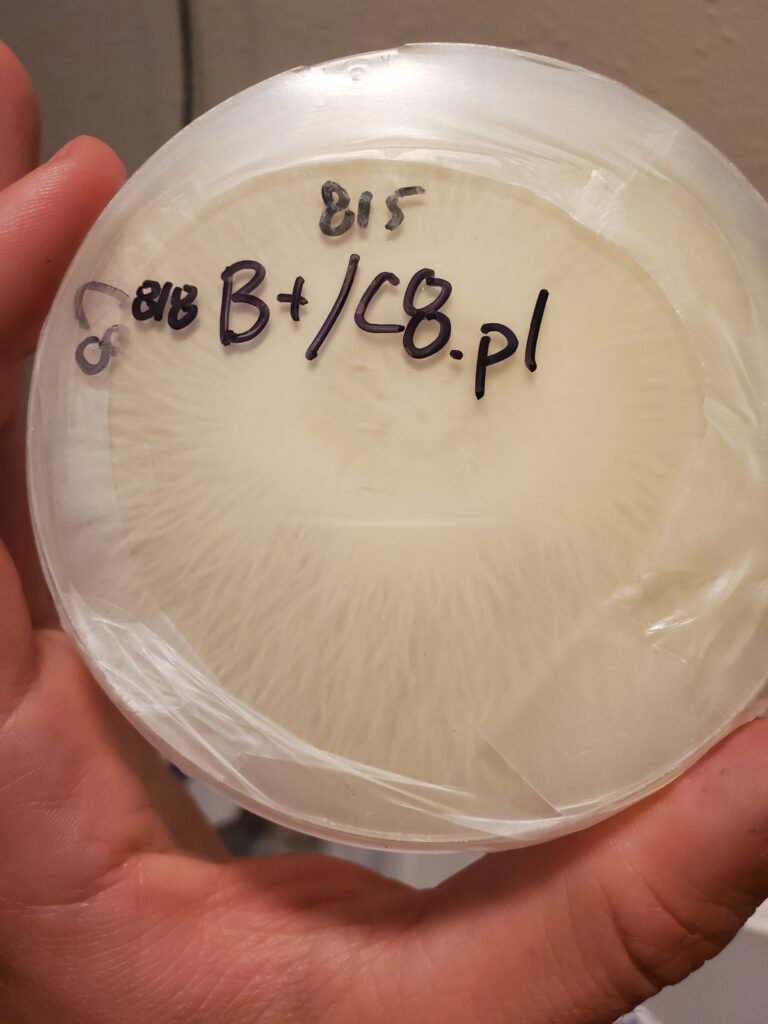
Agar (also sometimes referred to as agar plates) is a petri dish filled with a solid nutrient medium. It is kind of like fungi jello. Spores from a mushroom are spread on the agar and allowed to grow. Agar itself contains no fungi. It is simply the growing medium for fungi. If you want to learn more about making agar plates, give this article a read - How to Make Agar at Home.
Agar has the benefit of allowing users to catch any contamination early on. It will be visible on the agar plate alongside the mycelium. You can even clean your agar so you can keep the process going.
Agar is also beneficial if you want to isolate strong genetics from a particular strain. As we mentioned above, you can start with spores on agar. Each set of spores will produce slightly different mushrooms all within the same strain. Spore A might grow small and unflavorful shiitake while spore B grows the best shiitake mushrooms you’ve ever had. Agar allows you to pick and choose the genetics you really want.
There are a few downsides to using agar. For one, it takes a relatively longer time to reach harvest when compared to liquid cultures. Not only that, but it requires more supplies like a still air box or flow hood (tools to keep your agar clean and sterile while working with it).
If you want to develop a structurally sound mycology foundation, then working with agar is the way to go. It will teach you all about sterile techniques, genetics, and the growth process from spore to harvest.

If you want to grow fast then liquid cultures are for you. Assuming you have purchased your liquid culture from a reputable producer, you can get right into inoculating grains as soon as you receive your syringe. Liquid cultures are also best for those who wish to inoculate multiple bags of grains at a time. They are ideal for scaling up production.
There are a few scenarios in which starting from agar is the best choice over liquid cultures. The first scenario is if you have a desire to develop a really strong foundation in mycology. Starting from spore to make agar will teach you mycology from top to bottom.
Another reason you may choose to start with agar is if you want to hunt for strong genetics of the mushroom strain you wish to grow. Liquid cultures come as-is. There is no making the mycelium inside genetically stronger. With agar, you can select the genetics that you desire.
A third reason you might want to consider starting with agar is if you want to verify there is no contamination. As we mentioned above, it can be tricky to spot if a liquid culture is contaminated and if you use a contaminated liquid culture to inoculate grains, well there’s very little chance of coming back from that. When you use agar, you can physically see contamination spreading on the agar plate. Not only can you spot it, but you can also clean it. So if you want to verify cleanliness, use agar over liquid cultures.
Brand new to mycology: Consider starting with agar. You will learn everything you need to know and when you get to the inoculation phase, you will have a guaranteed clean starting point.
You want fast results: Start with a liquid culture. Starting from agar takes longer to reach harvest. Just do yourself a favor and check that the liquid culture producer you buy from is reputable. If it is contaminated and you use it, you just wasted time and supplies.
You want to learn everything about mycology: Start with agar and work your way through the entire process up to harvest and additional harvests (flushes).
You want to scale up: Liquid cultures are ideal for scaling your production. But you might consider starting with agar to select the genetics you want to grow in bulk. If you don’t start with agar, you're stuck growing whatever came in your liquid culture.
Let's talk about how to store liquid culture syringes. Liquid cultures are one of, if not the most popular starting place for many mushroom enthusiasts. It is quite easy to buy high quality mushroom liquid cultures online and they grow quickly.
But did you know that a liquid culture contains living mycelium? That’s right. A liquid culture is a syringe filled with a nutrient broth in which living mycelium is suspended. That is why they grow so quickly - they are already alive!
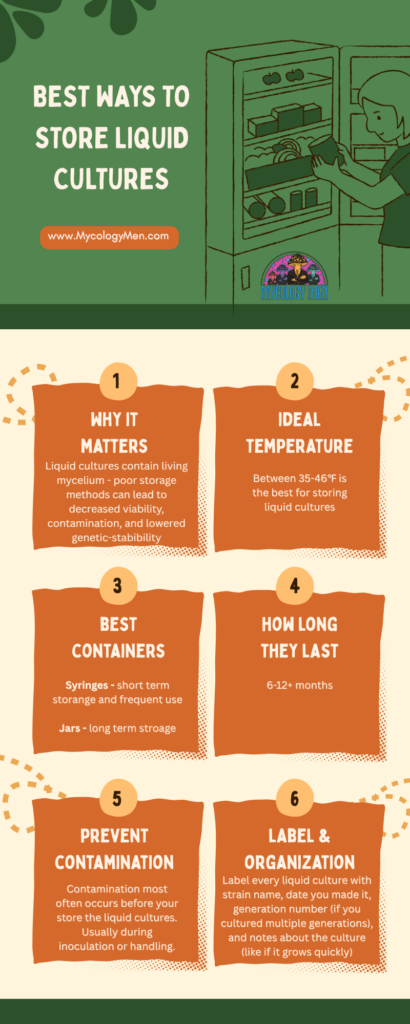
This is also the reason that proper storage methods are essential. The living mycelium inside of a liquid culture will be drastically affected by how you store it. Poor storage methods can lead to decreased viability, contamination, and lowered genetic-stabibility.
Good storage methods can save you time and money in the long term. You don’t want to start growing some mushrooms from some old liquid cultures only to find they are contaminated after weeks of waiting for your grains to colonize. What a waste!
Liquid cultures can last 6-12+ months under ideal storage conditions. It is really not that hard either. In this article we are going to teach you everything you need to know about storing liquid cultures so they remain contaminate-free for up to a year or more.
You want to store your liquid cultures in refrigerator temperatures. Between 35-46℉ is the best for storing liquid cultures. At these lower temperatures, the living mycelium inside the liquid culture slows its metabolism. This prevents overgrowth and the depletion of essential nutrients. Not only that, but the lower temperatures also inhibit bacteria growth so your LC can remain contaminant-free!
Be careful not to make the temperature too low or else you may run into some other problems. Freezing temperatures can kill or weaken the liquid culture.
If you are storing your liquid cultures at room-temperature, it is highly suggested that they be used within 1-2 weeks before you run a high risk of contamination.
Determining whether you want to store your liquid cultures in syringes or jars is really based on how long you need to store the liquid cultures for. Syringes are best for short term storage and frequent use. This means less than 12 months, but more ideally less than 6 months. Syringes are beneficial because they are easy to label and dose.
If you plan to store your liquid culture for more than 12 months or just longer periods in general (say, over 6 months), then jars are probably ideal for you. Jars are less prone to contamination than syringes are. They are a great way to build up a culture library.
Properly stored liquid cultures are generally stable for about 6-12 months. You can get more time from certain strains, but it is usually best to play it safe.
Regardless of how long you store the cultures, you should test them on agar every few months just to confirm they are still viable and contaminate-free. Simply plunge a few mL of culture onto an agar plate and see how it develops. You will be able to easily see any contamination.
If your culture turns cloudy, yellow, smells bad/rotten, or develops slimy sediment, then chances are it has gone bad. There are ways to save a cloudy culture (check our blog for more info), but the culture may be a lost cause if any of these signs persist.
Contamination most often occurs before your store the liquid cultures. Usually during inoculation or handling. Here are a few best practice tips you can follow to try to avoid any pre-storage contamination:
An organized culture library makes your life easier - trust us…
You should label every liquid culture with strain name, date you made it, generation number (if you cultured multiple generations), and notes about the culture (like if it grows quickly or fruits a lot). Labeling your cultures is very important so you don’t make any easily avoidable mistakes such as mixing strains or losing track of cultures. You can even digitize your library for even more accessibility!
Thinking about using your outdoor space to grow some mushrooms? Good choice! It is actually pretty simple to get started. After that, it is low maintenance and will continue to provide you with homegrown mushrooms for several years or more. In this article we will detail how to use mushroom plug spawn for growing on logs. This is different from sawdust spawn. Plug spawn is best for smaller projects (up to about 4 logs).
We will also discuss popular mushroom varieties and the type of wood they grow best on. Aside from that, we can’t forget about the different methods of inoculation including: logs, stumps, and pillars. Don’t worry if you do not know what that all means yet, we will lay it out nice and simple for you.Finally, we will also get into some common challenges mushroom growers can face and the best way to overcome these challenges. Let’s get started.
Choosing a proper mushroom/log combo is critical to a successful grow. Some mushroom varieties are just incompatible with certain types of wood. On the other hand, each variety of mushroom has a perfect wood match. Hardwoods like Oak, Maple, and Beech are most commonly used.
It doesn’t take much research to find the combination that works best for your situation. Here is a quick list of some of the most popular mushroom varieties and the types of wood that work best for them:
Oyster - Beech, Maple
Shiitake - Oak, Maple, Beech, Elm
Lion’s Mane - Poplar, Beech
Chicken of the Woods - Oak, Beech, Poplar
Turkey Tail - Oak, Maple, Beech
Maitake - Oak
Reishi - Maple, Oak
You want to use healthy logs from hardwood trees for inoculation. Dead or diseased logs won’t cut it. Any size log or branch can be used (as long as it is healthy). Smaller logs can colonize faster, but they won’t produce for as long as bigger logs. Logs that are too big are pretty difficult to move around and work with
Ideally, you want something that is about 6 inches in diameter and 4 feet in length. It is best to inoculate the logs within 2 weeks of being cut from a live and healthy tree. Any longer and the logs can dry out which is not ideal for mushroom growth.
This is the most widely used method of inoculation. It is tried and true and has worked for thousands of years.
Use logs that are about 6 inches in diameter and 4 feet in length. Larger and heavier logs will be hard to maneuver.
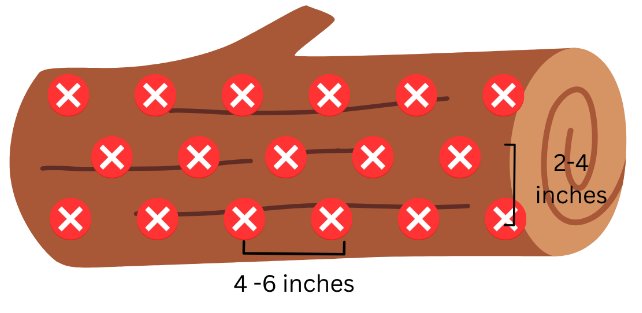
2. Place your plug spawns into the holes. Make sure they go all the way in and fit snug. Use a soft hammer if needed.
3. Melt wax in a thrift store pot (don’t use your good pots because the wax is hard to remove). Then brush the melted wax over the plug spawns in the holes. This will protect the plug spawns.
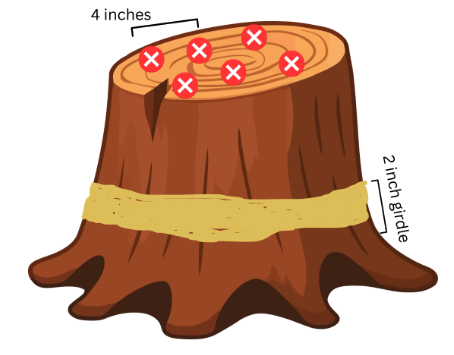
You can choose to inoculate stumps instead of logs. Stumps may take longer to colonize, but they will continue to fruit for up to a decade. So if you are not in a rush, maybe find yourself a good stump to grow some mushrooms on.
The stump you use needs to be from a tree that was cut down within a week or two prior. It also needs to be located in a shaded area. If you do not know what type of wood the stump is, it might not be worth trying to inoculate it because your efforts may go to waste.
This method is usually reserved for larger projects that utilize sawdust spawn. We will not be covering this in this article. Be on the lookout for an upcoming article that will cover this method.
Patience is a key factor when growing mushrooms on logs. It can take over a year for your logs to fully colonize before they start to fruit. Smaller logs will colonize faster, but they will fruit less often. Full size 4 foot logs like described above can fruit for several years.
Make sure to keep your logs in a shaded area for the incubation period. You do not want your logs just laying on the ground in contact with the soil, so use smaller pieces of wood to elevate the logs about 2 inches off the ground.
With just a few logs, you can lay them side by side in a layer with some space in between each log for airflow. If you have a larger amount of logs, you can stack them log cabin style.
There is very little maintenance that is needed while you wait for your logs to colonize. If the weather is dry for an extended period, it can be beneficial to soak them for about 24 hours to increase the moisture level. Frequent watering is NOT RECOMMENDED.
Fruiting will occur naturally when the log has fully colonized. Just be patient because this process can take a year or more. Fruiting usually occurs after rainfall.
To harvest the mushrooms, you can either just pull them out one-by-one or cut the stem at the base close to the log surface. Mushrooms on logs will continue to fruit over and over for a number of years.
Some varieties of mushrooms will do better if the log is partially buried into the ground. Chicken of the woods and Reishi are the two most common mushroom varieties that require partial log burying. Wait until the log is fully colonized before you bury it. This can take about a year so be patient. You will know the log is fully colonized when you see mycelium on the ends of the log.
To bury your logs, first dig a trench that is ½ the diameter of your log. Then place the log into the trench. Use the soil you dug out and pack it around the log so it is nice and snug. You only want the top surface of the log to be exposed.

The mushroom plug spawns are competing for nutrients against other fungi and mold and such. If your plug spawns are losing this battle, you may have to begin again with a fresher log and properly sealed inoculation holes.
The first thing you should do is be patient. Logs can take up to 2 years to fruit. If they are still not fruiting, you can try to force the fruiting by soaking the logs for 24 hours.
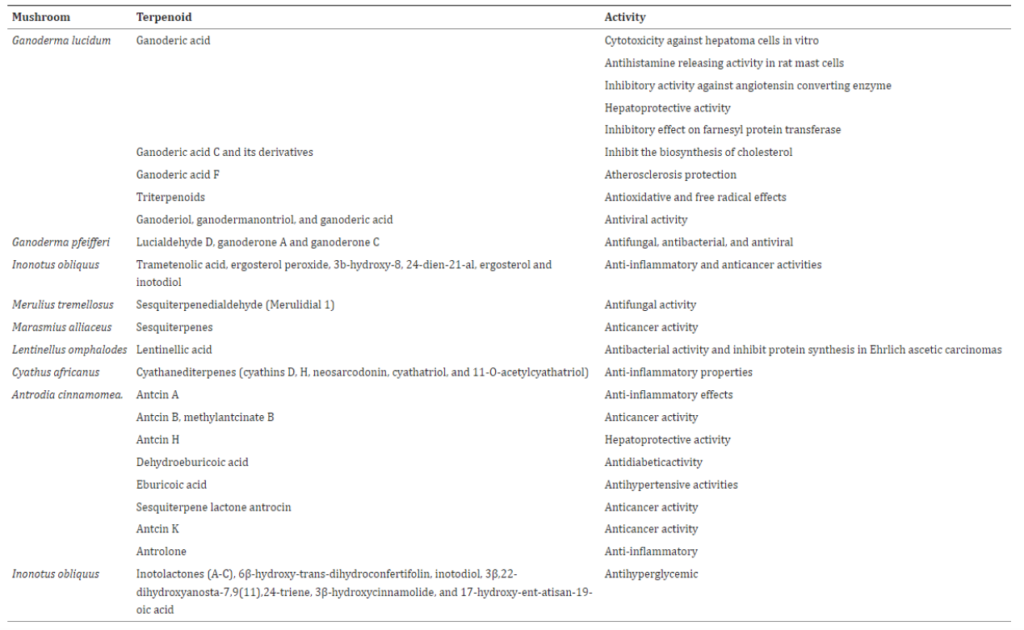
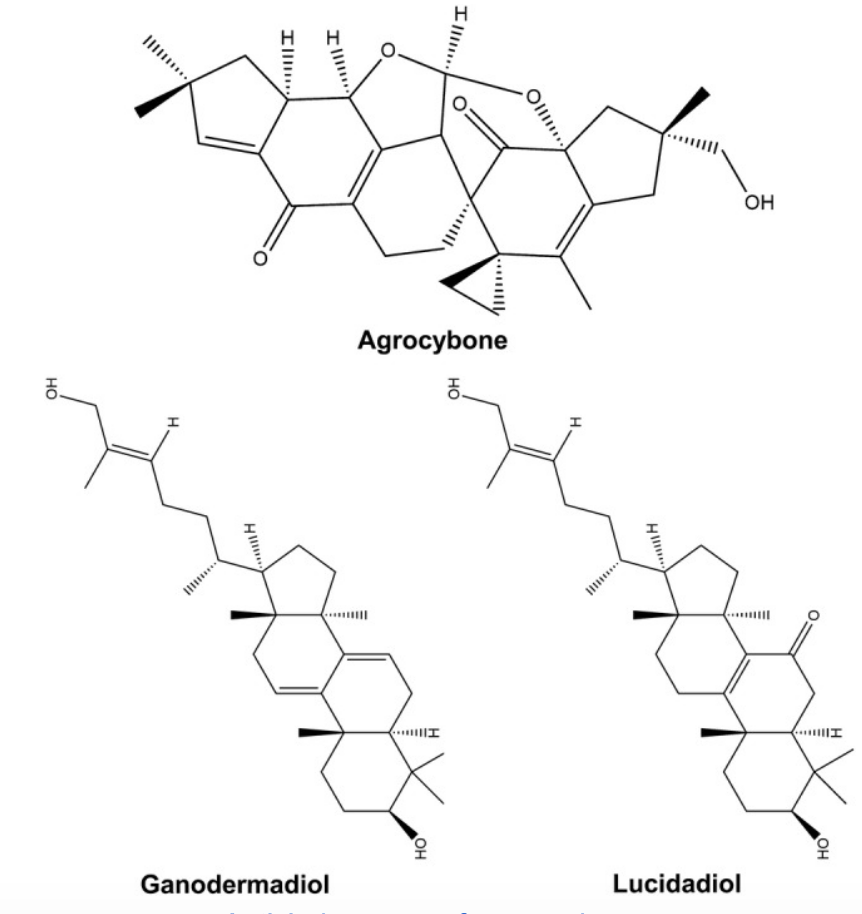
Terpenes are compounds found in plants, fruits, vegetables, and fungi. They can be partially responsible for the aroma and flavor of these plants. Terpenes have gained attention recently with the legalization of cannabis. Cannabis terpenes help to create the effects felt from different strains of cannabis. Some may help with pain management and inflammation. Others may help you sleep or get into a better mood. “Terpenes and terpenoids can be found in abundance in mushrooms”. (source) In this article we will discuss the types of terpenes found in mushrooms, the potential benefits of terpenes found in mushrooms, and the entourage effect.
Terpenes commonly found in mushrooms are different from the popular cannabis terpenes. In fact, there are more than 20,000 known terpene varieties. Here is a list of some popular mushroom strains and the most abundant terpenes found in them.
Reishi - Reishi mushrooms contain Ganoderic Acid, Ganoderiol, and Triterpinoids. Known benefits include being an antihistamine, antiviral, and antioxidant.
Chaga - Chaga mushrooms contain Trametenolic Acid. This terpene is known for its anti-inflammatory and anticancer properties.
Lion’s Mane - Lion’s Mane mushrooms contain hericenones. This can help with brain cell growth and may have antidepressant effects.
Psilocybin (Magic Mushrooms) - Psilocybin mushrooms contain several terpenes including Cubebol, B-copaene, Δ-cadinene, and Germacrene D.
Sadly, this is a little studied subject. There is a great need for more studies with more in-depth research. What we know from existing studies does show therapeutic promise in many wellness areas. Here (source, source) are a few of the most accepted benefits mushroom terpenes may have:
Antimicrobial - Terpenes found in certain mushroom varieties have shown promise in the fight against drug-resistant bacteria. Bacteria are constantly evolving and developing a resistance to the drugs we use to fight them. Therefore the search for natural alternatives with antimicrobial properties is “rapidly increasing”.
Antiviral - Like the search for natural compounds that can fight against bacteria, researchers are also on the hunt for compounds with antiviral properties to fight against viruses. Certain terpenes found in different mushroom varieties have shown promising antiviral properties.
Antiparasitic - Diseases like malaria are caused by a parasitic infection. This disease claims the lives of over 500,000 people each year. This is not made any better by the fact that there are limited treatment options available. Certain terpenes found in different types of mushrooms may provide a natural alternative to fighting against the likes of malaria and other parasitic diseases.
Antioxidant - Oxidation occurs to the cells in our body as we age, fight diseases, and deal with stress. This increases the speed at which we age.Antioxidants go against the oxidation process and it seems that some wild mushrooms may have therapeutic potential. Terpenes found in wild mushrooms have been shown to contain antioxidant properties.
Anti-inflammatory - The anti-inflammatory properties of terpenes found in a “wide variety of [mushroom] strains” are some of the most promising therapeutic results so far uncovered through the current research. There seems to be an abundance of terpenes and mushrooms containing these terpenes with anti-inflammatory properties.
Antitumor - One amazing area of research looks into how mushroom terpenes “counteract the growth of malignant tumors”. Certain terpenes found in mushrooms have shown promise in a laboratory setting. Much more research is needed on this topic.
Neurodegenerative - Mushroom terpenes extracted from a number of mushroom strains have shown neuroprotective properties. This means that they can protect cells from death and degeneration. Cell degeneration can lead to diseases like Alzheimer’s.
While the effects from isolated mushroom terpenes are all well and good, the real benefits of mushrooms lie within a phenomenon called the Entourage Effect. The entourage effect is basically like that old saying: the whole is greater than the sum of the parts (Aristotle said that!).
While research shows that mushroom terpenes can have therapeutic effects like anti-inflammation and antiviral, the highest level of benefits occurs when all parts of the mushroom are working together. The interactions between different terpenes and other compounds in mushrooms provides more benefits than just isolated mushroom terpenes. This, like most work on the therapeutic benefits of mushrooms, requires much more research to fully understand what is exactly going on.
Easy Guide to Make Your Own Mushroom Liquid Culture
What is a Mushroom Liquid Culture?
Mushroom liquid cultures are one of the best ways to easily grow your own mushrooms. Making them and using them is a pretty straightforward process than anyone can do. A liquid culture is, you guessed it, mushrooms in liquid. Specifically, a mushroom liquid culture is a liquid filled with nutrients and mycelium. The nutrient-rich liquid allows the mycelium to thrive and then be transported into a growing medium such as straw, logs, cardboard, etc.
Liquid cultures are similar to growing mushrooms from spawn, but with a few benefits. They allow for faster colonization, The nutrients in the liquid culture allow the mycelium to begin growing before you even use them. This gives you a head start and saves you time.
Liquid cultures also tend to have higher yields than using spores. Not only that, but they are more consistent because it is a very sterile technique so you are less prone to contamination. This also means that liquid cultures are easy to store as they will have a longer shelf-life than spawns.
To summarize, learning how to make liquid culture is an easy and efficient way to begin your mushroom grow. The nutrient-rich liquid environment is ideal for mycelium growth. This means faster colonization, less risk of contamination, and longer shelf-life. Now, let's take a look at how to make your very own mushroom liquid cultures.
You can use the calculator above to adjust the amount of H20, sugar, and malt extract you will need based on the number of syringes you want to end up with).
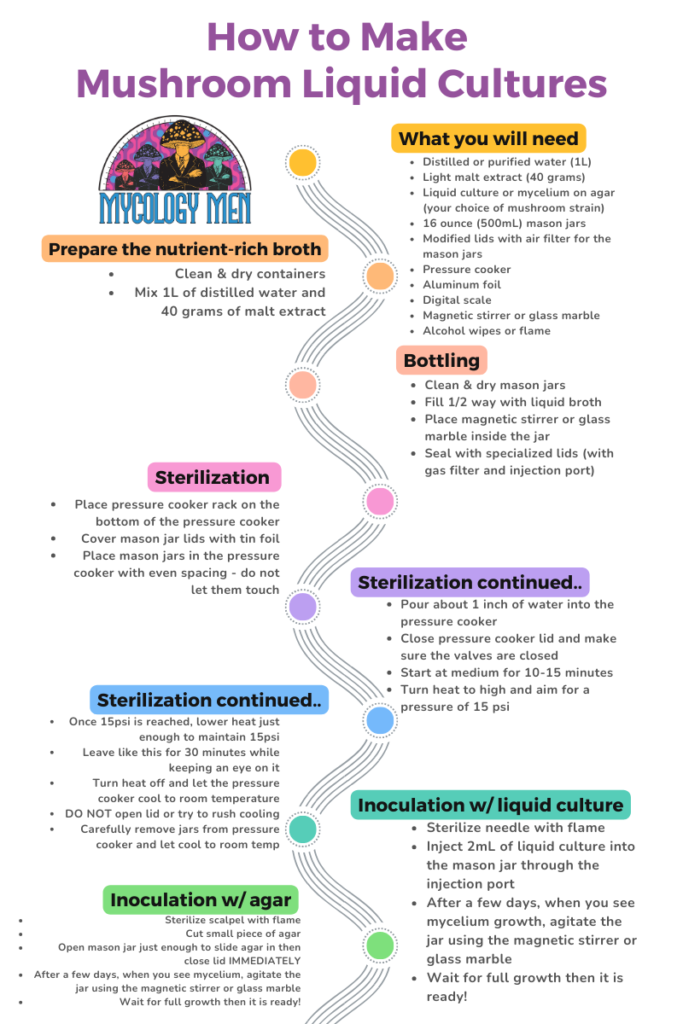
What You Will Need:
Measure out 1 L of distilled or purified water, 20 grams of light malt extract, and 40 grams of sugar (can also use honey or light corn syrup). Be sure to use CLEAN & DRY containers for this. Mix the two ingredients together. You also have the option to add 1 gram of brewer’s yeast for a nutrient boost.
Clean and dry your mason jars. This step is of the utmost importance and any contamination can be detrimental to mycelium growth.
Now, fill each mason jar up about halfway with the liquid broth. Place the magnetic stirring bar or glass marble into the jars. Make sure they are sterile before you do so (use an alcohol wipe).
Use a specialized mason jar lid to seal the jars. The lids should have a self-healing injection port and a gas exchange filter. Double check they are fully sealed! This is to prevent contamination.
This is the most important step. Sterilizing your jars is the best way to prevent contamination.
First, make sure you place your pressure cooker’s cooking rack at the bottom of the pressure cooker.. This is so that your jars do not sit on direct heat which could cause a crack in the glass jars.
Cover each mason jar lid with tin foil to protect the filters from the heat of the pressure cooker.
Now, place your jars into the pressure cooking with even spacing. Make sure they are not touching. If you have more jars than what comfortably fits in the pressure cooker, you will need to do this sterilization step more than once.
Pour about 1 inch of water into the pressure cooker.
Close the pressure cooker lid and check to make sure the pressure valve is closed or covered.
When pressure cooking liquid in glass I like to start at medium for about 10-15 minutes to avoid cracking the glass. If the temperature between the glass and the liquid is too different, rapid heating can cause the jars to break.
After 10-15 minutes, turn the heat to high and aim for a pressure of 15 psi (pounds per square inch). Once the pressure cooker reaches 15 psi, lower the heat just enough that the pressure is maintained. Leave it at this level for 30 minutes. It is best practice to keep an eye on the pressure cooker during this time to make sure nothing changes.
Once the 30 minutes is up, turn off the heat and let the pressure cooker cool to room temperature. Do not try to take off the lid or speed up the cool down process in any way. Venting the pressure cooker will allow outside, unsterilized air to rush in and fill the pressure cooker, potentially contaminating the jars inside. Patience is key!
When fully cooled, you can remove the pressure cooker lid. Use gloves to CAREFULLY take the jars out of the pressure cooker. Set them aside and let them cool to room temperature.
Grab your liquid culture syringe or cut a piece of agar in preparation for inoculation. If you are using a liquid culture syringe, sterilize the needle with a flame. If you are using an agar plate, sterilize the scalpel with a flame.
If you are using a liquid culture syringe, inject 2mL of the syringe content into the mason jar containing your liquid broth through the injection port.
If you are using a piece of agar, open the mason jar lid just enough to slide the agar into the liquid broth. Close and reseal the jar immediately to prevent contamination.
Now, give the jars a gentle shake so that you can more evenly distribute the mycelium within the mason jars. Place them in a dark place at around room temperature (you can look up the best temperature for your specific type of mushroom).
Over the next few days, keep watch over your mason jars. Look for cloudy white formations. These indicate mycelium growth.
Once you see some mycelium growth, it is time to agitate the jars to disperse the mycelium. This can be done with your magnetic stirrer or, if you are using a glass marble, shake the jar so the marble breaks up and disperses the mycelium clouds. This should be done once daily.
When your mason jars are filled with mycelium growth, they are ready to be made into liquid culture syringes!
Once you have your liquid culture ready to go, you can now use it to grow mushrooms! You are going to need a few things to properly use your liquid cultures. These include:a still air box, syringe and needle, alcohol wipes, gloves, and a container with grain spawn.
To begin, use the alcohol wipes to clean all work surfaces, the still air box, and the syringe and needle. You should be wearing gloves for this.
Now, shake the mason jar of liquid culture to evenly disperse the mycelium inside. Take your syringe and attach the needle. Now, insert the needle into the self-healing port of the lids of your mason jars. Draw liquid culture into the syringe while being careful to avoid air bubbles..
With your syringe filled with liquid culture, insert the needle into the injection port of your grain spawn container and plunge about 2 mL of liquid culture per 1 pound of grain spawn.
Seal and store your containers in a dark, warm, and clean environment. Check them regularly for growth. After 30% colonization, you can stir or mix the containers to disperse the growth.
Regardless if you are new to mushrooms or an experienced user, mushroom chocolate bars offer an approachable and effective experience. These delicious treats have become increasingly popular for consumers because they make eating mushrooms tasty instead of nasty! You can even find mushroom chocolate bars in a wide variety of flavors ranging from standard milk chocolate, to cookies and cream, to strawberry milkshake, and beyond.
You may be excited to learn that these are pretty darn easy to make yourself in the comfort of your own home! It is essentially as easy as grinding up dried mushrooms and mixing them into chocolate. In this article we will detail a step-by-step guide on how to make mushroom chocolates. Let’s dive in.
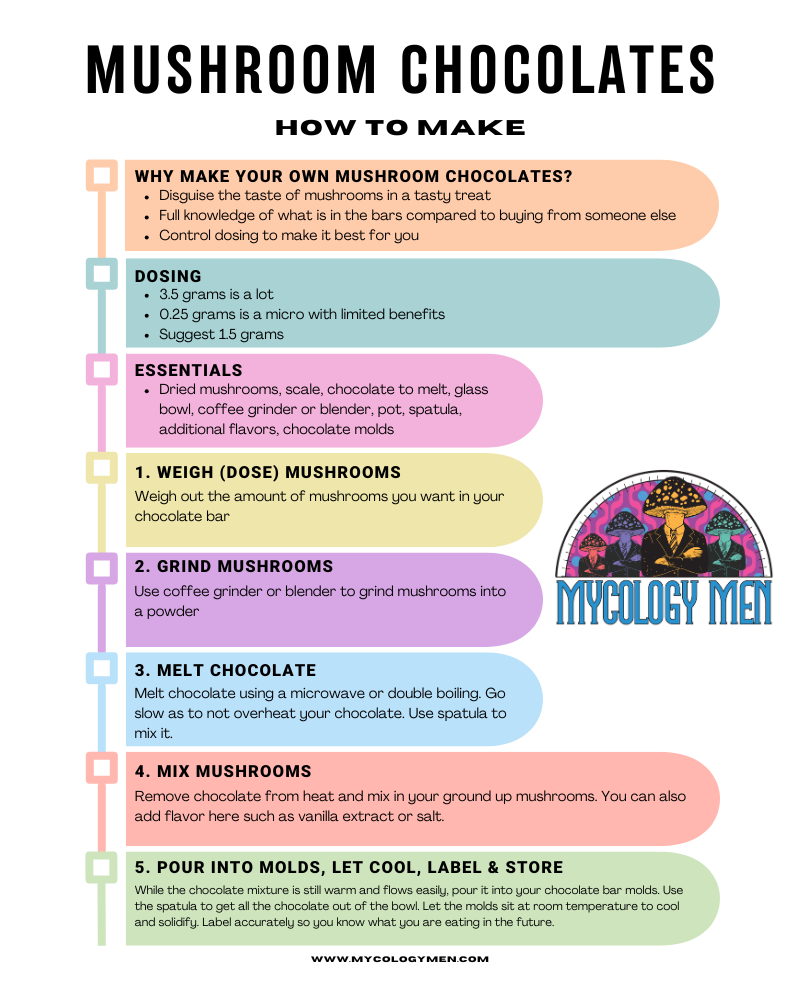
Why Make Your Own Mushroom Chocolate Bars?
If you have ever eaten mushrooms straight up, then you might agree with many of us that the taste is none too pleasant. If you are like me, you may have even tried disguising the taste by putting mushrooms on pizza or in a sandwich. Disguising the taste is what chocolate bars do best. The sweet chocolate flavor makes eating mushrooms an enjoyable culinary experience rather than a situation where you have to choke down some dry, chewy, and unpleasant tasting mushrooms.This is especially useful for those of you looking to take bigger doses. Sure I can get down half a gram no problem, but five grams is a different story.
Learning how to make mushroom chocolates at home is as easy as mixing chocolate and mushrooms together (well, there are a few more steps than that). It does not take more than 20ish minutes.
On top of that, by learning how to make mushroom chocolates, you can accurately control dosing. Typical chocolate bars from the street contain 4-5 grams of mushrooms (so the packaging says…). Many people eat just a single square or a few squares. If you made your own chocolate bars, you could dose the entire bar to be a comfortable dose for you. You could even make a bar for a guest and dose it comfortably for them. Now that is hospitality!
To make your very own mushroom chocolate bars, you are going to need a few supplies. Here is a list for you to use:
When we apply this to chocolate bars, it might be best to consider the dose per rectangle of chocolate (assuming your chocolate mold is broken into rectangles like Hershey Bars). For example, if your chocolate bar will be made up of 12 equal sized rectangles, and you want them each to contain 0.25 grams, then your entire bar needs 3 grams of mushrooms. If you are making 5 bars of all equal strength, then you will need 3 grams X 5 bars = 15 grams of mushrooms.
First you must decide how many mushrooms you are putting into each chocolate bar or each rectangle within a chocolate bar. See the Dosing section above for more detailed suggestions. Use your scale to accurately measure out the amount of mushrooms you require.
Use a coffee grinder or blender to grind your mushrooms into a fine powder. Mushrooms should be entirely dry before grinding. Any amount of moisture will not allow you to grind the mushrooms as finely as recommended.
You have two options when it comes to melting the chocolate. In either case, it is important to avoid overheating the chocolate. The first option is to use the microwave. The second option is to use a technique called double-boiling.
If you choose to melt chocolate using the microwave, place your chocolate into a glass bowl. Now place the bowl in the microwave for 15-20 seconds. Remove the bowl and give the chocolates a quick mix with your spatula. Keep repeating this process until the chocolate is fully melted. This is the best method to avoid overheating your chocolate which will be disastrous for the flavor.
If you choose to melt the chocolate using a double-boil, first fill a pot small to medium with water about ½ of the way up. Place that pot on the stove with medium-low heat. Now, place your chocolate into a glass bowl that is big enough to sit inside of the pot without touching the bottom. The goal is to use the heat of the water to melt the chocolate in the glass bowl. You do not want any water getting out of the pot and into the chocolate bowl. While heating, use your spatula to mix occasionally.
Remove the chocolate from the heat and mix in your pre-grinded mushrooms. Try your hardest to evenly mix the mushrooms throughout the chocolate mixture so that each piece of chocolate has consistent dosing.
When the chocolate is melted, you can choose to add some flavor. This could be a dash of vanilla extract or a pinch of salt. It can be fun to experiment with different flavor profiles as you continue your chocolate making journey.
While the chocolate is still warm and flows easily, pour it into your molds. It can be useful to use a spatula to get all the chocolate out of the bowl and to even out the molds when they have been filled.
The chocolate needs to cool and form into a solid chocolate bar for a while. It is best not to rush this process. The cooling can be done at room temperature.
Once your chocolate has cooled and formed into solid bars, you can wrap them in parchment paper to protect them from moisture. The chocolate bars should be stored in a cool, dark place away from direct sunlight. You may consider keeping them in your refrigerator.
It is best practice to accurately label your chocolate bars. You should mark the dosage, the date they were made, and clearly mark that these are mushroom chocolates.
Check out the rest of our blog here for more guides!
If you are like many others throughout America and the rest of the world, you may be interested in growing your very own mushrooms at home. There is no shortage of supplies available online, but how do you successfully use them to grow an abundance of mushrooms in the comfort of your own home?
While the basic process is somewhat easy to figure out, there are some nuances that require a bit of know-how to successfully grow a mushroom crop. The basic process is as follows:
The tricky part is knowing the specifics of these steps. For example, knowing how to keep your work area and materials sterile and free from contamination is crucial. Additionally, different mushroom varieties work best with different grain and substrate mixtures. You also need to know how to keep your grow within the proper humidity and temperature ranges.
If this all sounds a bit overwhelming that is understandable, but we promise you, it is not as bad as it may seem at first. By reading this in depth article that details exactly how to grow gourmet mushrooms at home using liquid cultures, you are already ahead of the curve. We are going to discuss the exact steps in a How-to-Guide, dive into the differences between each popular mushroom variety, and provide you with some tips and tricks to keep your grow sterile and successfully harvest some tasty fungi!
Which mushroom you decide to grow can be based on a few criteria including: time to harvest, materials needed, and difficulty of growing. Growing mushrooms is not an hours or even days long process. This can take months or even up to a year to fully harvest your mushrooms. Here is a quick guide to help you decide which mushroom varieties you want to grow.
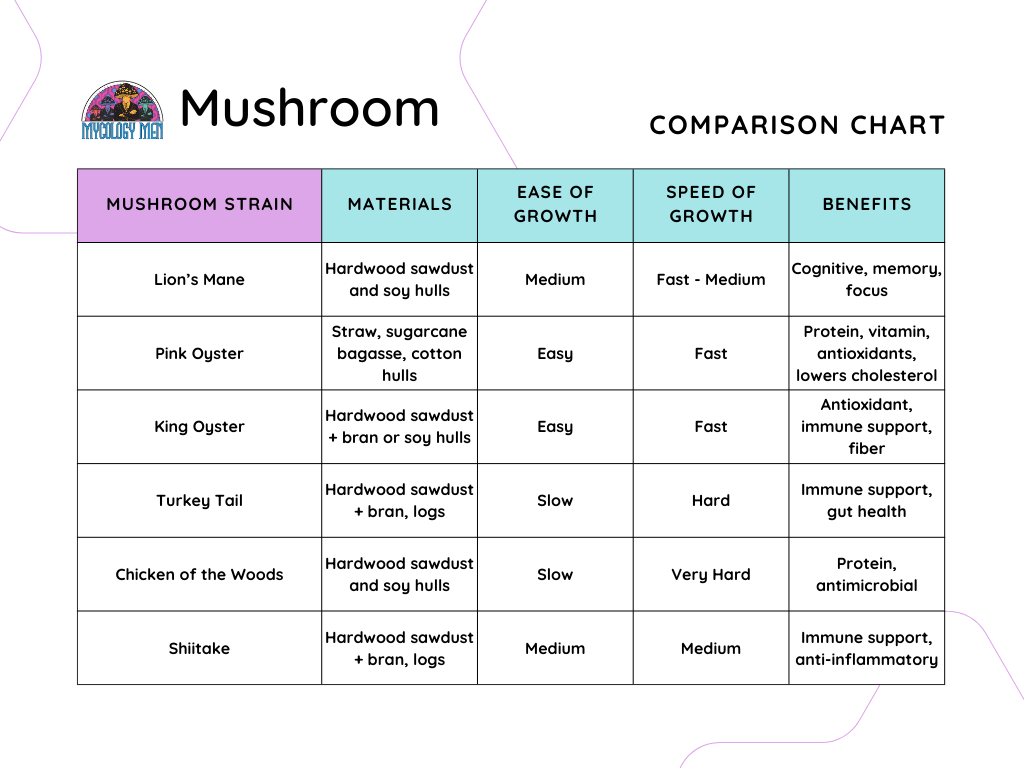
Here we are going to outline the materials and supplies you will need to successfully grow your mushrooms at home. It all starts with the liquid culture. A liquid culture is a sterile nutrient liquid containing live mushroom mycelium. It is basically your mushroom starter pack. You can buy mushroom liquid cultures online from reputable retailers.
After sourcing your liquid culture, you will need grains and a grow bag. The most commonly used grain is rye grain. You will also need a mushroom grow bag with an injection port. You can either buy the grains and mushroom grow bag separately or you can find pre-filled grow bags. Either option is viable.
Finally, you will need the specific substrate that works best for the mushroom variety you chose (see the chart above) and a bucket in which you will grow the mushrooms. The bucket needs to have a lid and holes. The lid will hold moisture and keep the temperature consistent. The holes will allow excess moisture to escape.
Once you have your bucket, it is important to drill some ¼ inch holes about 4 inches apart spreading across the middle and upper portions of the bucket. These holes should be covered with micropore tape. You should drill some more holes towards the bottom of the bucket and leave them uncovered. These bottom holes will allow excess moisture to escape.
Supplies:
Which Substrates Work with Which Mushrooms
Substrate Overview (by Composition)
| Substrate Type | Base Ingredients | Ideal For | Notes |
| Straw (Pasteurized) | Wheat, oat, or barley straw | Oysters, Golden, Pink | Cheap, forgiving; best for beginners |
| Master’s Mix (Sterilized) | 50 % hardwood sawdust + 50 % soy hulls | Lion’s Mane, King Oyster, Reishi | High yields; requires sterilization |
| Hardwood Sawdust + Bran | 80 % sawdust + 20 % wheat/rice bran | Shiitake, Turkey Tail, Reishi | Classic woodlover substrate |
| Compost + Casing Layer | Horse manure compost + peat/vermiculite casing | Button, Portobello | Requires precise composting |
| Brown Rice + Nutrients | Brown rice + sugar + yeast | Cordyceps militaris | Lab-sterile process only |
| Paper/Cardboard | Shredded cardboard or paper pulp | Oyster species | Eco-friendly, lower yield |
| Coffee Grounds (Mixed) | Coffee + straw/sawdust | Oysters | Supplementary use only; can contaminate easily |
If you purchased your grains separately from the grow bag, then you need to sterilize the grains before using them. This is a pretty simple task, but it requires a pressure cooker and a heat sealer. Optionally you can supplement your grains with gypsum. Adding gypsum to the grains reduces clumping of the grains and gives the mycelium extra nutrients to promote healthier and quicker growth.
Use the calculator above to calculate exactly how much gypsum and water you need based on how much grains you have.
Here is a quick recipe you can follow to supplement your grains:
Rye grains: 500g
Gypsum: 5g
H2O: 320g
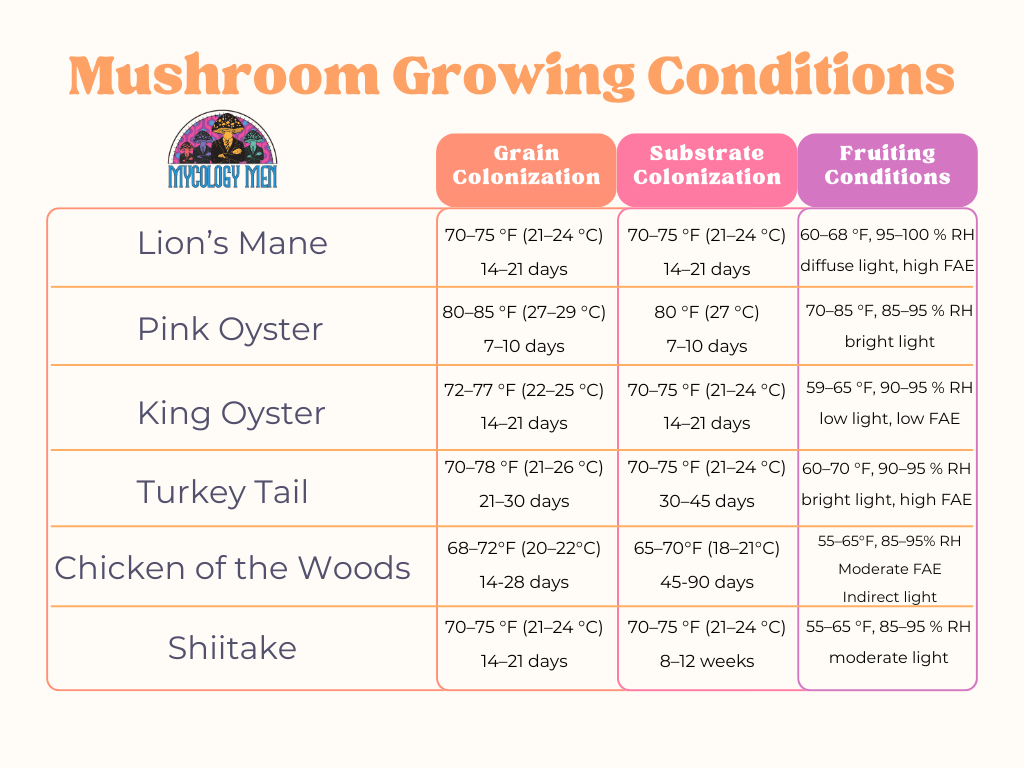
The perfect growing environment for mushrooms is one where you can accurately control both temperature and humidity. The exact temperature range will depend on the type of mushroom you are growing. Take a look at this quick chart to help you figure out your specific needs.
Now that all the set up is done, it is time to start to growing-process! This is where the fun really begins.
Now that you have your liquid culture, sterilized grains, and mushroom grow bag, it is time to sterilize your materials and work station. This step is of the utmost importance. Mycelium is just one tiny part of an entire ecosystem of microorganisms and they are all fighting for the same resources to grow. If your materials and work station are covered in bacteria, it is likely the mycelium will lose the battle for resources and either not grow at all or grow with significant contamination.
Here are some steps you can take to ensure a clean work space:
If you are using a new needle it should be sterile and can be used directly out of the packaging. If you are reusing a needle, use a flame to sterilize the needle and let cool before injecting into grains. Use an alcohol wipe to clean the injection port of your bag before injecting. Remember, contamination is your biggest enemy! It is best to wear nitrile gloves while doing this whole process.
Inject 3mL of liquid culture per pound of grain. So if you have a 3lb grain bag, inject 9mL of liquid culture.
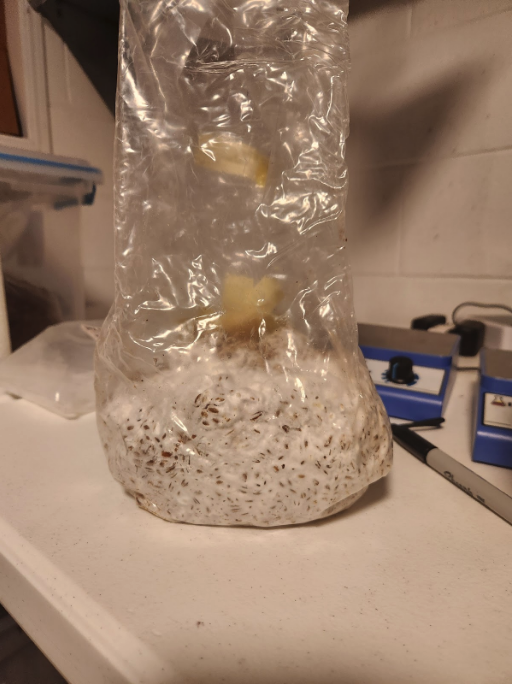
To spread the mycelium from the liquid culture evenly through the grow bag, give the grow bag a good shaking.
Now the mycelium will begin to grow over a few days. Once you see about 30% colonization, give the bag another good shake to spread the mycelium again. You can repeat this step when the bag has reached about 80-90% colonization.
Finally, once the bag has fully colonized, practice a bit of patience and wait a week to make sure the interior grains have colonized as well.
As we have mentioned multiple times during this article, bacteria and mold are the enemy when it comes to growing mushrooms. They compete for limited resources and can beat out mycelium. To fight against bacteria and mold, there are two options for your substrate. Either sterilize it (kill everything and start with a blank slate), or pasteurization (kill bad microbes, but leave some beneficial ones).
Which you use mostly depends on the substrate you are using. Nutrient-rich or finely processed substrates must be sterilized. Bacteria and mold thrive on nutrients. Low-nutrient and fibrous substrates can be pasteurized.
Here is a quick guide to help you determine which method to use:
| Mushroom | Substrate | Sterilize or Pasteurize? |
| Pink Oyster | Straw / sawdust+bran | Pasteurize / Sterilize |
| Lion’s Mane | Hardwood sawdust | Sterilize |
| Turkey Tail | Chips | Pasteurize |
| King Oyster | Master’s Mix | Sterilize |
| Chicken of the Woods | Sawdust blocks | Sterilize |
| Shiitake | Sawdust blocks | Sterilize |
Use your pressure cooker to sterilize the substrate. Place them inside at 15psi for 2.5 hours. Follow the manufacturer's instructions for using the pressure cooker. It usually involves about ½ inch of water at the bottom to produce the steam.
No dripping
Squeezed handful releases only a few drops
With fully colonized grains, it is time to transfer everything to your bucket filled with substrate. Remember to drill the appropriate holes in the bucket and cover the upper and middle holes with micropore tape. Here are the steps we outlined in the Supplies section above: “¼ inch holes about 4 inches apart spreading across the middle and upper portions of the bucket. These holes should be covered with micropore tape. You should drill some more holes towards the bottom of the bucket and leave them uncovered. These bottom holes will allow excess moisture to escape”.
Refer to the table above in the Choose Which Mushroom(s) to Grow section to find which substrate works best for your mushroom variety.
Mix the colonized grains with the substrate in a 1:2 ratio. This means using double the amount of substrate than the amount of grains. For example, a 3lb grain bag needs 6lb of substrate. Cover your bucket top with a lid. Make sure to break up clumps of grain and fully mix into the substrate to ensure full colonization
Leave the filled buckets in your growing environment with proper temperature and humidity levels. You can refer to the Create the Perfect Growing Environment section above for specifics. Here is a summary: warm and dark place, 70-80℉, 90-95% humidity
Once the substrate has fully colonized, it is time to make it fruit. Just remember to be patient, the colonization process can take a few weeks. To induce fruiting, remove the micropore tape from the buckets upper and middle holes. This will allow airflow which is important.
You want to keep the bucket in a highly humid environment (~90% humidity). If you find the substrate is drying out at all, you can spray the holes with a fine mist. You should also introduce indirect sunlight to whichever room the bucket lives.
After about a week in this environment, you should see the mushroom “pins” start to appear. This is a great sign! After about another week, you will see full mushroom clusters begin to form. You're nearly there!
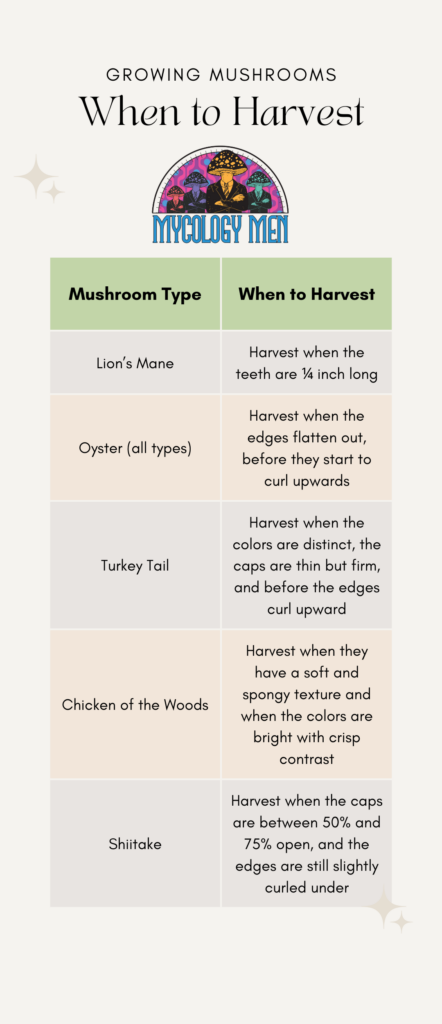
Harvesting your mushrooms is as simple as grabbing and twisting them loose or using a sharp knife (like this mushroom knife) to cut them at the base. There are some things you can look for to help you determine when the mushrooms are ready for harvest. When done correctly, the substrate will fruit multiple times!
Your mushrooms should fruit multiple times as long as you have set everything up properly and harvested them without too much disturbance. To help with more fruiting, you can spray mist onto the hole openings of your bucket after each harvest.
If your liquid culture or grain have bacteria, then you are most likely doomed from the start. Check if the grains are wet and slimy or smell bad. If there is no colonization after 2 weeks, you probably had contaminated liquid culture or grains,
You need just the right amount of humidity. Too wet and the grains will burst and bacteria will run rampant. Too dry and the mycelium will struggle to colonize.
You need just the right temperature for mycelium to thrive. Too cold and it will not grow. Too hot and bacteria will take over and mycelium will die.
If you do not sterilize properly, bacteria will thrive. This is true for both your grains and work space.
Mycelium requires oxygen to grow. If there is no airflow, the mycelium will not grow. Check for clogged vents and holes. Breathable micropore tape is considered a must-have.
If you fail to shake and disperse the grains after about 30% colonization, growth will slow significantly.
If air is not flowing, CO2 is building up and this will prevent fruiting.
High humidity is a must. Usually 90% or more. Anything lower and you risk aborting the fruiting stage.
Light is what tells the mushrooms it is ok to start fruiting. Without light, they will not enter the fruiting stage.
Mushrooms are pretty specific with the temperatures they will grow in. Check the chart above in the Perfect Growing Environment section for specifics relating to the type of mushrooms you are growing.
Keep that substrate moist or it will not fruit! You can use a spray mist to keep the substrate moist.
Be sure to check the chart in the section Purchase Liquid Cultures and Other Supplies above to see which substrate pairs with which mushroom varieties.
What is in Your Mushroom Chocolate Bar?
Chocolate bars which contain magic mushrooms have become very popular in the psychedelic community. Many love them because the taste can be more enjoyable than just munching on some regular dried mushrooms. Not only that, but dosing is pretty consistent among the different bars which makes the user's job of dosing even easier. Some popular brands you may have come across include: Polka Dots, Fun Guys, Azure, One Up Bars, Wonderbars, and more.
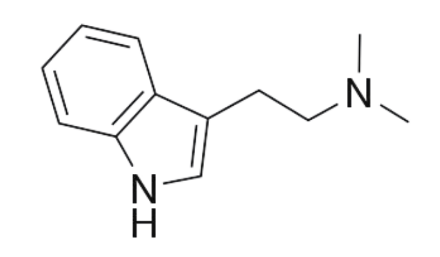
If you are like many others, you probably just assumed these bars contain psilocybin, the main molecule in magic mushrooms which leads to the hallucinogenic effects. In many cases, you would be correct. But in some cases, the main molecule in these chocolate bars is not psilocybin, but rather a similar compound known as 4-Aco-DMT. In this article we will discuss the similarities and differences between psilocybin, 4-Aco-DMT, and regular old DMT.
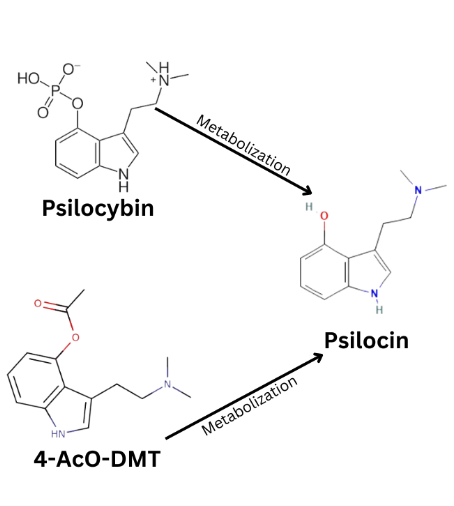
One of the main differences between psilocybin and 4-AcO-DMT is that psilocybin occurs naturally in magic mushrooms and 4-AcO-DMT is a synthetic compound which was first made by Albert Hofmann and Franz Troxler in 1963.* This does not necessarily mean that one is “better” than the other but, if natural ingredients are important to you, psilocybin is the answer. Chemically, the two are pretty darn similar.
In fact, they both covert into psilocin, which is the active compound that produces psychedelic effects. Psilocybin converts into psilocin* when you are consuming magic mushrooms in any form (dried, capsules, or chocolate bars). 4-Aco-DMT also converts into psilocin when consumed. Both psilocybin and 4-AcO-DMT are known as prodrugs which means they are inactive until they are metabolized (metabolizing psilocybin turns into psilocin, the same is true for 4-AcO-DMT). So, while psilocybin and 4-AcO-DMT come from different sources, they both end up as the same compound, psilocin.*
As we have just discussed, both psilocybin and 4-AcO-DMT metabolize into the same compound, psilocin, which is the active compound that produces psychedelic effects, but the question remains, does this mean that psilocybin and 4-AcO-DMT have the same effects? Unfortunately there is no concrete answer to this question. A recent post on Reddit had many users saying they felt different effects, but there were also people who suggested the effects were basically the same.
Taking either substance can result in many of the typical psychedelic effects including visual hallucinations, color enhancement, pupil dilation, increased sense of humor, enhanced creativity, euphoria, joy, anxiety, and possibly nausea. The effects of both psilocybin and 4-AcO-DMT can last upward of 6 hours. Some users report that the effects of 4-Aco-DMT last longer and have visual effects more similar to DMT than to magic mushrooms.
Psilocybin is a Schedule I drug, the same classification as heroin and LSD.* Possession of psilocybin in chocolate bars or magic mushrooms can carry severe legal penalties. That being said, there are certain areas of the country where you can participate in psilocybin therapy with trained guides. In the United States, 4-AcO-DMT exists in a legal gray area. While it is not a scheduled substance like psilocybin, it can fall under the Federal Analogue Act because it converts into psilocin.
There are some major differences between regular DMT (N,N Dimethyltryptamine) and 4-AcO-DMT. For one, a DMT trip usually lasts about 15 minutes and the hallucinations are much more intense than 4-AcO-DMT. They also differ in how they are consumed. Regular DMT is usually smoked or vaporized while 4-AcO-DMT is ingested like with chocolate bars. They also differ in legality. As we mentioned above, 4-AcO-DMT exists in a legal gray area. Regular DMT is a Schedule I substance just like psilocybin.
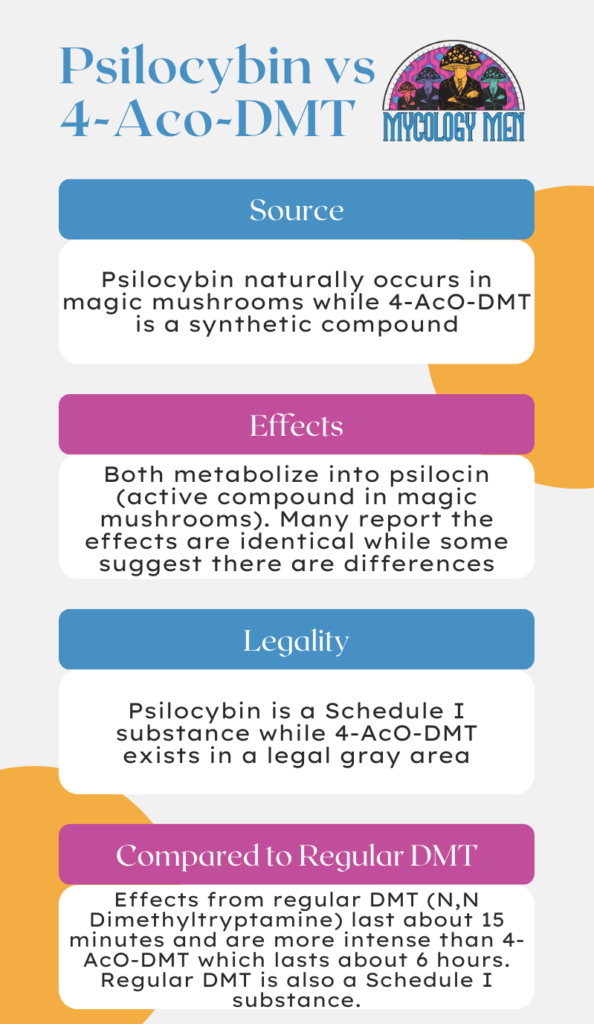
There is limited data available looking at the effects of psilocybin vs 4-AcO-DMT, but it is known that both of them metabolize into the active compound in magic mushrooms, psilocin. Many users report that the effects are identical, but some find that 4-AcO-DMT has longer-lasting effects and the hallucinations are more similar to DMT than to magic mushrooms.
Psilocybin is a Schedule I substance and highly illegal while 4-AcO-DMT exists in a legal gray area. It is also important to note that 4-AcO-DMT and regular DMT (N,N Dimethyltryptamine) are not the same. Taking regular DMT results in a relatively intense trip that lasts about 15 minutes while 4-AcO-DMT is more likened to magic mushrooms and can last up to 6 hours.