Easy Guide to Make Your Own Mushroom Liquid Culture
What is a Mushroom Liquid Culture?
Mushroom liquid cultures are one of the best ways to easily grow your own mushrooms. Making them and using them is a pretty straightforward process than anyone can do. A liquid culture is, you guessed it, mushrooms in liquid. Specifically, a mushroom liquid culture is a liquid filled with nutrients and mycelium. The nutrient-rich liquid allows the mycelium to thrive and then be transported into a growing medium such as straw, logs, cardboard, etc.
Liquid cultures are similar to growing mushrooms from spawn, but with a few benefits. They allow for faster colonization, The nutrients in the liquid culture allow the mycelium to begin growing before you even use them. This gives you a head start and saves you time.
Liquid cultures also tend to have higher yields than using spores. Not only that, but they are more consistent because it is a very sterile technique so you are less prone to contamination. This also means that liquid cultures are easy to store as they will have a longer shelf-life than spawns.
To summarize, learning how to make liquid culture is an easy and efficient way to begin your mushroom grow. The nutrient-rich liquid environment is ideal for mycelium growth. This means faster colonization, less risk of contamination, and longer shelf-life. Now, let's take a look at how to make your very own mushroom liquid cultures.
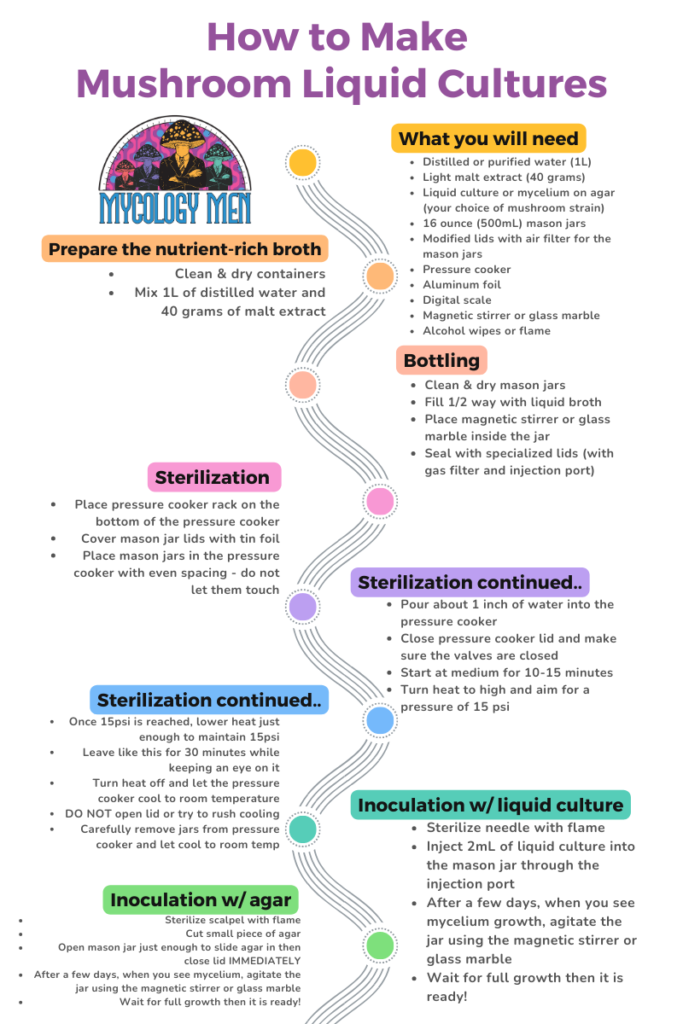
What You Will Need:
Measure out 1 L of distilled or purified water and 40 grams of light malt extract. Be sure to use CLEAN & DRY containers for this. Mix the two ingredients together. You also have the option to add 1 gram of brewer’s yeast for a nutrient boost.
Clean and dry your mason jars. This step is of the utmost importance and any contamination can be detrimental to mycelium growth.
Now, fill each mason jar up about halfway with the liquid broth. Place the magnetic stirring bar or glass marble into the jars. Make sure they are sterile before you do so (use an alcohol wipe).
Use a specialized mason jar lid to seal the jars. The lids should have a self-healing injection port and a gas exchange filter. Double check they are fully sealed! This is to prevent contamination.
This is the most important step. Sterilizing your jars is the best way to prevent contamination.
First, make sure you place your pressure cooker’s cooking rack at the bottom of the pressure cooker.. This is so that your jars do not sit on direct heat which could cause a crack in the glass jars.
Cover each mason jar lid with tin foil to protect the filters from the heat of the pressure cooker.
Now, place your jars into the pressure cooking with even spacing. Make sure they are not touching. If you have more jars than what comfortably fits in the pressure cooker, you will need to do this sterilization step more than once.
Pour about 1 inch of water into the pressure cooker.
Close the pressure cooker lid and check to make sure the pressure valve is closed or covered.
When pressure cooking liquid in glass I like to start at medium for about 10-15 minutes to avoid cracking the glass. If the temperature between the glass and the liquid is too different, rapid heating can cause the jars to break.
After 10-15 minutes, turn the heat to high and aim for a pressure of 15 psi (pounds per square inch). Once the pressure cooker reaches 15 psi, lower the heat just enough that the pressure is maintained. Leave it at this level for 30 minutes. It is best practice to keep an eye on the pressure cooker during this time to make sure nothing changes.
Once the 30 minutes is up, turn off the heat and let the pressure cooker cool to room temperature. Do not try to take off the lid or speed up the cool down process in any way. Venting the pressure cooker will allow outside, unsterilized air to rush in and fill the pressure cooker, potentially contaminating the jars inside. Patience is key!
When fully cooled, you can remove the pressure cooker lid. Use gloves to CAREFULLY take the jars out of the pressure cooker. Set them aside and let them cool to room temperature.
Grab your liquid culture syringe or cut a piece of agar in preparation for inoculation. If you are using a liquid culture syringe, sterilize the needle with a flame. If you are using an agar plate, sterilize the scalpel with a flame.
If you are using a liquid culture syringe, inject 2mL of the syringe content into the mason jar containing your liquid broth through the injection port.
If you are using a piece of agar, open the mason jar lid just enough to slide the agar into the liquid broth. Close and reseal the jar immediately to prevent contamination.
Now, give the jars a gentle shake so that you can more evenly distribute the mycelium within the mason jars. Place them in a dark place at around room temperature (you can look up the best temperature for your specific type of mushroom).
Over the next few days, keep watch over your mason jars. Look for cloudy white formations. These indicate mycelium growth.
Once you see some mycelium growth, it is time to agitate the jars to disperse the mycelium. This can be done with your magnetic stirrer or, if you are using a glass marble, shake the jar so the marble breaks up and disperses the mycelium clouds. This should be done once daily.
When your mason jars are filled with mycelium growth, they are ready to be made into liquid culture syringes!
Once you have your liquid culture ready to go, you can now use it to grow mushrooms! You are going to need a few things to properly use your liquid cultures. These include:a still air box, syringe and needle, alcohol wipes, gloves, and a container with grain spawn.
To begin, use the alcohol wipes to clean all work surfaces, the still air box, and the syringe and needle. You should be wearing gloves for this.
Now, shake the mason jar of liquid culture to evenly disperse the mycelium inside. Take your syringe and attach the needle. Now, insert the needle into the self-healing port of the lids of your mason jars. Draw liquid culture into the syringe while being careful to avoid air bubbles..
With your syringe filled with liquid culture, insert the needle into the injection port of your grain spawn container and plunge about 2 mL of liquid culture per 1 pound of grain spawn.
Seal and store your containers in a dark, warm, and clean environment. Check them regularly for growth. After 30% colonization, you can stir or mix the containers to disperse the growth.