Thinking about using your outdoor space to grow some mushrooms? Good choice! It is actually pretty simple to get started. After that, it is low maintenance and will continue to provide you with homegrown mushrooms for several years or more. In this article we will detail how to use mushroom plug spawn for growing on logs. This is different from sawdust spawn. Plug spawn is best for smaller projects (up to about 4 logs).
We will also discuss popular mushroom varieties and the type of wood they grow best on. Aside from that, we can’t forget about the different methods of inoculation including: logs, stumps, and pillars. Don’t worry if you do not know what that all means yet, we will lay it out nice and simple for you.Finally, we will also get into some common challenges mushroom growers can face and the best way to overcome these challenges. Let’s get started.
Choosing a proper mushroom/log combo is critical to a successful grow. Some mushroom varieties are just incompatible with certain types of wood. On the other hand, each variety of mushroom has a perfect wood match. Hardwoods like Oak, Maple, and Beech are most commonly used.
It doesn’t take much research to find the combination that works best for your situation. Here is a quick list of some of the most popular mushroom varieties and the types of wood that work best for them:
Oyster - Beech, Maple
Shiitake - Oak, Maple, Beech, Elm
Lion’s Mane - Poplar, Beech
Chicken of the Woods - Oak, Beech, Poplar
Turkey Tail - Oak, Maple, Beech
Maitake - Oak
Reishi - Maple, Oak
You want to use healthy logs from hardwood trees for inoculation. Dead or diseased logs won’t cut it. Any size log or branch can be used (as long as it is healthy). Smaller logs can colonize faster, but they won’t produce for as long as bigger logs. Logs that are too big are pretty difficult to move around and work with
Ideally, you want something that is about 6 inches in diameter and 4 feet in length. It is best to inoculate the logs within 2 weeks of being cut from a live and healthy tree. Any longer and the logs can dry out which is not ideal for mushroom growth.
This is the most widely used method of inoculation. It is tried and true and has worked for thousands of years.
Use logs that are about 6 inches in diameter and 4 feet in length. Larger and heavier logs will be hard to maneuver.
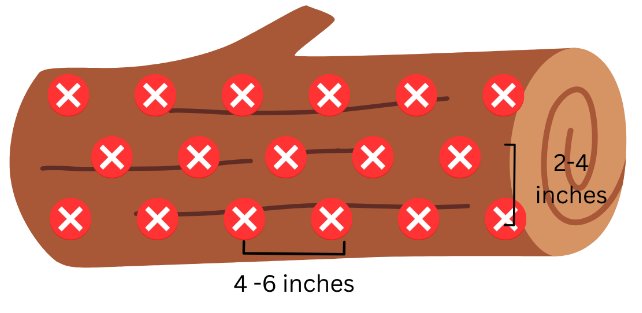
2. Place your plug spawns into the holes. Make sure they go all the way in and fit snug. Use a soft hammer if needed.
3. Melt wax in a thrift store pot (don’t use your good pots because the wax is hard to remove). Then brush the melted wax over the plug spawns in the holes. This will protect the plug spawns.
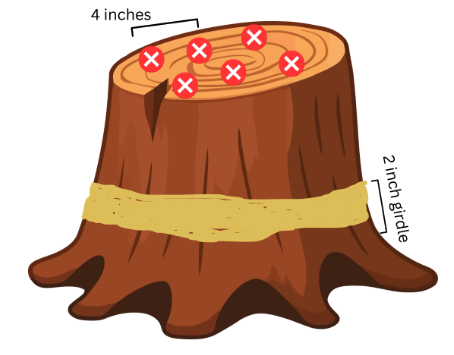
You can choose to inoculate stumps instead of logs. Stumps may take longer to colonize, but they will continue to fruit for up to a decade. So if you are not in a rush, maybe find yourself a good stump to grow some mushrooms on.
The stump you use needs to be from a tree that was cut down within a week or two prior. It also needs to be located in a shaded area. If you do not know what type of wood the stump is, it might not be worth trying to inoculate it because your efforts may go to waste.
This method is usually reserved for larger projects that utilize sawdust spawn. We will not be covering this in this article. Be on the lookout for an upcoming article that will cover this method.
Patience is a key factor when growing mushrooms on logs. It can take over a year for your logs to fully colonize before they start to fruit. Smaller logs will colonize faster, but they will fruit less often. Full size 4 foot logs like described above can fruit for several years.
Make sure to keep your logs in a shaded area for the incubation period. You do not want your logs just laying on the ground in contact with the soil, so use smaller pieces of wood to elevate the logs about 2 inches off the ground.
With just a few logs, you can lay them side by side in a layer with some space in between each log for airflow. If you have a larger amount of logs, you can stack them log cabin style.
There is very little maintenance that is needed while you wait for your logs to colonize. If the weather is dry for an extended period, it can be beneficial to soak them for about 24 hours to increase the moisture level. Frequent watering is NOT RECOMMENDED.
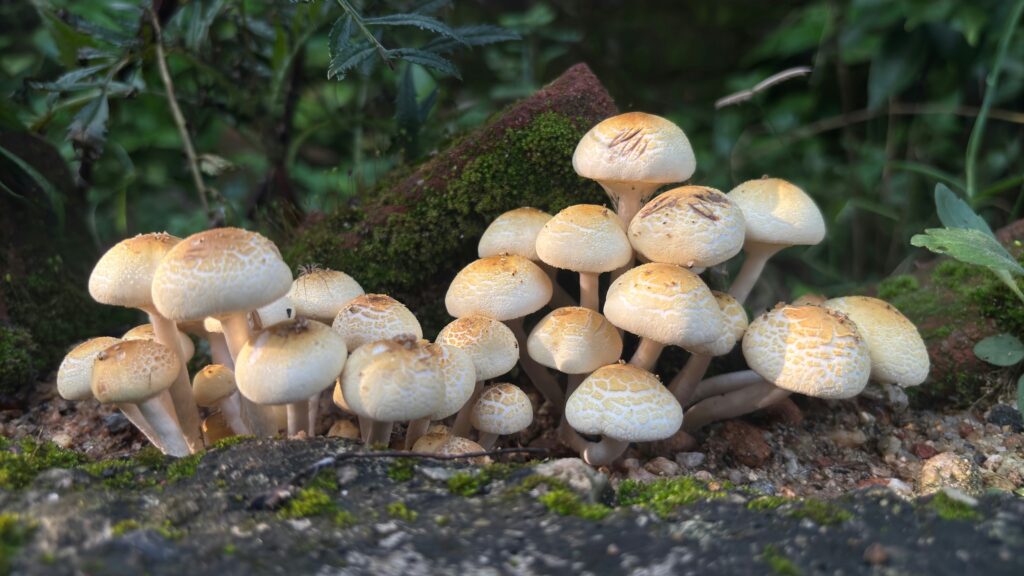
Fruiting will occur naturally when the log has fully colonized. Just be patient because this process can take a year or more. Fruiting usually occurs after rainfall.
To harvest the mushrooms, you can either just pull them out one-by-one or cut the stem at the base close to the log surface. Mushrooms on logs will continue to fruit over and over for a number of years.
Some varieties of mushrooms will do better if the log is partially buried into the ground. Chicken of the woods and Reishi are the two most common mushroom varieties that require partial log burying. Wait until the log is fully colonized before you bury it. This can take about a year so be patient. You will know the log is fully colonized when you see mycelium on the ends of the log.
To bury your logs, first dig a trench that is ½ the diameter of your log. Then place the log into the trench. Use the soil you dug out and pack it around the log so it is nice and snug. You only want the top surface of the log to be exposed.

The mushroom plug spawns are competing for nutrients against other fungi and mold and such. If your plug spawns are losing this battle, you may have to begin again with a fresher log and properly sealed inoculation holes.
The first thing you should do is be patient. Logs can take up to 2 years to fruit. If they are still not fruiting, you can try to force the fruiting by soaking the logs for 24 hours.